Popular Woodworking 2001-02 № 120, страница 48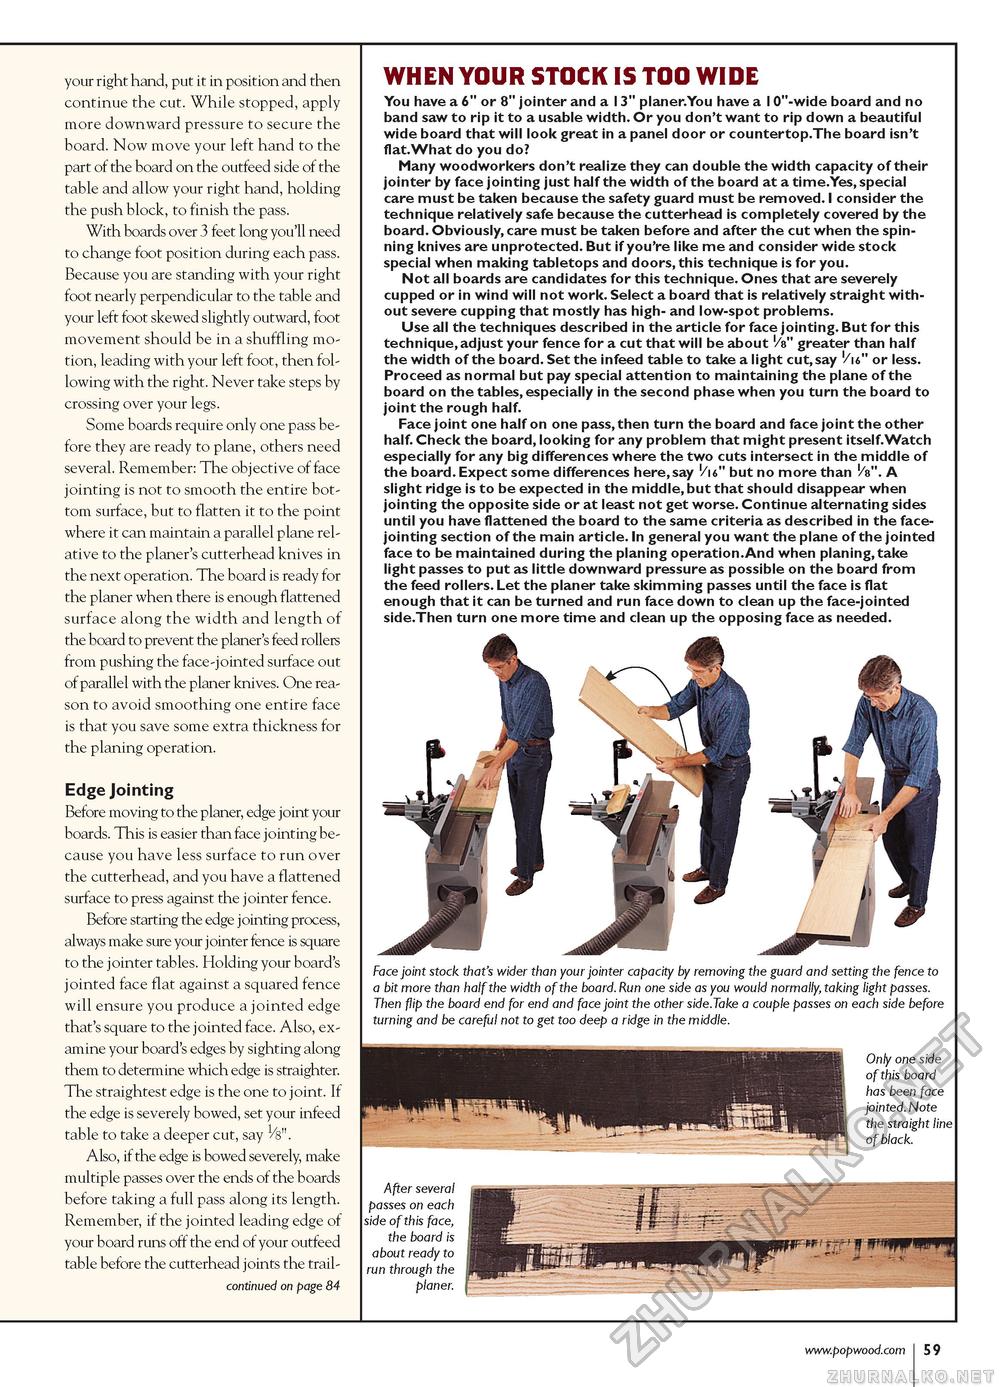
your right hand, put it in position and then continue the cut. While stopped, apply more downward pressure to secure the board. Now move your left hand to the part of the board on the outfeed side of the table and allow your right hand, holding the push block, to finish the pass. With boards over 3 feet long you'll need to change foot position during each pass. Because you are standing with your right foot nearly perpendicular to the table and your left foot skewed slightly outward, foot movement should be in a shuffling motion, leading with your left foot, then following with the right. Never take steps by crossing over your legs. Some boards require only one pass before they are ready to plane, others need several. Remember: The objective of face jointing is not to smooth the entire bottom surface, but to flatten it to the point where it can maintain a parallel plane relative to the planer's cutterhead knives in the next operation. The board is ready for the planer when there is enough flattened surface along the width and length of the board to prevent the planer's feed rollers from pushing the face-jointed surface out of parallel with the planer knives. One reason to avoid smoothing one entire face is that you save some extra thickness for the planing operation. Edge Jointing Before moving to the planer, edge joint your boards. This is easier than face jointing because you have less surface to run over the cutterhead, and you have a flattened surface to press against the jointer fence. Before starting the edge jointing process, always make sure your jointer fence is square to the jointer tables. Holding your board's jointed face flat against a squared fence will ensure you produce a jointed edge that's square to the jointed face. Also, examine your board's edges by sighting along them to determine which edge is straighter. The straightest edge is the one to joint. If the edge is severely bowed, set your infeed table to take a deeper cut, say 1/8". Also, if the edge is bowed severely, make multiple passes over the ends of the boards before taking a full pass along its length. Remember, if the jointed leading edge of your board runs off the end of your outfeed table before the cutterhead joints the trail-continued on page 84 WHEN YOUR STOCK IS TOO WIDE You have a 6" or 8" jointer and a 13" planer.You have a 10"-wide board and no band saw to rip it to a usable width. Or you don't want to rip down a beautiful wide board that will look great in a panel door or countertop.The board isn't flat.What do you do? Many woodworkers don't realize they can double the width capacity of their jointer by face jointing just half the width of the board at a time.Yes, special care must be taken because the safety guard must be removed. I consider the technique relatively safe because the cutterhead is completely covered by the board. Obviously, care must be taken before and after the cut when the spinning knives are unprotected. But if you're like me and consider wide stock special when making tabletops and doors, this technique is for you. Not all boards are candidates for this technique. Ones that are severely cupped or in wind will not work. Select a board that is relatively straight without severe cupping that mostly has high- and low-spot problems. Use all the techniques described in the article for face jointing. But for this technique, adjust your fence for a cut that will be about '/V greater than half the width of the board. Set the infeed table to take a light cut,say '/'6" or less. Proceed as normal but pay special attention to maintaining the plane of the board on the tables, especially in the second phase when you turn the board to joint the rough half. Face joint one half on one pass, then turn the board and face joint the other half. Check the board, looking for any problem that might present itself.Watch especially for any big differences where the two cuts intersect in the middle of the board. Expect some differences here,say '/i6" but no more than /V'. A slight ridge is to be expected in the middle, but that should disappear when jointing the opposite side or at least not get worse. Continue alternating sides until you have flattened the board to the same criteria as described in the face-jointing section of the main article. In general you want the plane of the jointed face to be maintained during the planing operation.And when planing,take light passes to put as little downward pressure as possible on the board from the feed rollers. Let the planer take skimming passes until the face is flat enough that it can be turned and run face down to clean up the face-jointed side.Then turn one more time and clean up the opposing face as needed. Face joint stock that's wider than your jointer capacity by removing the guard and setting the fence to a bit more than half the width of the board. Run one side as you would normally, taking light passes. Then flip the board end for end and face joint the other side.Take a couple passes on each side before turning and be careful not to get too deep a ridge in the middle. |


