Popular Woodworking 2001-06 № 122, страница 29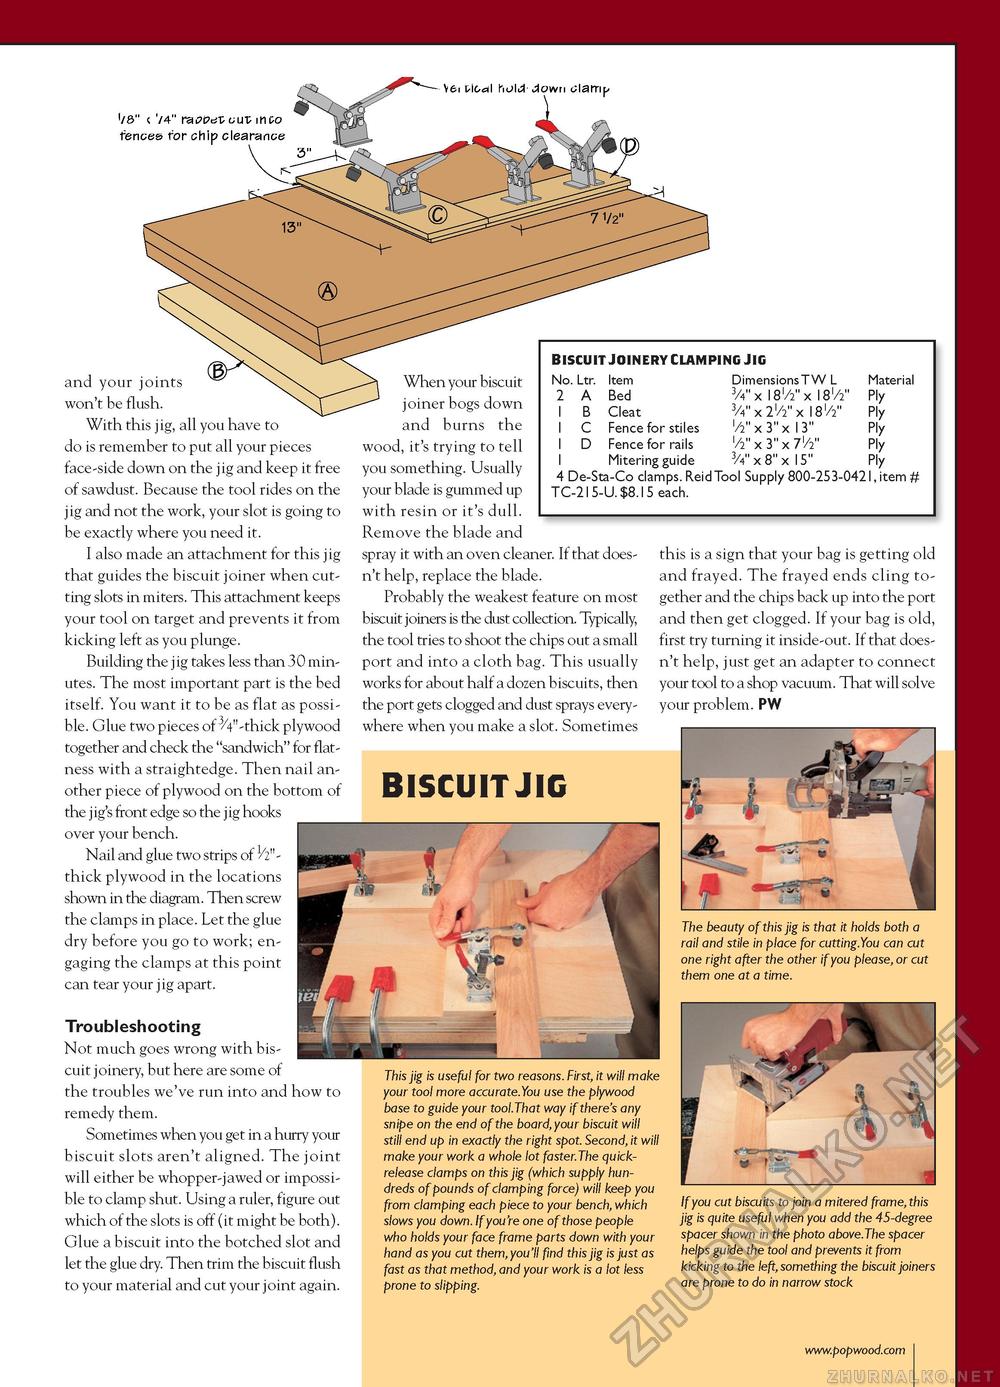
V6i tical hold-down clamp Vd" x 74" rabbet cut into fences for chip clearance and your joints won't be flush. With this jig, all you have to do is remember to put all your pieces face-side down on the jig and keep it free of sawdust. Because the tool rides on the jig and not the work, your slot is going to be exactly where you need it. I also made an attachment for this jig that guides the biscuit joiner when cutting slots in miters. This attachment keeps your tool on target and prevents it from kicking left as you plunge. Building the jig takes less than 30 minutes. The most important part is the bed itself. You want it to be as flat as possible. Glue two pieces of ^V'-thick plywood together and check the "sandwich" for flatness with a straightedge. Then nail another piece of plywood on the bottom of the j ig's front edge so the j ig hooks over your bench. Nail and glue two strips of 1/2n-thick plywood in the locations shown in the diagram. Then screw the clamps in place. Let the glue dry before you go to work; engaging the clamps at this point can tear your jig apart. Troubleshooting Not much goes wrong with biscuit joinery, but here are some of the troubles we've run into and how to remedy them. Sometimes when you get in a hurry your biscuit slots aren't aligned. The joint will either be whopper-jawed or impossible to clamp shut. Using a ruler, figure out which of the slots is off (it might be both). Glue a biscuit into the botched slot and let the glue dry. Then trim the biscuit flush to your material and cut your joint again. When your biscuit joiner bogs down and burns the wood, it's trying to tell you something. Usually your blade is gummed up with resin or it's dull. Remove the blade and spray it with an oven cleaner. If that doesn't help, replace the blade. Probably the weakest feature on most biscuit joiners is the dust collection. Typically, the tool tries to shoot the chips out a small port and into a cloth bag. This usually works for about half a dozen biscuits, then the port gets clogged and dust sprays everywhere when you make a slot. Sometimes BISCUIT JIG
this is a sign that your bag is getting old and frayed. The frayed ends cling together and the chips back up into the port and then get clogged. If your bag is old, first try turning it inside-out. If that doesn't help, just get an adapter to connect your tool to a shop vacuum. That will solve your problem. PW The beauty of this jig is that it holds both a rail and stile in place for cutting.You can cut one right after the other if you please, or cut them one at a time. This jig is useful for two reasons. First, it will make your tool more accurate.You use the plywood base to guide your tool.That way if there's any snipe on the end of the board, your biscuit will still end up in exactly the right spot. Second, it will make your work a whole lot faster.The quick-release clamps on this jig (which supply hundreds of pounds of clamping force) will keep you from clamping each piece to your bench, which slows you down. If you're one of those people who holds your face frame parts down with your hand as you cut them,you'll find this jig is just as fast as that method, and your work is a lot less prone to slipping. If you cut biscuits to join a mitered frame, this jig is quite useful when you add the 45-degree spacer shown in the photo above.The spacer helps guide the tool and prevents it from kicking to the left, something the biscuit joiners are prone to do in narrow stock |
|||||||||||||||||||||||||||


