Popular Woodworking 2001-06 № 122, страница 38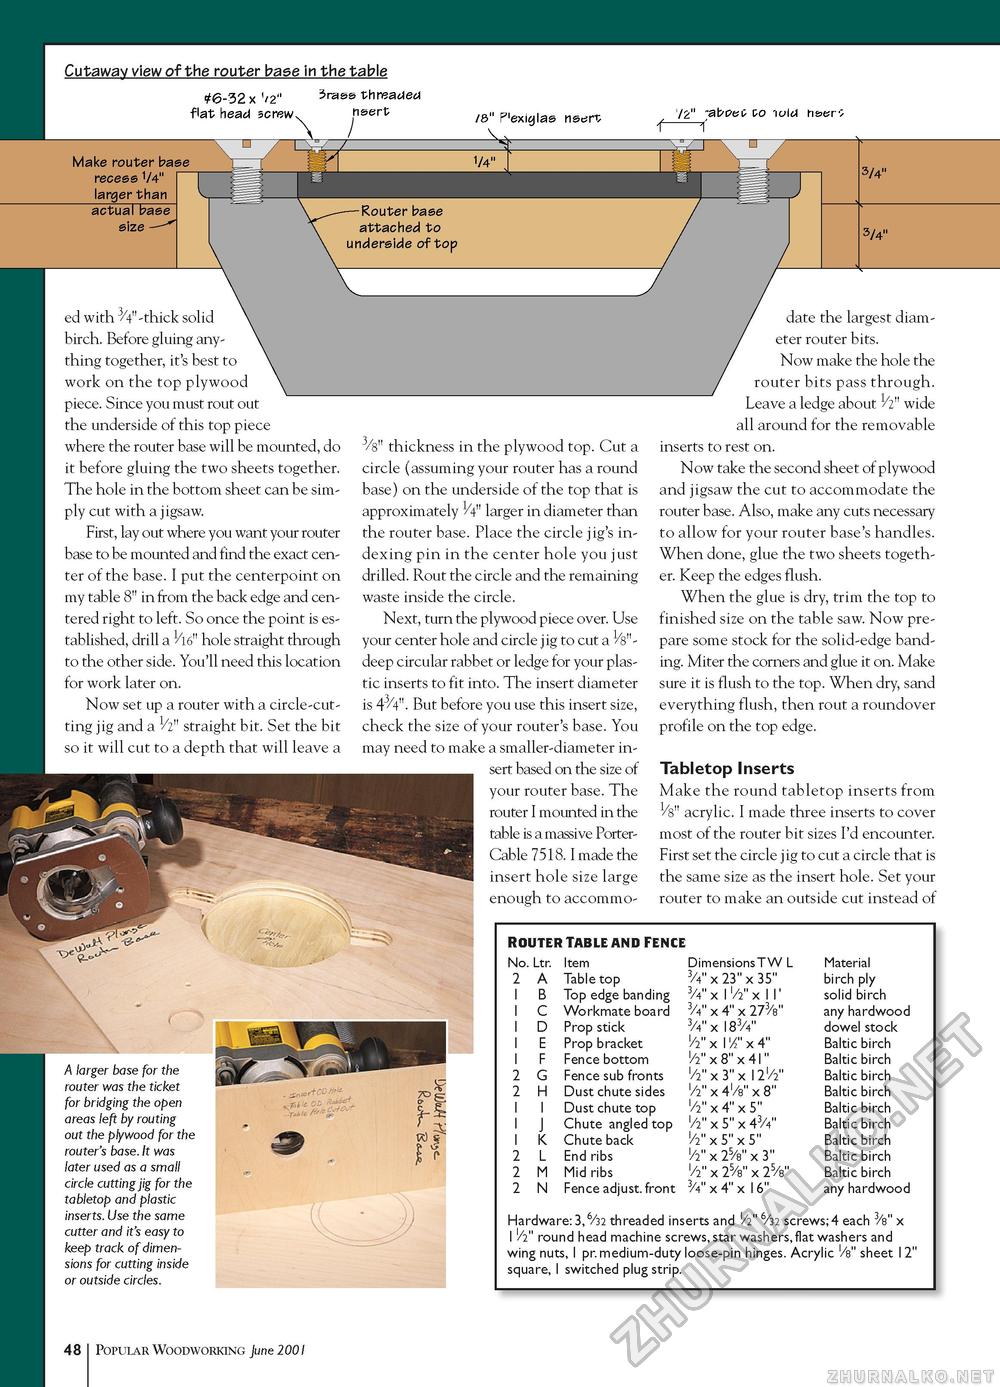
Cutaway view of the router base in the table #6-32 x ''2" Brass threaded _flat head screw^ ^n^i-t /8" P'exlglas nsert V_ '/2" rabbet to hold nsert ■ Make router base recess 1/4" larger than actual base size - ed with 3/4"-thick solid birch. Before gluing anything together, it's best to work on the top plywood piece. Since you must rout out the underside of this top piece where the router base will be mounted, do it before gluing the two sheets together. The hole in the bottom sheet can be simply cut with a jigsaw. First, lay out where you want your router base to be mounted and find the exact center of the base. I put the centerpoint on my table 8" in from the back edge and centered right to left. So once the point is established, drill a hole straight through to the other side. You'll need this location for work later on. Now set up a router with a circle-cutting jig and a 1/2" straight bit. Set the bit so it will cut to a depth that will leave a '/4" Router base attached to underside of top A larger base for the router was the ticket for bridging the open areas left by routing out the plywood for the router's base. It was later used as a small circle cutting jig for the tabletop and plastic inserts. Use the same cutter and it's easy to keep track of dimensions for cutting inside or outside circles. 3/4" 3/4" 3/8" thickness in the plywood top. Cut a circle (assuming your router has a round base) on the underside of the top that is approximately 1/4" larger in diameter than the router base. Place the circle jig's indexing pin in the center hole you just drilled. Rout the circle and the remaining waste inside the circle. Next, turn the plywood piece over. Use your center hole and circle jig to cut a 1/8"-deep circular rabbet or ledge for your plastic inserts to fit into. The insert diameter is 43/4". But before you use this insert size, check the size of your router's base. You may need to make a smaller-diameter insert based on the size of your router base. The router I mounted in the table is a massive Porter-Cable 7518. I made the insert hole size large enough to accommo- date the largest diameter router bits. Now make the hole the router bits pass through. Leave a ledge about 1/2" wide all around for the removable inserts to rest on. Now take the second sheet of plywood and jigsaw the cut to accommodate the router base. Also, make any cuts necessary to allow for your router base's handles. When done, glue the two sheets together. Keep the edges flush. When the glue is dry, trim the top to finished size on the table saw. Now prepare some stock for the solid-edge banding. Miter the corners and glue it on. Make sure it is flush to the top. When dry, sand everything flush, then rout a roundover profile on the top edge. Tabletop Inserts Make the round tabletop inserts from 1/8" acrylic. I made three inserts to cover most of the router bit sizes I'd encounter. First set the circle jig to cut a circle that is the same size as the insert hole. Set your router to make an outside cut instead of
48 Popular Woodworking June 2001 |
||||||||||||||||||||||||||||||||||||||||||||||||||||||||||||||||||||||||||||||||||||||||||||||||||||


