Popular Woodworking 2001-06 № 122, страница 40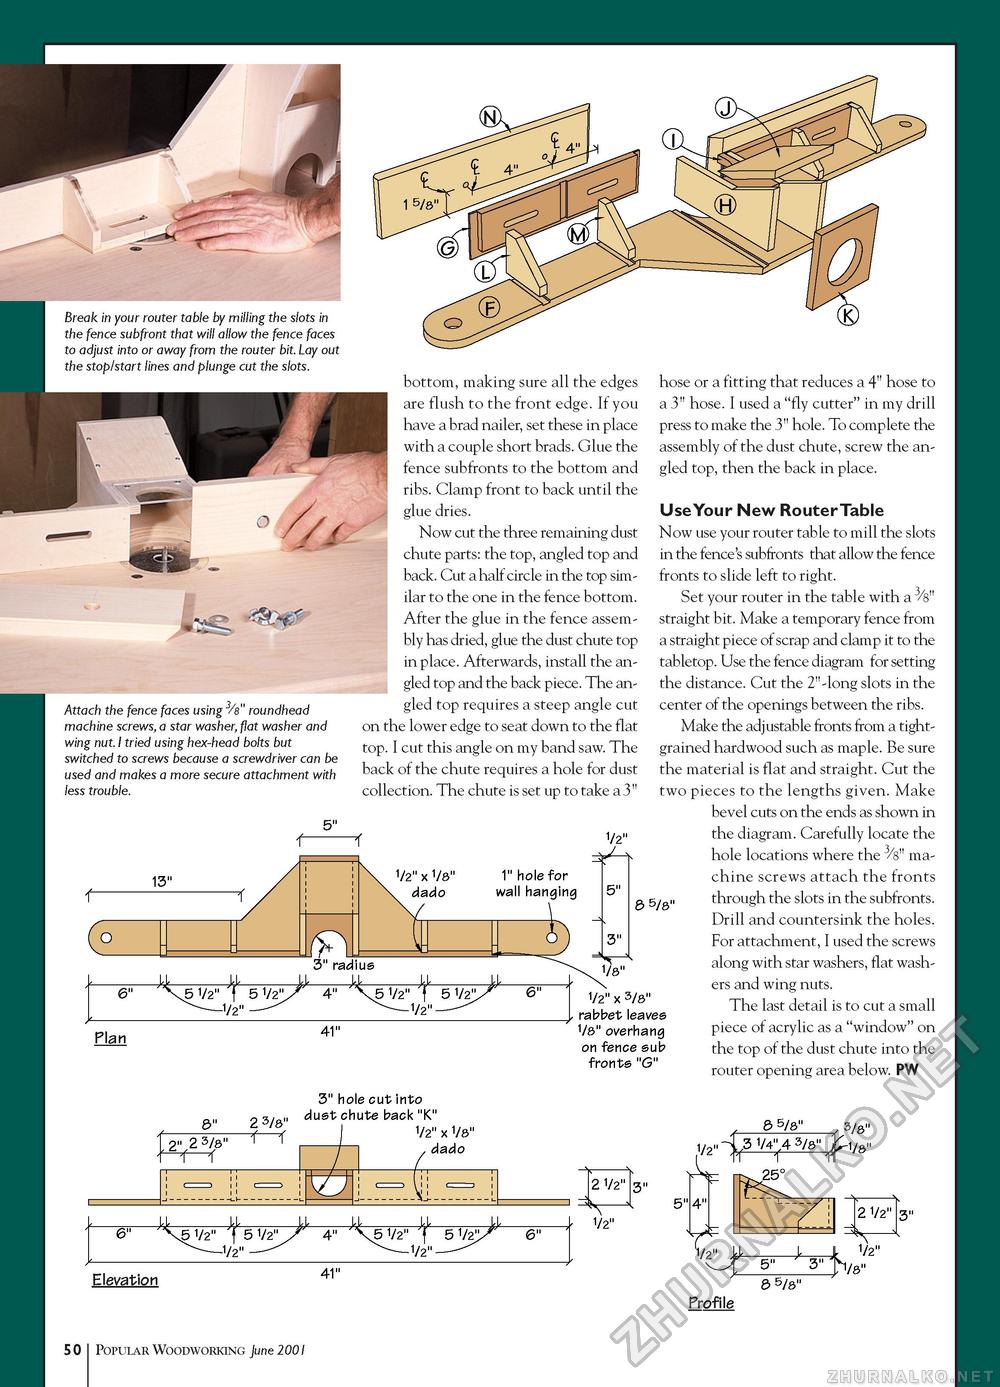
Break in your router table by milling the slots in the fence subfront that will allow the fence faces to adjust into or away from the router bit. Lay out the stop/start lines and plunge cut the slots. Attach the fence faces using 3/e" roundhead machine screws, a star washer, flat washer and wing nut. I tried using hex-head bolts but switched to screws because a screwdriver can be used and makes a more secure attachment with less trouble. bottom, making sure all the edges are flush to the front edge. If you have a brad nailer, set these in place with a couple short brads. Glue the fence subfronts to the bottom and ribs. Clamp front to back until the glue dries. Now cut the three remaining dust chute parts: the top, angled top and back. Cut a half circle in the top similar to the one in the fence bottom. After the glue in the fence assembly has dried, glue the dust chute top in place. Afterwards, install the angled top and the back piece. The angled top requires a steep angle cut on the lower edge to seat down to the flat top. I cut this angle on my band saw. The back of the chute requires a hole for dust collection. The chute is set up to take a 3" Plan 8 5/8' 1/2" x 3/8" rabbet leaves 1/8" overhang on fence sub fronts "G" hose or a fitting that reduces a 4" hose to a 3" hose. I used a "fly cutter" in my drill press to make the 3" hole. To complete the assembly of the dust chute, screw the angled top, then the back in place. Use Your New Router Table Now use your router table to mill the slots in the fence's subfronts that allow the fence fronts to slide left to right. Set your router in the table with a 3/8" straight bit. Make a temporary fence from a straight piece of scrap and clamp it to the tabletop. Use the fence diagram for setting the distance. Cut the 2"-long slots in the center of the openings between the ribs. Make the adjustable fronts from a tight-grained hardwood such as maple. Be sure the material is flat and straight. Cut the two pieces to the lengths given. Make bevel cuts on the ends as shown in the diagram. Carefully locate the hole locations where the 3/8" machine screws attach the fronts through the slots in the subfronts. Drill and countersink the holes. For attachment, I used the screws along with star washers, flat washers and wing nuts. The last detail is to cut a small piece of acrylic as a "window" on the top of the dust chute into the router opening area below. PW 3" hole cut into dust chute back "K" 1/2" x 1/8" dado 8 5/8" .V2"~f-3 1/4''4 3/8 3/8" 5" 4" ff-f" N5L '/2" 2 '/2" Elevation 5" -y- 8 5/8" '/2" Profile 50 Popular Woodworking June 2001 |


