Popular Woodworking 2001-06 № 122, страница 57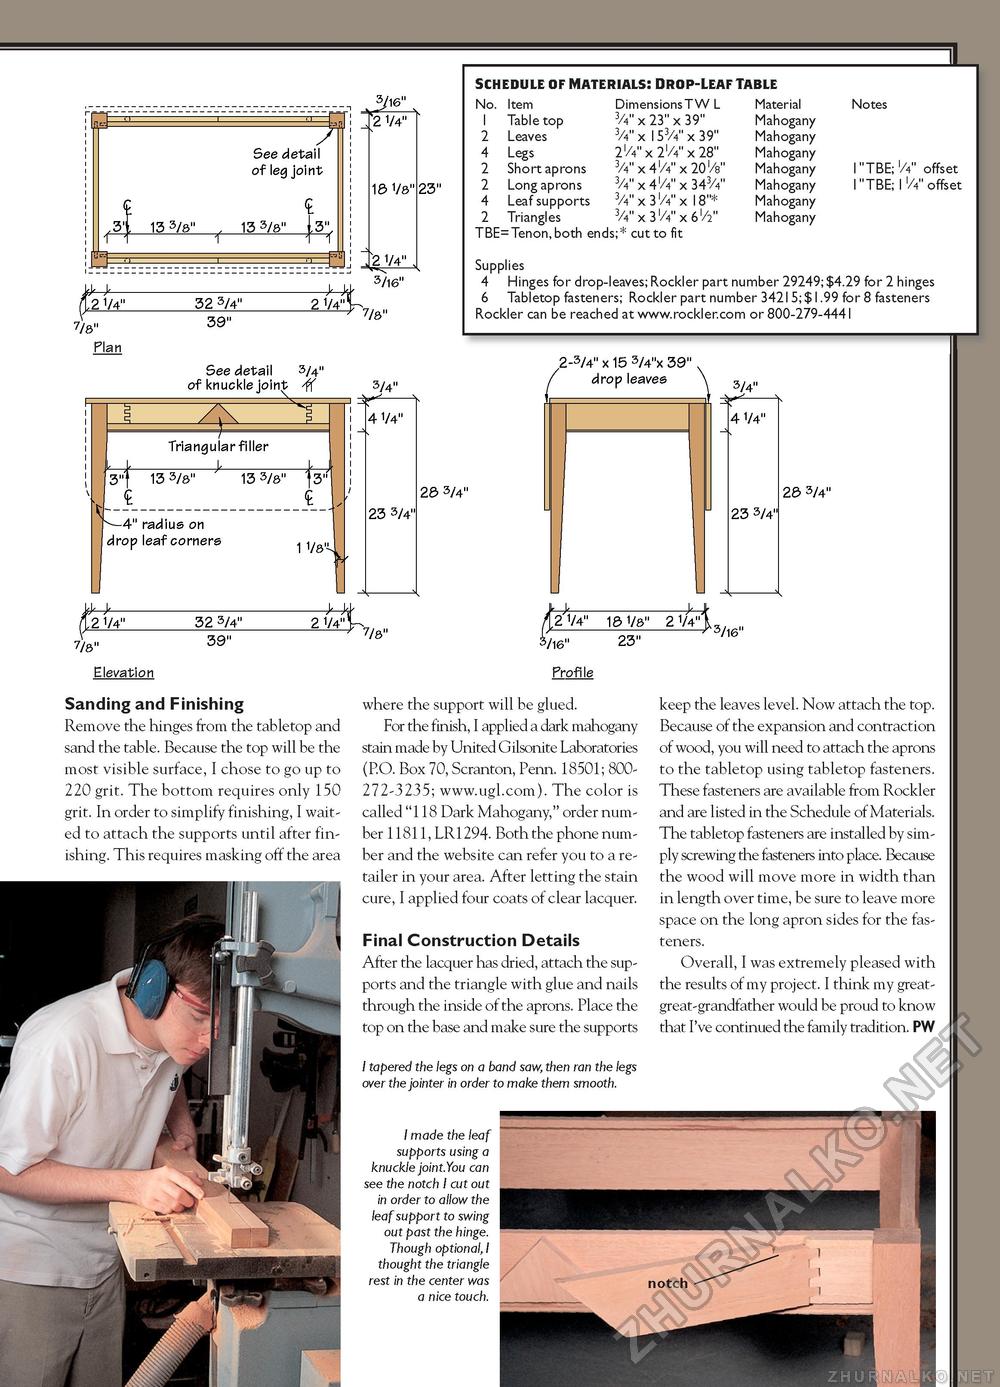
.31 See detail of leg joint 13 3/8" ^ 13 3/8" 1 13 3/8" ^ 13 3/8" 1
7/8" Plan 39" See detail of leg joint
23" 3/l6" 7/8" 23" 7/8" Plan 39" See detail 3/4" of knuckle joint^ -ff 3/l6" 7/8" 3/4" SCHEDULE OF MATERIALS! DROP-LEAF TABLE No. 2 4 2 2 4 2 Item Table top Leaves Legs Short aprons Long aprons Leaf supports Triangles Dimensions T W L 3/t" x 23" x 39" 3/t" x l53/4" x 39" 2lA" x 2lA" x 28" 3/4" x 4l/4" x 20l/8" W x 4l/»" x 343/4" 3/4" x 3l/4" x 18"* W x 3l/V' x 6l/2" TBE= Tenon,both ends;* cut to fit Material Mahogany Mahogany Mahogany Mahogany Mahogany Mahogany Mahogany Notes 1" TBE;1/*" offset 1"TBE; 1 offset Supplies 4 Hinges for drop-leaves; Rockier part number 29249; $4.29 for 2 hinges 6 Tabletop fasteners; Rockier part number 342l5;$l.99 for 8 fasteners Rockier can be reached at www.rockler.com or 800-279-444l 2-3/4" x 15 3/4"x 39" . / drop leaves Triangular filler 13 3/8" 13 3/8" -4" radius on I drop leaf corners 4 1/4" 28 3/4" 3/4" 4 1/4" 28 3/4" 2 1/4" 32 3/4" -y-k 2 1/4 7/8" Elevation 39" 7/8" 3/1 2 1/4" 18 1/8" 2 1/4' /16" Profile 23" Sanding and Finishing Remove the hinges from the tabletop and sand the table. Because the top will be the most visible surface, I chose to go up to 220 grit. The bottom requires only 150 grit. In order to simplify finishing, I waited to attach the supports until after finishing. This requires masking off the area where the support will be glued. For the finish, I applied a dark mahogany stain made by United Gilsonite Laboratories (P.O. Box 70, Scranton, Penn. 18501; 800272-3235; www.ugl.com). The color is called "118 Dark Mahogany," order number 11811, LR1294. Both the phone number and the website can refer you to a retailer in your area. After letting the stain cure, I applied four coats of clear lacquer. Final Construction Details After the lacquer has dried, attach the supports and the triangle with glue and nails through the inside of the aprons. Place the top on the base and make sure the supports I tapered the legs on a band saw, then ran the legs over the jointer in order to make them smooth. I made the leaf supports using a knuckle jointYou can see the notch I cut out in order to allow the leaf support to swing out past the hinge. Though optional, I thought the triangle rest in the center was a nice touch. 3/16" keep the leaves level. Now attach the top. Because of the expansion and contraction of wood, you will need to attach the aprons to the tabletop using tabletop fasteners. These fasteners are available from Rockler and are listed in the Schedule of Materials. The tabletop fasteners are installed by simply screwing the fasteners into place. Because the wood will move more in width than in length over time, be sure to leave more space on the long apron sides for the fasteners. Overall, I was extremely pleased with the results of my project. I think my great-great-grandfather would be proud to know that I've continued the family tradition. PW |


