Popular Woodworking 2001-06 № 122, страница 56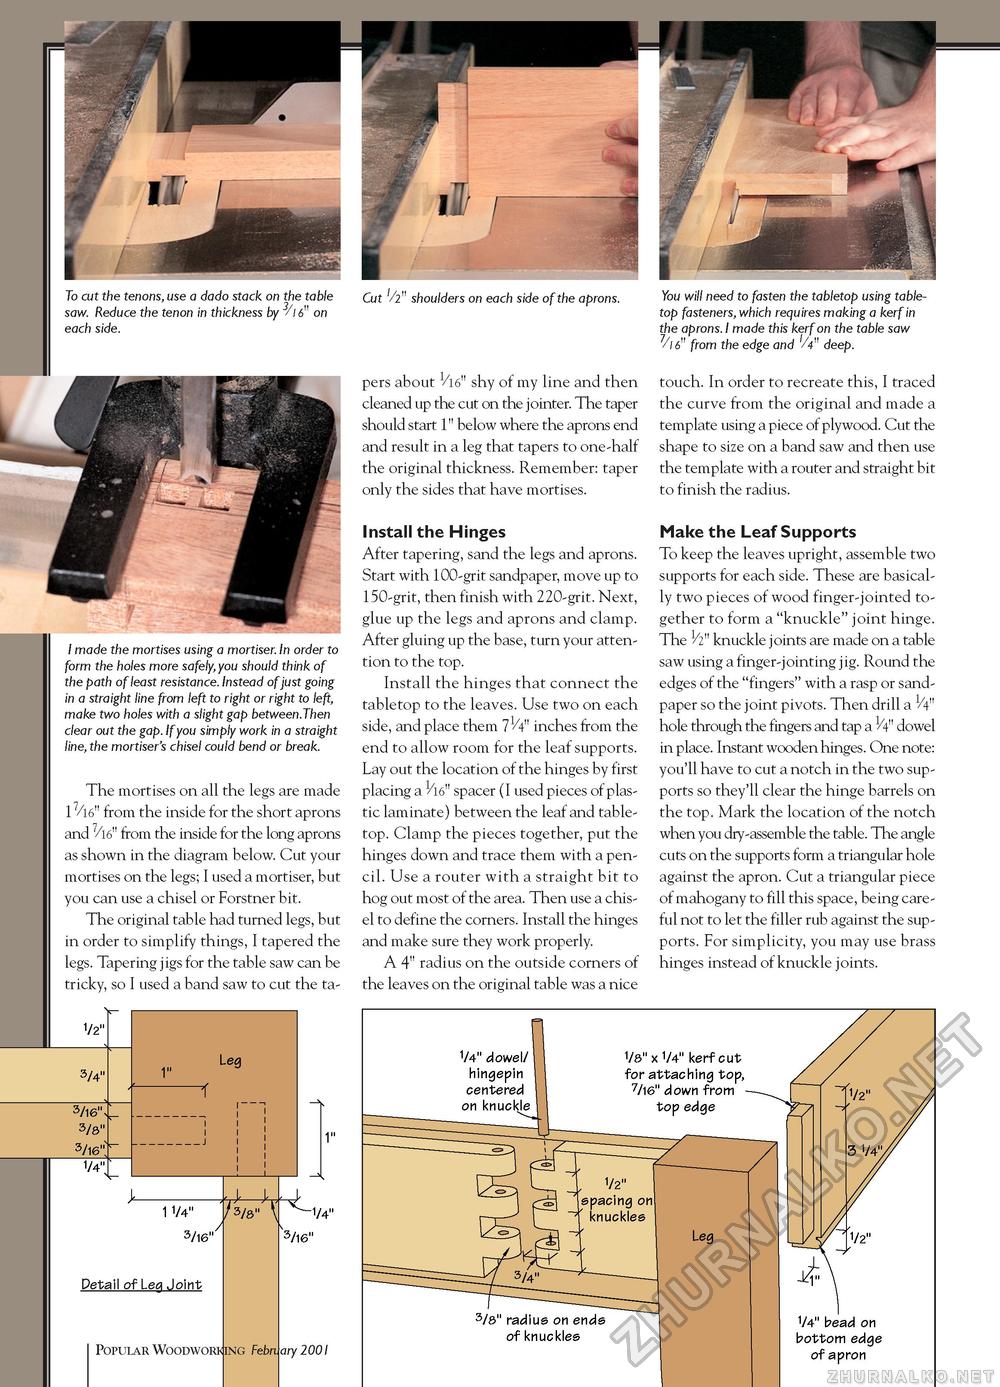
To cut the tenons,use a dado stack on the table saw. Reduce the tenon in thickness by 3/i6" on each side. I made the mortises using a mortiser. In order to form the holes more safely,you should think of the path of least resistance. Instead of just going in a straight line from left to right or right to left, make two holes with a slight gap between.Then clear out the gap. If you simply work in a straight line, the mortiser's chisel could bend or break. The mortises on all the legs are made from the inside for the short aprons and 7/16" from the inside for the long aprons as shown in the diagram below. Cut your mortises on the legs; I used a mortiser, but you can use a chisel or Forstner bit. The original table had turned legs, but in order to simplify things, I tapered the legs. Tapering jigs for the table saw can be tricky, so I used a band saw to cut the ta 1/2" 3/4. 3/l6" 3/8" 3/l6" 1/4' Leg 1 1/4" /3/8"\ 3/l6" 3/l6" Detail of Leg Joint Popular Woodworking February 2001 1/4" Cut '/2" shoulders on each side of the aprons. pers about 1/16" shy of my line and then cleaned up the cut on the jointer. The taper should start 1" below where the aprons end and result in a leg that tapers to one-half the original thickness. Remember: taper only the sides that have mortises. Install the Hinges After tapering, sand the legs and aprons. Start with 100-grit sandpaper, move up to 150-grit, then finish with 220-grit. Next, glue up the legs and aprons and clamp. After gluing up the base, turn your attention to the top. Install the hinges that connect the tabletop to the leaves. Use two on each side, and place them 714" inches from the end to allow room for the leaf supports. Lay out the location of the hinges by first placing a spacer (I used pieces of plastic laminate) between the leaf and table-top. Clamp the pieces together, put the hinges down and trace them with a pencil. Use a router with a straight bit to hog out most of the area. Then use a chisel to define the corners. Install the hinges and make sure they work properly. A 4" radius on the outside corners of the leaves on the original table was a nice You will need to fasten the tabletop using table-top fasteners, which requires making a kerf in the aprons. I made this kerf on the table saw 1/\6n from the edge and '/4" deep. touch. In order to recreate this, I traced the curve from the original and made a template using a piece of plywood. Cut the shape to size on a band saw and then use the template with a router and straight bit to finish the radius. Make the Leaf Supports To keep the leaves upright, assemble two supports for each side. These are basically two pieces of wood finger-jointed together to form a "knuckle" joint hinge. The 1/2" knuckle joints are made on a table saw using a finger-jointing jig. Round the edges of the "fingers" with a rasp or sandpaper so the joint pivots. Then drill a 1/4n hole through the fingers and tap a 1/4" dowel in place. Instant wooden hinges. One note: you'll have to cut a notch in the two supports so they'll clear the hinge barrels on the top. Mark the location of the notch when you dry-assemble the table. The angle cuts on the supports form a triangular hole against the apron. Cut a triangular piece of mahogany to fill this space, being careful not to let the filler rub against the supports. For simplicity, you may use brass hinges instead of knuckle joints. |


