Popular Woodworking 2001-08 № 123, страница 41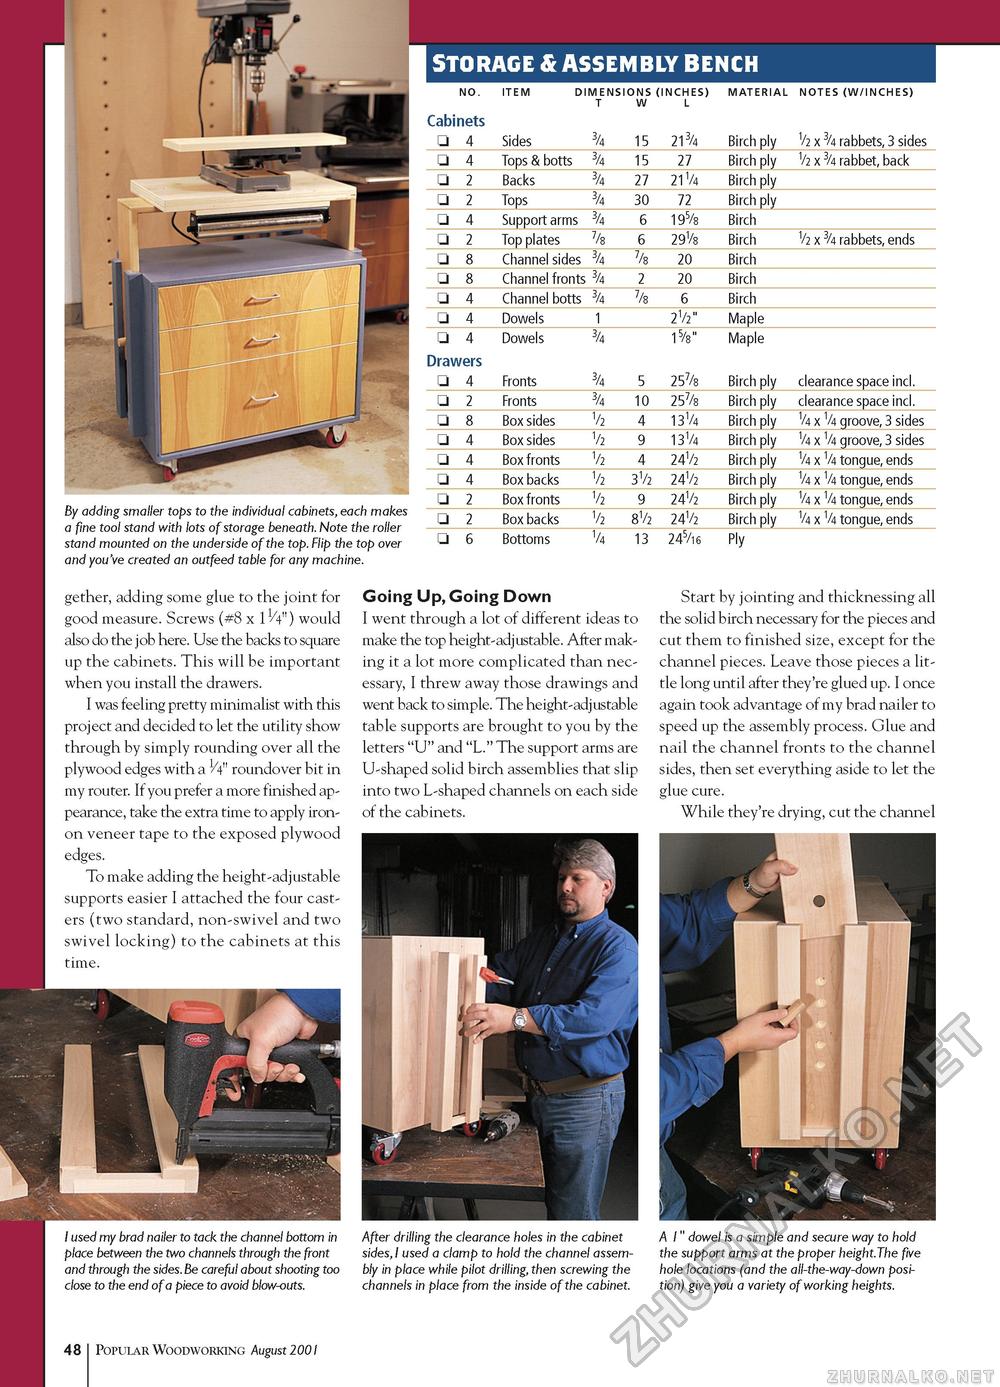
STORAGE & ASSEMBLY BENCH By adding smaller tops to the individual cabinets, each makes a fine tool stand with lots of storage beneath. Note the roller stand mounted on the underside of the top. Flip the top over and you've created an outfeed table for any machine.
□ 6 Bottoms /4 13 245/i6 Ply □ 6 Bottoms /4 13 245/i6 Ply gether, adding some glue to the joint for good measure. Screws (#8 x 1V4") would also do the job here. Use the backs to square up the cabinets. This will be important when you install the drawers. I was feeling pretty minimalist with this project and decided to let the utility show through by simply rounding over all the plywood edges with a V4" roundover bit in my router. If you prefer a more finished appearance, take the extra time to apply iron-on veneer tape to the exposed plywood edges. To make adding the height-adjustable supports easier I attached the four casters (two standard, non-swivel and two swivel locking) to the cabinets at this time. Going Up, Going Down I went through a lot of different ideas to make the top height-adjustable. After making it a lot more complicated than necessary, I threw away those drawings and went back to simple. The height-adjustable table supports are brought to you by the letters "U" and "L." The support arms are U-shaped solid birch assemblies that slip into two L-shaped channels on each side of the cabinets. Start by jointing and thicknessing all the solid birch necessary for the pieces and cut them to finished size, except for the channel pieces. Leave those pieces a little long until after they're glued up. I once again took advantage of my brad nailer to speed up the assembly process. Glue and nail the channel fronts to the channel sides, then set everything aside to let the glue cure. While they're drying, cut the channel I used my brad nailer to tack the channel bottom in place between the two channels through the front and through the sides. Be careful about shooting too close to the end of a piece to avoid blow-outs. 41 Popular Woodworking August 2001 After drilling the clearance holes in the cabinet sides, I used a clamp to hold the channel assembly in place while pilot drilling, then screwing the channels in place from the inside of the cabinet. A 1" dowel is a simple and secure way to hold the support arms at the proper height.The five hole locations (and the all-the-way-down position) give you a variety of working heights. |
||||||||||||||||||||||||||||||||||||||||||||||||||||||||||||||||||||||||||||||||||||||||||||||||||||||||||||||||||||||||||||||||||||||||||||||||||||||||||||||||||||||||||||||||||||||||||||||||||||||


