Popular Woodworking 2001-08 № 123, страница 42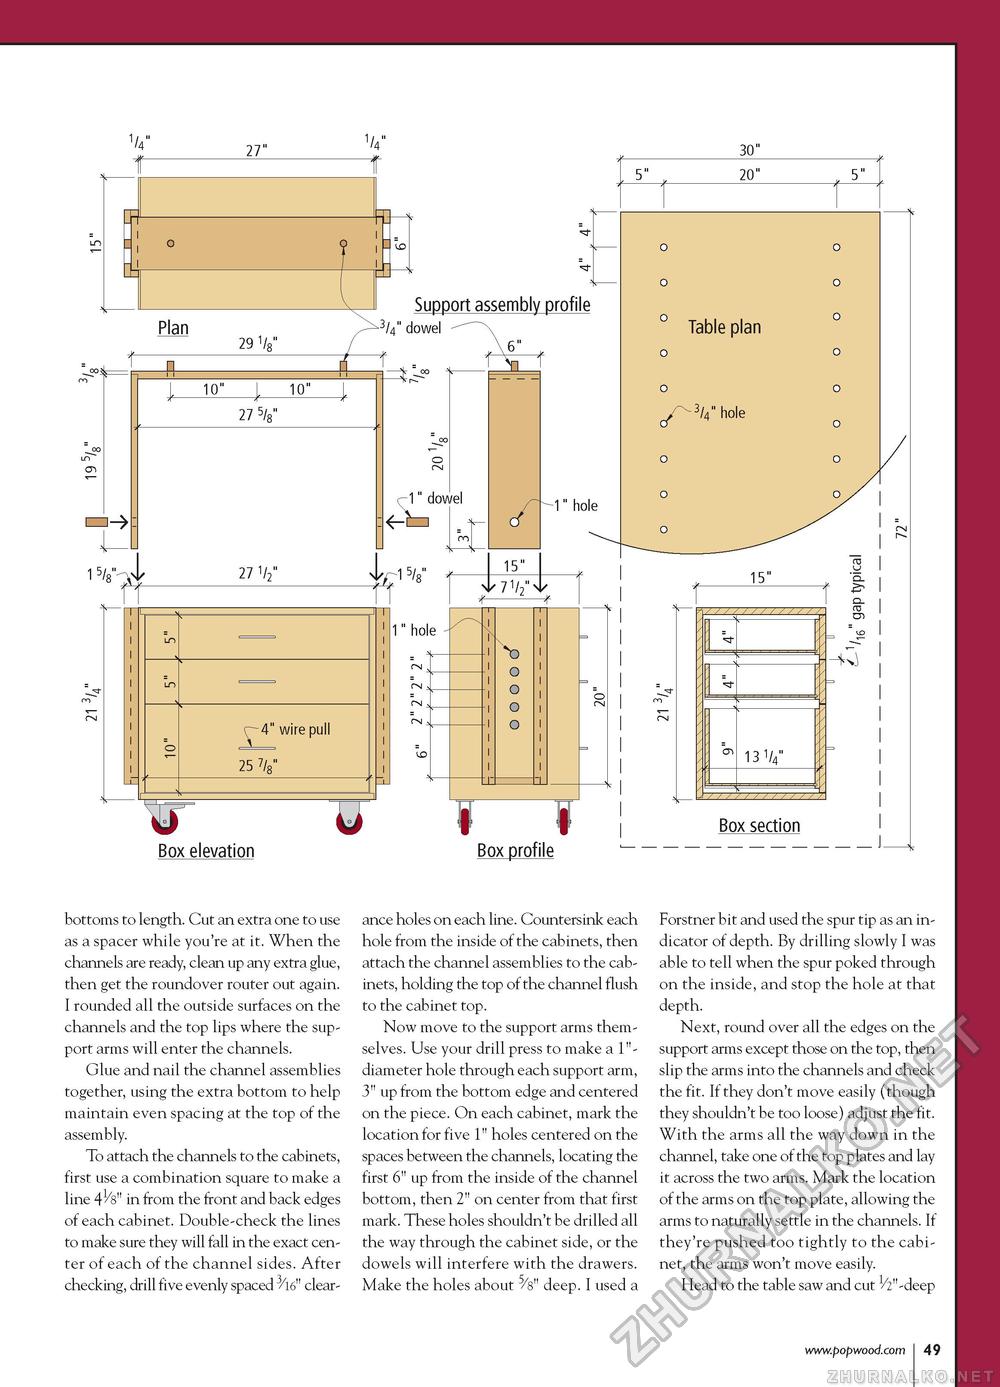
V — 27" Plan 29 V 1 5/a'W 27 1/2I X 4" wire pull 25 V 1/4" -tf" Support assembly profile 3/4" dowel 6" J<_10"_J._10"_J. 27 5/a" O i-1" dowel C £■15/a" -1" hole 15" 7 1/2" f-2—f -1" hole o o o o ¥ Box elevation I | Box profile bottoms to length. Cut an extra one to use as a spacer while you're at it. When the channels are ready, clean up any extra glue, then get the roundover router out again. I rounded all the outside surfaces on the channels and the top lips where the support arms will enter the channels. Glue and nail the channel assemblies together, using the extra bottom to help maintain even spacing at the top of the assembly. To attach the channels to the cabinets, first use a combination square to make a line 418" in from the front and back edges of each cabinet. Double-check the lines to make sure they will fall in the exact center of each of the channel sides. After checking, drill five evenly spaced ^V clear ance holes on each line. Countersink each hole from the inside of the cabinets, then attach the channel assemblies to the cabinets, holding the top of the channel flush to the cabinet top. Now move to the support arms themselves. Use your drill press to make a 1"-diameter hole through each support arm, 3" up from the bottom edge and centered on the piece. On each cabinet, mark the location for five 1" holes centered on the spaces between the channels, locating the first 6" up from the inside of the channel bottom, then 2" on center from that first mark. These holes shouldn't be drilled all the way through the cabinet side, or the dowels will interfere with the drawers. Make the holes about 5/s" deep. I used a Forstner bit and used the spur tip as an indicator of depth. By drilling slowly I was able to tell when the spur poked through on the inside, and stop the hole at that depth. Next, round over all the edges on the support arms except those on the top, then slip the arms into the channels and check the fit. If they don't move easily (though they shouldn't be too loose) adjust the fit. With the arms all the way down in the channel, take one of the top plates and lay it across the two arms. Mark the location of the arms on the top plate, allowing the arms to naturally settle in the channels. If they're pushed too tightly to the cabinet, the arms won't move easily. Head to the table saw and cut 1/2"-deep 49 |


