Popular Woodworking 2001-08 № 123, страница 43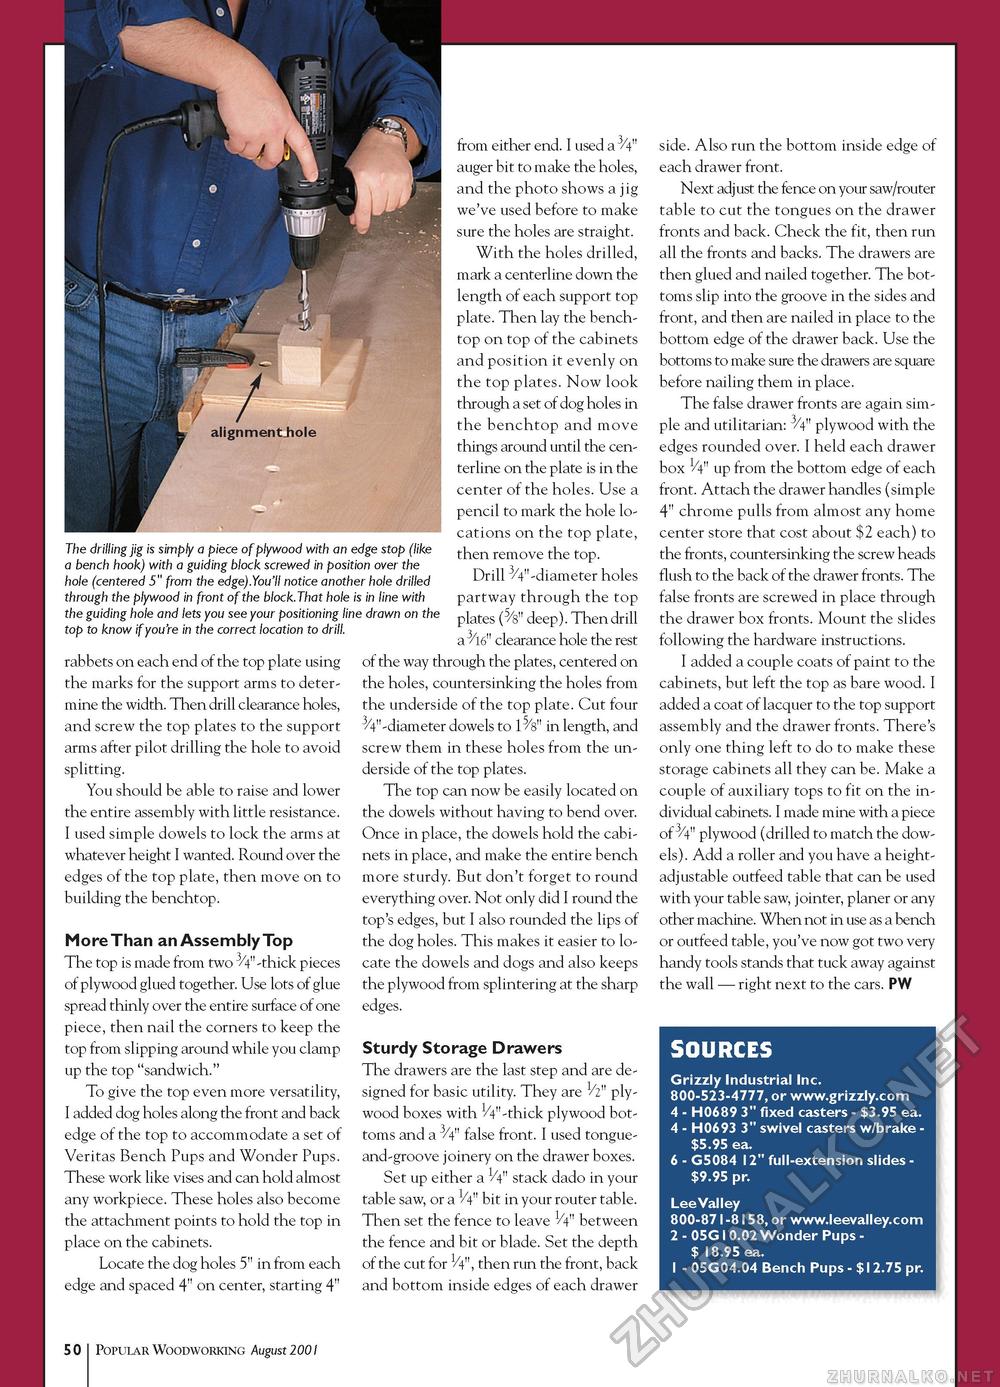
1 The drilling jig is simply a piece of plywood with an edge stop (like a bench hook) with a guiding block screwed in position over the hole (centered 5" from the edge).You'll notice another hole drilled through the plywood in front of the block.That hole is in line with the guiding hole and lets you see your positioning line drawn on the top to know if you're in the correct location to drill. rabbets on each end of the top plate using the marks for the support arms to determine the width. Then drill clearance holes, and screw the top plates to the support arms after pilot drilling the hole to avoid splitting. You should be able to raise and lower the entire assembly with little resistance. I used simple dowels to lock the arms at whatever height I wanted. Round over the edges of the top plate, then move on to building the benchtop. More Than an Assembly Top The top is made from two 3/4"-thick pieces of plywood glued together. Use lots of glue spread thinly over the entire surface of one piece, then nail the corners to keep the top from slipping around while you clamp up the top "sandwich." To give the top even more versatility, I added dog holes along the front and back edge of the top to accommodate a set of Veritas Bench Pups and Wonder Pups. These work like vises and can hold almost any workpiece. These holes also become the attachment points to hold the top in place on the cabinets. Locate the dog holes 5" in from each edge and spaced 4" on center, starting 4" from either end. I used a 3/4" auger bit to make the holes, and the photo shows a jig we've used before to make sure the holes are straight. With the holes drilled, mark a centerline down the length of each support top plate. Then lay the bench-top on top of the cabinets and position it evenly on the top plates. Now look through a set of dog holes in the benchtop and move things around until the cen-terline on the plate is in the center of the holes. Use a pencil to mark the hole locations on the top plate, then remove the top. Drill 3/4" -diameter holes partway through the top plates (5/8" deep). Then drill a3V clearance hole the rest of the way through the plates, centered on the holes, countersinking the holes from the underside of the top plate. Cut four 3/4"-diameter dowels to 15/8" in length, and screw them in these holes from the underside of the top plates. The top can now be easily located on the dowels without having to bend over. Once in place, the dowels hold the cabinets in place, and make the entire bench more sturdy. But don't forget to round everything over. Not only did I round the top's edges, but I also rounded the lips of the dog holes. This makes it easier to locate the dowels and dogs and also keeps the plywood from splintering at the sharp edges. Sturdy Storage Drawers The drawers are the last step and are designed for basic utility. They are 1/2" plywood boxes with 1/4"-thick plywood bottoms and a 3/4" false front. I used tongue-and-groove joinery on the drawer boxes. Set up either a V4" stack dado in your table saw, or a V4" bit in your router table. Then set the fence to leave 1/4" between the fence and bit or blade. Set the depth of the cut for 1/4", then run the front, back and bottom inside edges of each drawer side. Also run the bottom inside edge of each drawer front. Next adjust the fence on your saw/router table to cut the tongues on the drawer fronts and back. Check the fit, then run all the fronts and backs. The drawers are then glued and nailed together. The bottoms slip into the groove in the sides and front, and then are nailed in place to the bottom edge of the drawer back. Use the bottoms to make sure the drawers are square before nailing them in place. The false drawer fronts are again simple and utilitarian: 3/4" plywood with the edges rounded over. I held each drawer box 1/4" up from the bottom edge of each front. Attach the drawer handles (simple 4" chrome pulls from almost any home center store that cost about $2 each) to the fronts, countersinking the screw heads flush to the back of the drawer fronts. The false fronts are screwed in place through the drawer box fronts. Mount the slides following the hardware instructions. I added a couple coats of paint to the cabinets, but left the top as bare wood. I added a coat of lacquer to the top support assembly and the drawer fronts. There's only one thing left to do to make these storage cabinets all they can be. Make a couple of auxiliary tops to fit on the individual cabinets. I made mine with a piece of 3/4" plywood (drilled to match the dowels). Add a roller and you have a height-adjustable outfeed table that can be used with your table saw, jointer, planer or any other machine. When not in use as a bench or outfeed table, you've now got two very handy tools stands that tuck away against the wall — right next to the cars. PW 50 Popular Woodworking August 2001 SOURCES Grizzly Industrial Inc. 800-523-4777, or www.grizzly.com 4 - H0689 3" fixed casters - $3.95 ea. 4 - H0693 3" swivel casters w/brake -$5.95 ea. 6 - G5084 12" full-extension slides -$9.95 pr. Lee Valley 800-871-8158, or www.leevalley.com 2 - 05G10.02 Wonder Pups - $ 18.95 ea. 1 - 05G04.04 Bench Pups - $12.75 pr. |


