Popular Woodworking 2002-02 № 126, страница 51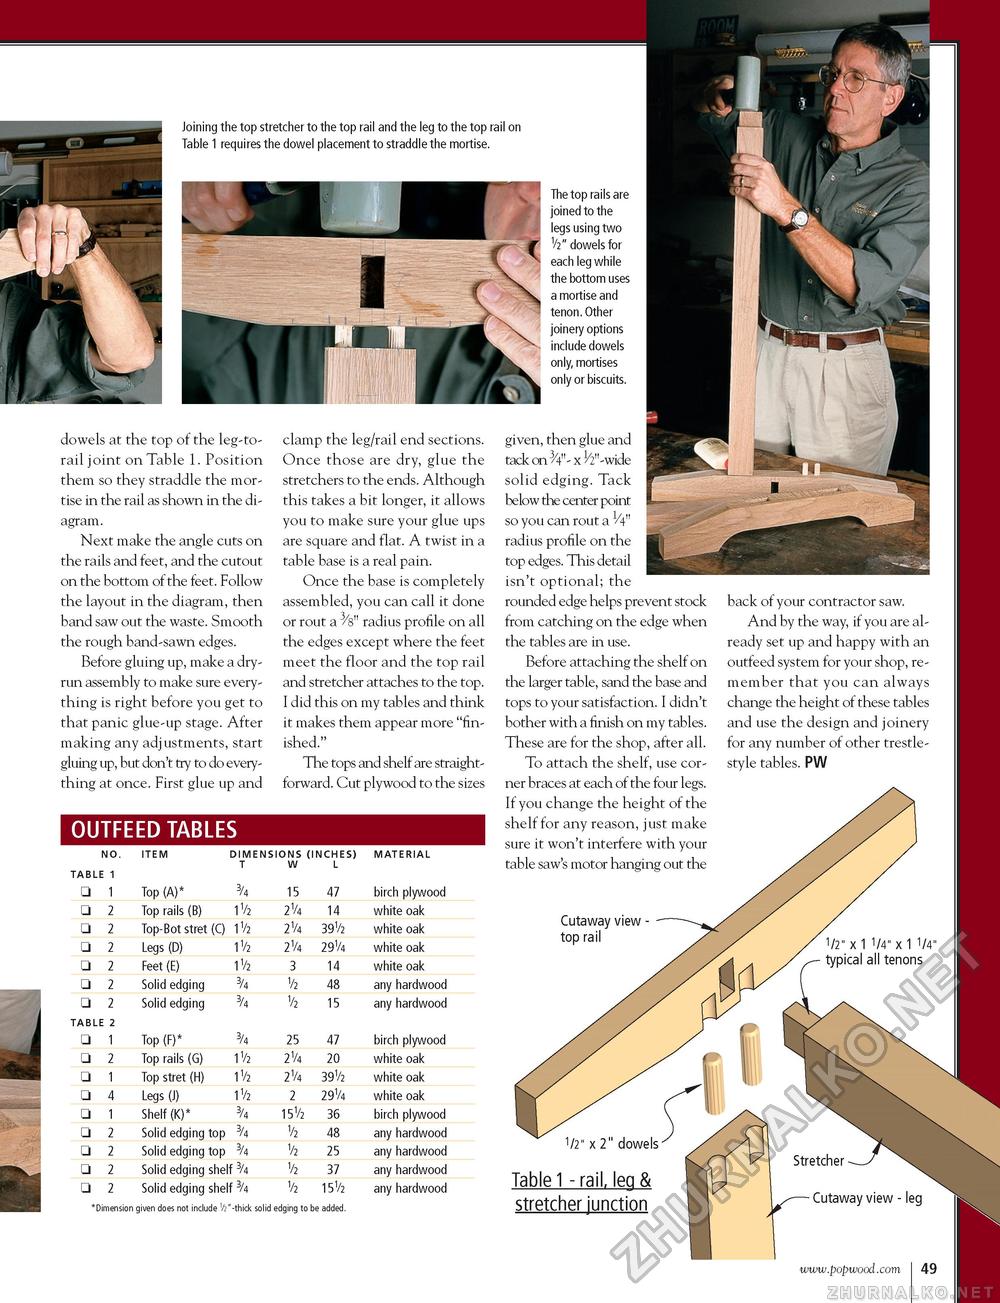
Joining the top stretcher to the top rail and the leg to the top rail on Table 1 requires the dowel placement to straddle the mortise. dowels at the top of the leg-to-rail joint on Table 1. Position them so they straddle the mortise in the rail as shown in the diagram. Next make the angle cuts on the rails and feet, and the cutout on the bottom of the feet. Follow the layout in the diagram, then band saw out the waste. Smooth the rough band-sawn edges. Before gluing up, make a dry-run assembly to make sure everything is right before you get to that panic glue-up stage. After making any adjustments, start gluing up, but don't try to do everything at once. First glue up and OUTFEED TABLES clamp the leg/rail end sections. Once those are dry, glue the stretchers to the ends. Although this takes a bit longer, it allows you to make sure your glue ups are square and flat. A twist in a table base is a real pain. Once the base is completely assembled, you can call it done or rout a ^s" radius profile on all the edges except where the feet meet the floor and the top rail and stretcher attaches to the top. I did this on my tables and think it makes them appear more "finished." The tops and shelf are straightforward. Cut plywood to the sizes
Table 1 - rail, leg & stretcher junction *Dimension given does not include V2"-thick solid edging to be added. *Dimension given does not include V2"-thick solid edging to be added. The top rails are joined to the legs using two V2" dowels for each leg while the bottom uses a mortise and tenon. Other joinery options include dowels only, mortises only or biscuits. given, then glue and tack on 3/4"- x 1/2"-wide solid edging. Tack below the center point so you can rout a 1/4n radius profile on the top edges. This detail isn't optional; the rounded edge helps prevent stock from catching on the edge when the tables are in use. Before attaching the shelf on the larger table, sand the base and tops to your satisfaction. I didn't bother with a finish on my tables. These are for the shop, after all. To attach the shelf, use corner braces at each of the four legs. If you change the height of the shelf for any reason, just make sure it won't interfere with your table saw's motor hanging out the Cutaway view top rail back of your contractor saw. And by the way, if you are already set up and happy with an outfeed system for your shop, remember that you can always change the height of these tables and use the design and joinery for any number of other trestle-style tables. PW 1/2" X 1 1/4" X 1 1/4" typical all tenons 1/2" x 2" dowels Table 1 - rail, leg & stretcher junction Stretcher - Cutaway view - leg www.popwood.com I 51 |
||||||||||||||||||||||||||||||||||||||||||||||||||||||||||||||||||||||||||||||||||||||||||||||||||||||||||||||||||||||||||||||


