Popular Woodworking 2002-04 № 127, страница 68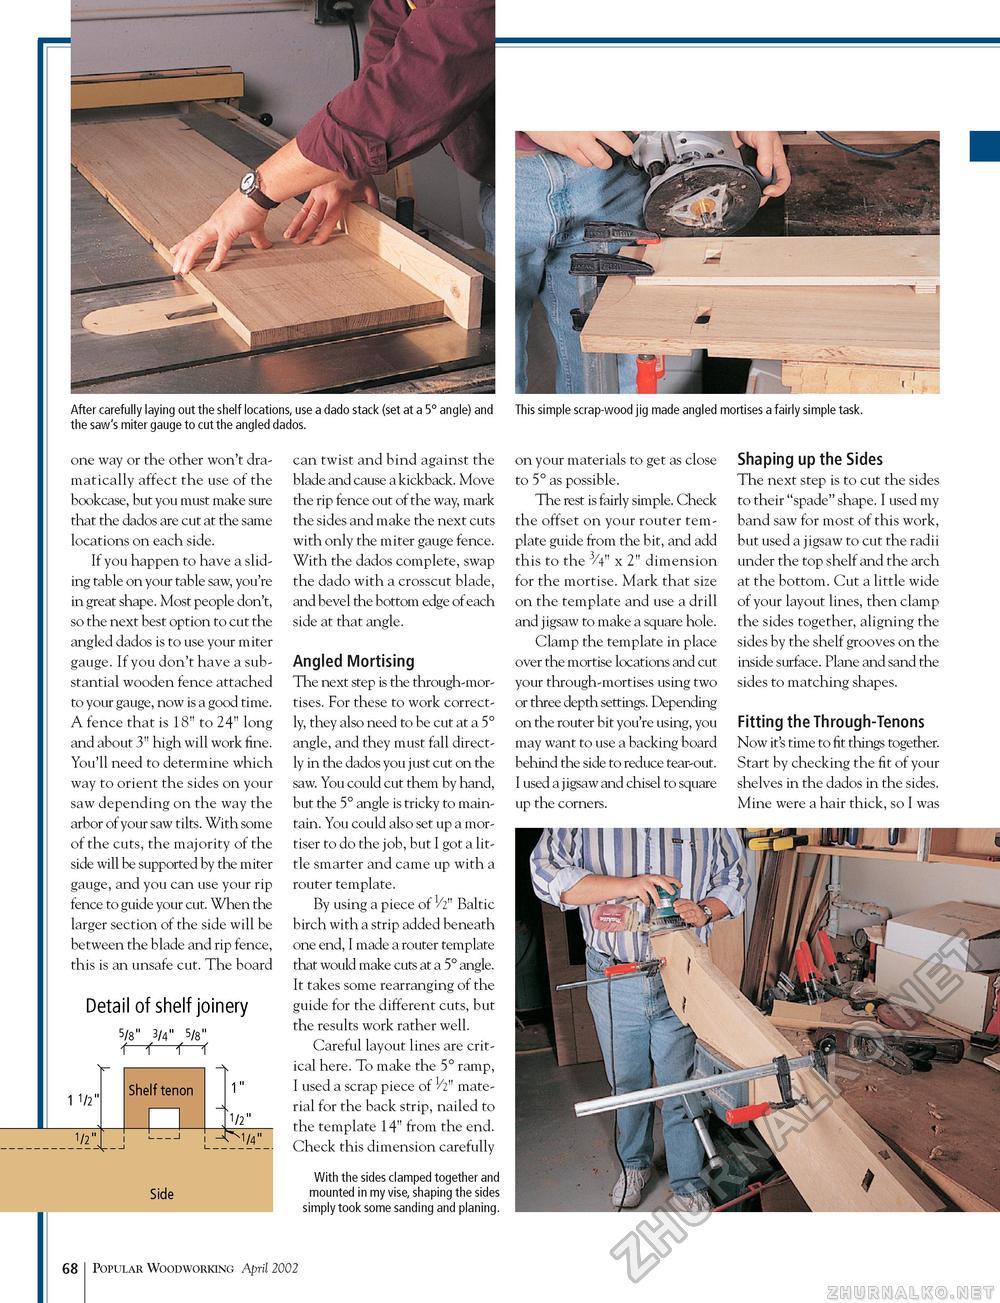
This simple scrap-wood jig made angled mortises a fairly simple task. one way or the other won't dramatically affect the use of the bookcase, but you must make sure that the dados are cut at the same locations on each side. If you happen to have a sliding table on your table saw, you're in great shape. Most people don't, so the next best option to cut the angled dados is to use your miter gauge. If you don't have a substantial wooden fence attached to your gauge, now is a good time. A fence that is 18" to 24" long and about 3" high will work fine. You'll need to determine which way to orient the sides on your saw depending on the way the arbor of your saw tilts. With some of the cuts, the majority of the side will be supported by the miter gauge, and you can use your rip fence to guide your cut. When the larger section of the side will be between the blade and rip fence, this is an unsafe cut. The board Detail of shelf joinery 5/8" 3/4" 5/8" •r-r—■r-r Side can twist and bind against the blade and cause a kickback. Move the rip fence out of the way, mark the sides and make the next cuts with only the miter gauge fence. With the dados complete, swap the dado with a crosscut blade, and bevel the bottom edge of each side at that angle. Angled Mortising The next step is the through-mortises. For these to work correctly, they also need to be cut at a 5° angle, and they must fall directly in the dados you just cut on the saw. You could cut them by hand, but the 5° angle is tricky to maintain. You could also set up a mor-tiser to do the job, but I got a little smarter and came up with a router template. By using a piece of 1/2" Baltic birch with a strip added beneath one end, I made a router template that would make cuts at a 5° angle. It takes some rearranging of the guide for the different cuts, but the results work rather well. Careful layout lines are critical here. To make the 5° ramp, I used a scrap piece of 1/2" material for the back strip, nailed to the template 14" from the end. Check this dimension carefully With the sides clamped together and mounted in my vise, shaping the sides simply took some sanding and planing. on your materials to get as close to 5° as possible. The rest is fairly simple. Check the offset on your router template guide from the bit, and add this to the 3/4" x 2" dimension for the mortise. Mark that size on the template and use a drill and jigsaw to make a square hole. Clamp the template in place over the mortise locations and cut your through-mortises using two or three depth settings. Depending on the router bit you're using, you may want to use a backing board behind the side to reduce tear-out. I used a jigsaw and chisel to square up the corners. Shaping up the Sides The next step is to cut the sides to their "spade" shape. I used my band saw for most of this work, but used a jigsaw to cut the radii under the top shelf and the arch at the bottom. Cut a little wide of your layout lines, then clamp the sides together, aligning the sides by the shelf grooves on the inside surface. Plane and sand the sides to matching shapes. Fitting the Through-Tenons Now it's time to fit things together. Start by checking the fit of your shelves in the dados in the sides. Mine were a hair thick, so I was 68 Popular Woodworking April 2002 |


