Popular Woodworking 2002-04 № 127, страница 69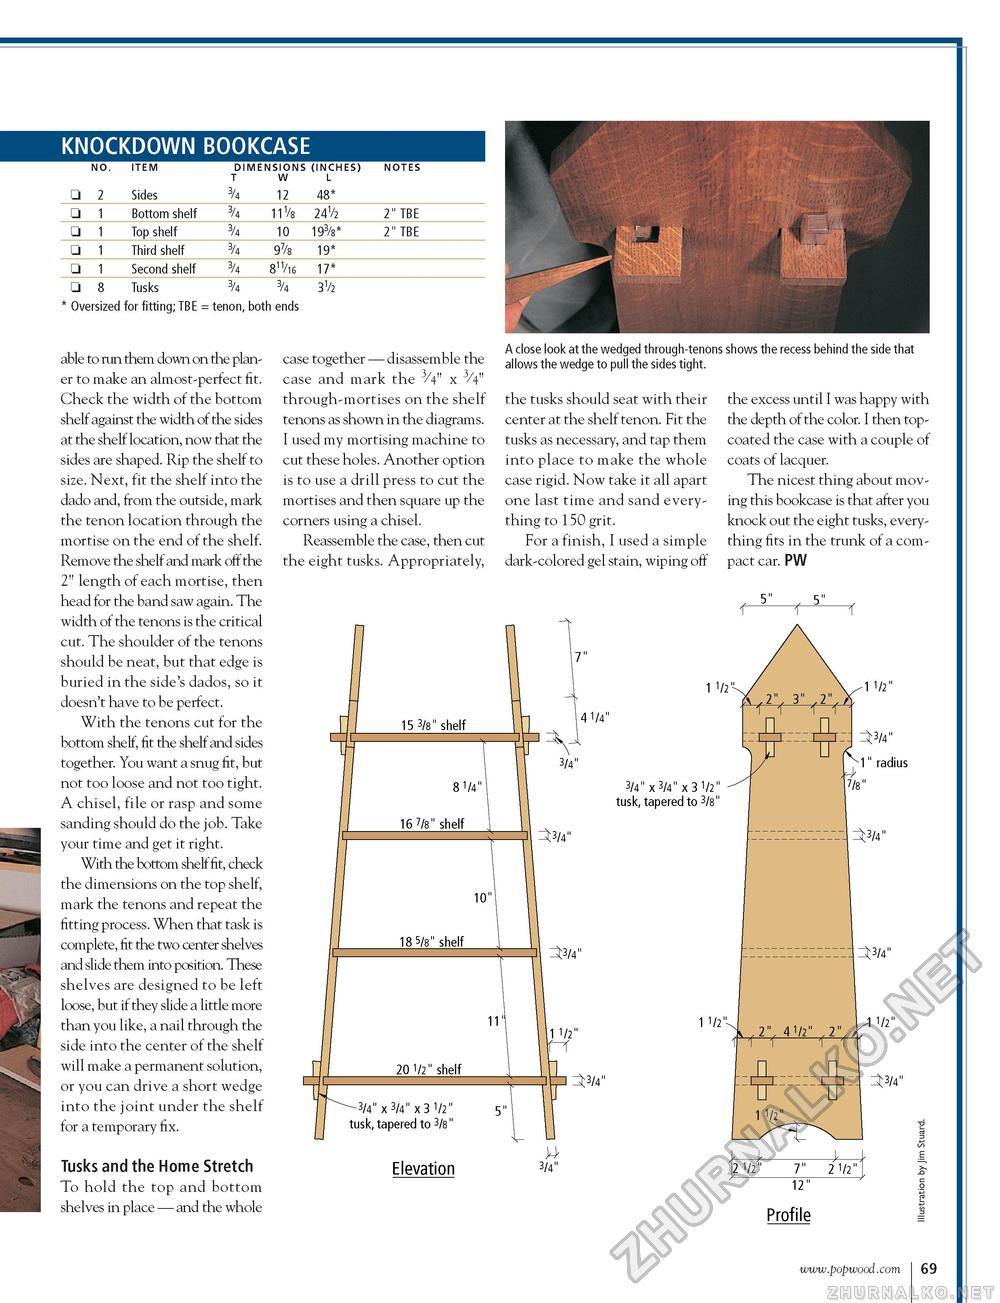
able to run them down on the planer to make an almost-perfect fit. Check the width of the bottom shelf against the width of the sides at the shelf location, now that the sides are shaped. Rip the shelf to size. Next, fit the shelf into the dado and, from the outside, mark the tenon location through the mortise on the end of the shelf. Remove the shelf and mark off the 2" length of each mortise, then head for the band saw again. The width of the tenons is the critical cut. The shoulder of the tenons should be neat, but that edge is buried in the side's dados, so it doesn't have to be perfect. With the tenons cut for the bottom shelf, fit the shelf and sides together. You want a snug fit, but not too loose and not too tight. A chisel, file or rasp and some sanding should do the job. Take your time and get it right. With the bottom shelf fit, check the dimensions on the top shelf, mark the tenons and repeat the fitting process. When that task is complete, fit the two center shelves and slide them into position. These shelves are designed to be left loose, but if they slide a little more than you like, a nail through the side into the center of the shelf will make a permanent solution, or you can drive a short wedge into the joint under the shelf for a temporary fix. Tusks and the Home Stretch To hold the top and bottom shelves in place — and the whole case together — disassemble the case and mark the 3/4" x 3/4" through-mortises on the shelf tenons as shown in the diagrams. I used my mortising machine to cut these holes. Another option is to use a drill press to cut the mortises and then square up the corners using a chisel. Reassemble the case, then cut the eight tusks. Appropriately, A close look at the wedged through-tenons shows the recess behind the side that allows the wedge to pull the sides tight. the tusks should seat with their center at the shelf tenon. Fit the tusks as necessary, and tap them into place to make the whole case rigid. Now take it all apart one last time and sand everything to 150 grit. For a finish, I used a simple dark-colored gel stain, wiping off the excess until I was happy with the depth of the color. I then top-coated the case with a couple of coats of lacquer. The nicest thing about moving this bookcase is that after you knock out the eight tusks, everything fits in the trunk of a compact car. PW f- -t- -1 15 3/8" shelf □ Q 4 1/4" 3/4" 8 1/4" 16 7/8" shelf ? ^3/4" 18 5/8" shelf 20 1/2" shelf □tp ^3/4" -3/4" x 3/4" x 3 1/2" tusk, tapered to 3/8" Elevation 2 1/2" 7" 2 1/2' 12" Profile |
||||||||||||||||||||||||||||||||||||||||||||||||||||||


