Popular Woodworking 2002-04 № 127, страница 72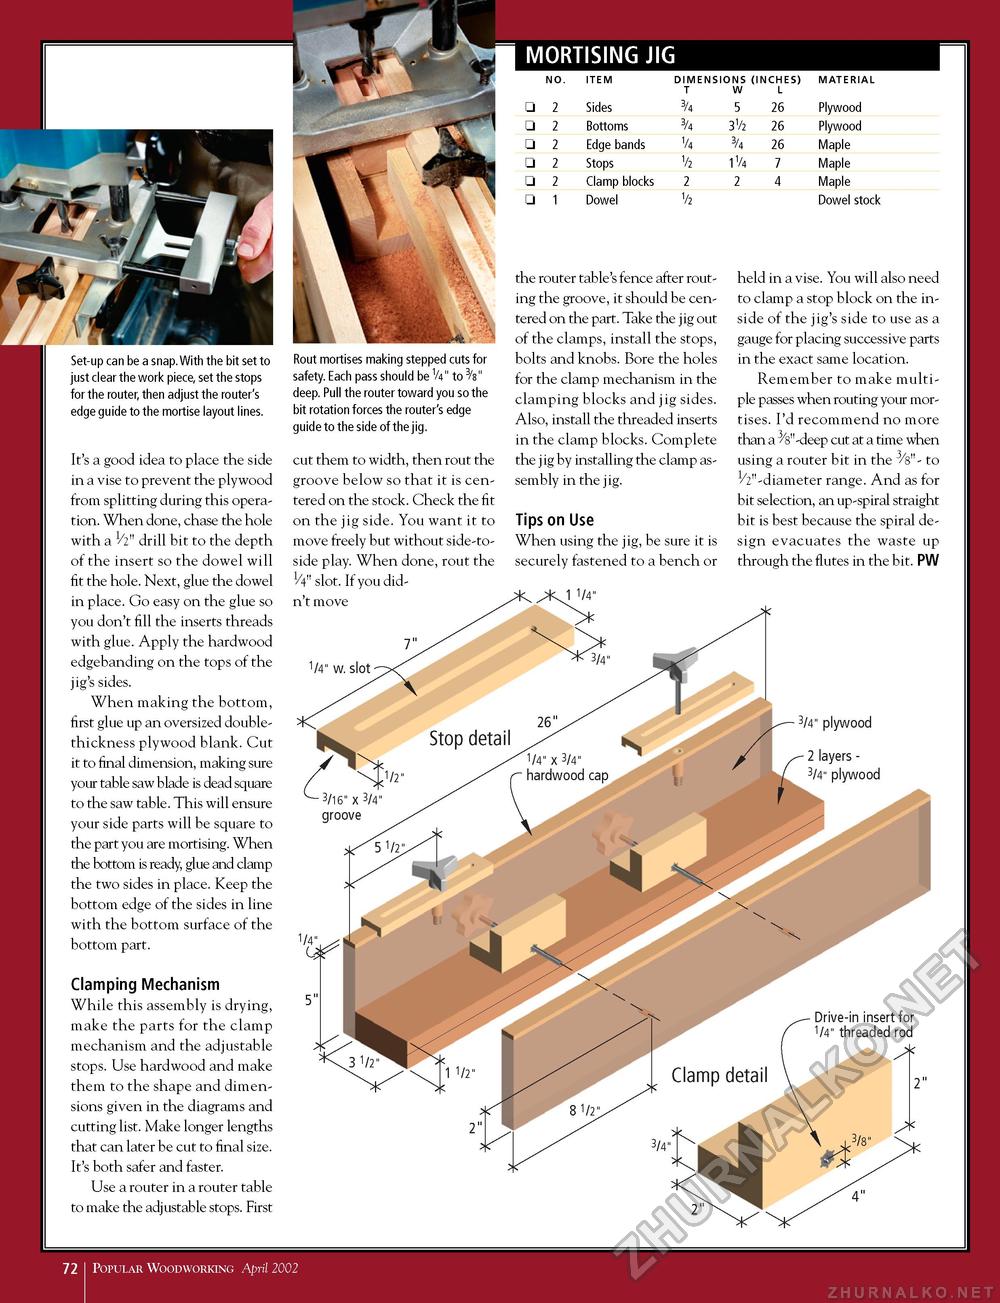
MORTISING JIG
Set-up can be a snap. With the bit set to just clear the work piece, set the stops for the router, then adjust the router's edge guide to the mortise layout lines. It's a good idea to place the side in a vise to prevent the plywood from splitting during this operation. When done, chase the hole with a V2" drill bit to the depth of the insert so the dowel will fit the hole. Next, glue the dowel in place. Go easy on the glue so you don't fill the inserts threads with glue. Apply the hardwood edgebanding on the tops of the jig's sides. When making the bottom, first glue up an oversized double-thickness plywood blank. Cut it to final dimension, making sure your table saw blade is dead square to the saw table. This will ensure your side parts will be square to the part you are mortising. When the bottom is ready, glue and clamp the two sides in place. Keep the bottom edge of the sides in line with the bottom surface of the bottom part. Clamping Mechanism While this assembly is drying, make the parts for the clamp mechanism and the adjustable stops. Use hardwood and make them to the shape and dimensions given in the diagrams and cutting list. Make longer lengths that can later be cut to final size. It's both safer and faster. Use a router in a router table to make the adjustable stops. First Rout mortises making stepped cuts for safety. Each pass should be V4" to 3/s" deep. Pull the router toward you so the bit rotation forces the router's edge guide to the side of the jig. cut them to width, then rout the groove below so that it is centered on the stock. Check the fit on the jig side. You want it to move freely but without side-to-side play. When done, rout the W' slot. If you didn't move 1/4" W. slot the router table's fence after routing the groove, it should be centered on the part. Take the jig out of the clamps, install the stops, bolts and knobs. Bore the holes for the clamp mechanism in the clamping blocks and jig sides. Also, install the threaded inserts in the clamp blocks. Complete the jig by installing the clamp assembly in the jig. Tips on Use When using the jig, be sure it is securely fastened to a bench or held in a vise. You will also need to clamp a stop block on the inside of the jig's side to use as a gauge for placing successive parts in the exact same location. Remember to make multiple passes when routing your mortises. I'd recommend no more than a ^"-deep cut at a time when using a router bit in the 3/s"- to ^"-diameter range. And as for bit selection, an up-spiral straight bit is best because the spiral design evacuates the waste up through the flutes in the bit. PW 72 1 Popular Woodworking April 2002 |
|||||||||||||||||||||||||||||||||||||||||||||||||


