Popular Woodworking 2002-10 № 130, страница 31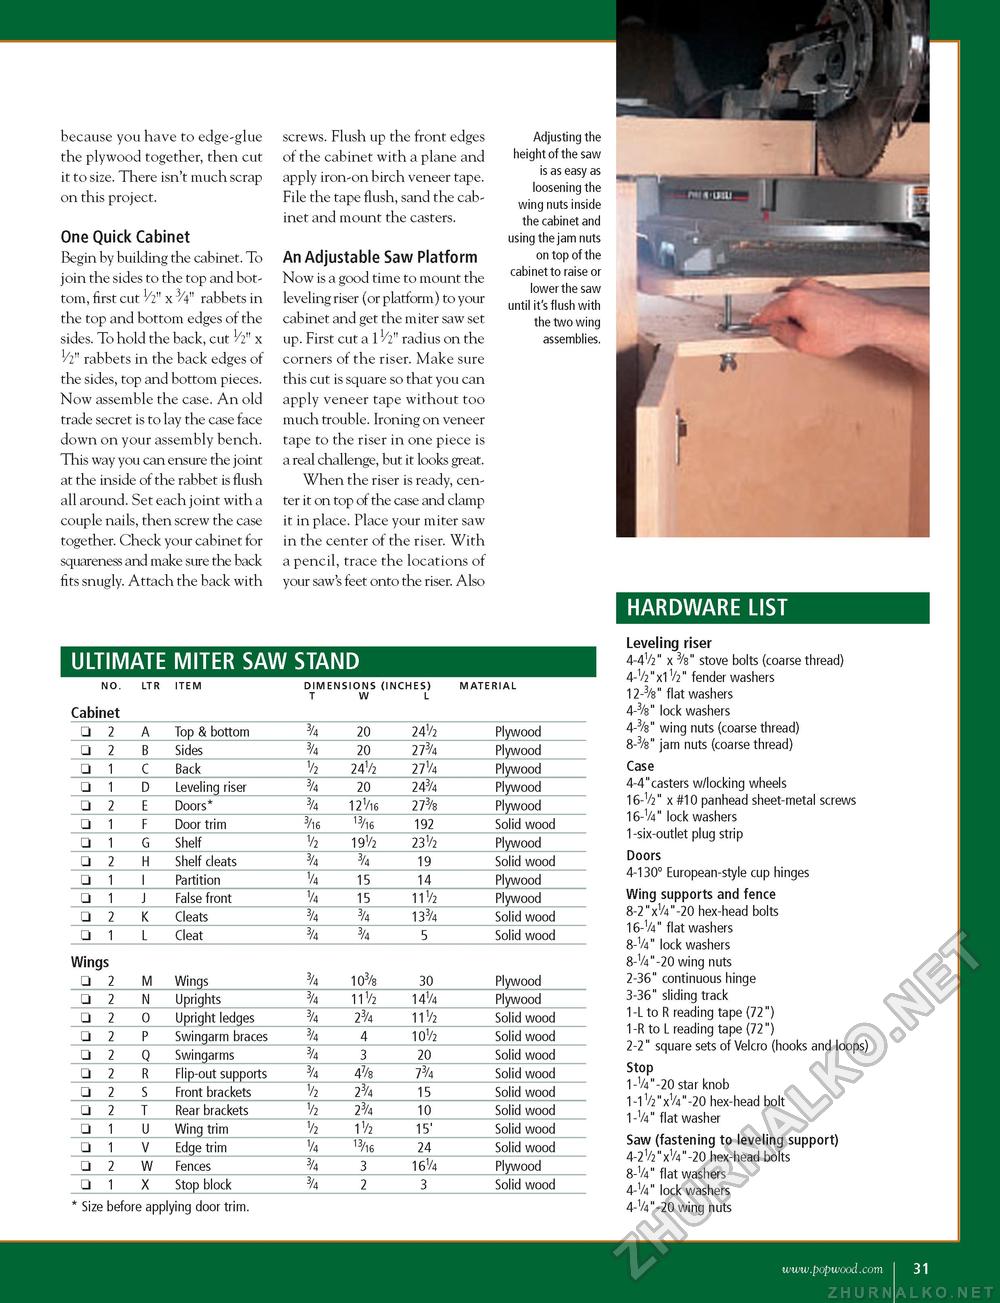
because you have to edge-glue the plywood together, then cut it to size. There isn't much scrap on this project. One Quick Cabinet Begin by building the cabinet. To join the sides to the top and bottom, first cut 1/2" x 3/4" rabbets in the top and bottom edges of the sides. To hold the back, cut 1/2" x 1/2" rabbets in the back edges of the sides, top and bottom pieces. Now assemble the case. An old trade secret is to lay the case face down on your assembly bench. This way you can ensure the joint at the inside of the rabbet is flush all around. Set each joint with a couple nails, then screw the case together. Check your cabinet for squareness and make sure the back fits snugly. Attach the back with screws. Flush up the front edges of the cabinet with a plane and apply iron-on birch veneer tape. File the tape flush, sand the cabinet and mount the casters. An Adjustable Saw Platform Now is a good time to mount the leveling riser (or platform) to your cabinet and get the miter saw set up. First cut a 11/2" radius on the corners of the riser. Make sure this cut is square so that you can apply veneer tape without too much trouble. Ironing on veneer tape to the riser in one piece is a real challenge, but it looks great. When the riser is ready, center it on top of the case and clamp it in place. Place your miter saw in the center of the riser. With a pencil, trace the locations of your saw's feet onto the riser. Also Adjusting the height of the saw is as easy as loosening the wing nuts inside the cabinet and using the jam nuts on top of the cabinet to raise or lower the saw until it's flush with the two wing assemblies. ULTIMATE MITER SAW STAND
Size before applying door trim. Size before applying door trim. HARDWARE LIST Leveling riser 4-41/2" x 3/8" stove bolts (coarse thread) 4-1/2"x11/2" fender washers 12-3/8" flat washers 4-3/8" lock washers 4-3/8" wing nuts (coarse thread) 8-3/8" jam nuts (coarse thread) Case 4-4"casters w/locking wheels I6-V2" x #10 panhead sheet-metal screws I6-V4" lock washers 1-six-outlet plug strip Doors 4-130° European-style cup hinges Wing supports and fence 8-2"x1/4"-20 hex-head bolts 16-V4" flat washers 8-V4" lock washers 8-1/4"-20 wing nuts 2-36" continuous hinge 3-36" sliding track 1-L to R reading tape (72") 1-R to L reading tape (72") 2-2" square sets of Velcro (hooks and loops) Stop 1-1/4"-20 star knob 1-11/2"x1/4"-20 hex-head bolt 1-1/4" flat washer Saw (fastening to leveling support) 4-21/2"x1/4"-20 hex-head bolts 8-V4" flat washers 4-1/4" lock washers 4-1/4"-20 wing nuts www.popwood.com I 31 |
||||||||||||||||||||||||||||||||||||||||||||||||||||||||||||||||||||||||||||||||||||||||||||||||||||||||||||||||||||||||||||||||||||||||||||||||||||||||||||||||||||||||||||||||||||||||||||||||||||||||||||||||


