Popular Woodworking 2002-10 № 130, страница 32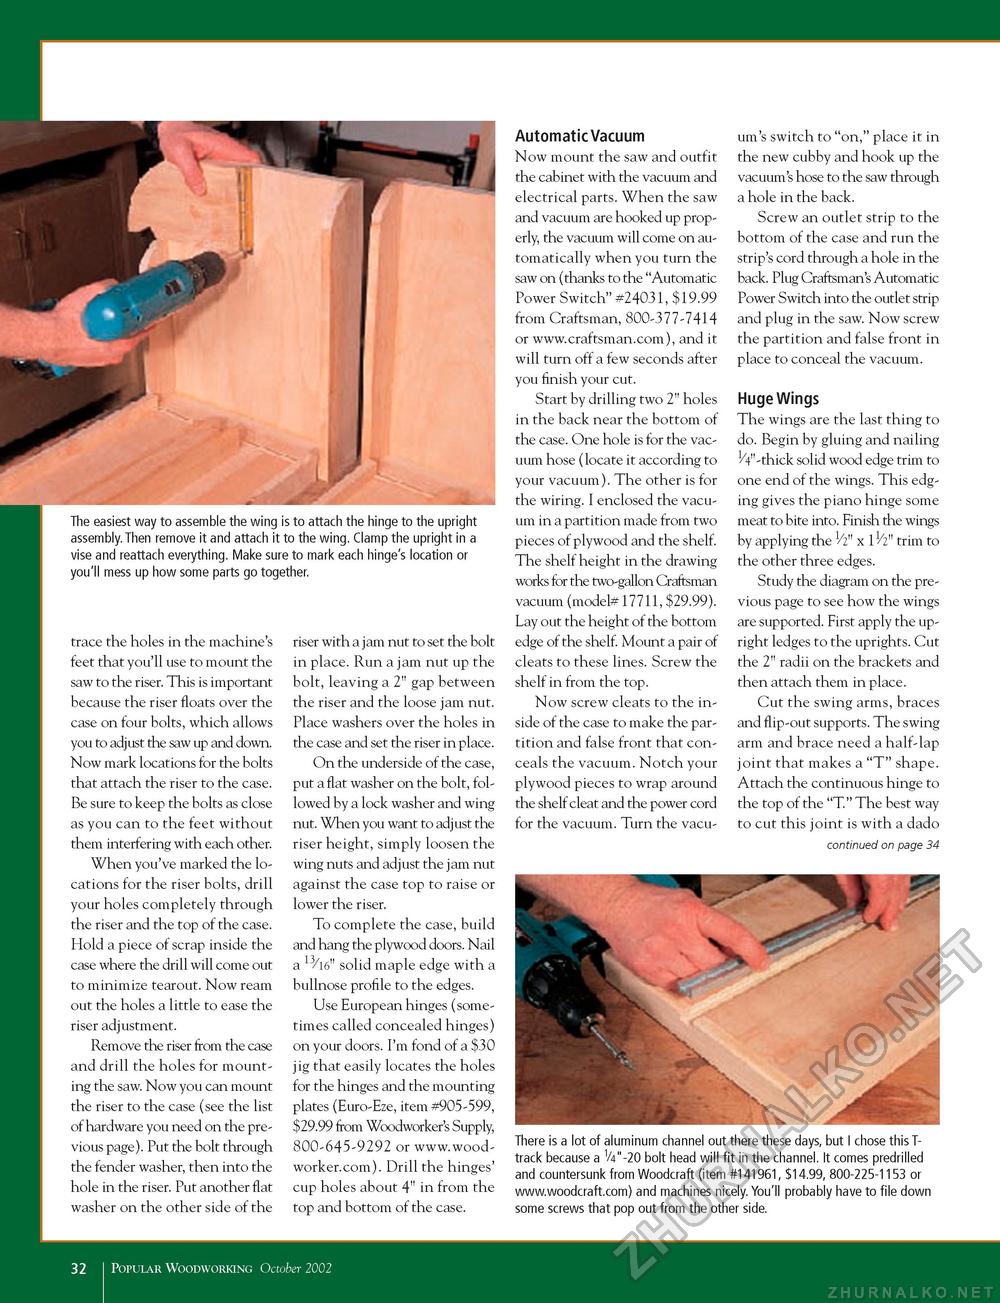
The easiest way to assemble the wing is to attach the hinge to the upright assembly. Then remove it and attach it to the wing. Clamp the upright in a vise and reattach everything. Make sure to mark each hinge's location or you'll mess up how some parts go together. trace the holes in the machine's feet that you'll use to mount the saw to the riser. This is important because the riser floats over the case on four bolts, which allows you to adjust the saw up and down. Now mark locations for the bolts that attach the riser to the case. Be sure to keep the bolts as close as you can to the feet without them interfering with each other. When you've marked the locations for the riser bolts, drill your holes completely through the riser and the top of the case. Hold a piece of scrap inside the case where the drill will come out to minimize tearout. Now ream out the holes a little to ease the riser adjustment. Remove the riser from the case and drill the holes for mounting the saw. Now you can mount the riser to the case (see the list of hardware you need on the previous page). Put the bolt through the fender washer, then into the hole in the riser. Put another flat washer on the other side of the riser with a jam nut to set the bolt in place. Run a jam nut up the bolt, leaving a 2" gap between the riser and the loose jam nut. Place washers over the holes in the case and set the riser in place. On the underside of the case, put a flat washer on the bolt, followed by a lock washer and wing nut. When you want to adjust the riser height, simply loosen the wing nuts and adjust the jam nut against the case top to raise or lower the riser. To complete the case, build and hang the plywood doors. Nail a solid maple edge with a bullnose profile to the edges. Use European hinges (sometimes called concealed hinges) on your doors. I'm fond of a $30 jig that easily locates the holes for the hinges and the mounting plates (Euro-Eze, item #905-599, $29.99 from Woodworker's Supply, 800-645-9292 or www. wood-worker.com). Drill the hinges' cup holes about 4" in from the top and bottom of the case. Automatic Vacuum Now mount the saw and outfit the cabinet with the vacuum and electrical parts. When the saw and vacuum are hooked up properly, the vacuum will come on automatically when you turn the saw on (thanks to the "Automatic Power Switch" #24031, $19.99 from Craftsman, 800-377-7414 or www.craftsman.com), and it will turn off a few seconds after you finish your cut. Start by drilling two 2" holes in the back near the bottom of the case. One hole is for the vacuum hose (locate it according to your vacuum). The other is for the wiring. I enclosed the vacuum in a partition made from two pieces of plywood and the shelf. The shelf height in the drawing works for the two-gallon Craftsman vacuum (model# 17711, $29.99). Lay out the height of the bottom edge of the shelf. Mount a pair of cleats to these lines. Screw the shelf in from the top. Now screw cleats to the inside of the case to make the partition and false front that conceals the vacuum. Notch your plywood pieces to wrap around the shelf cleat and the power cord for the vacuum. Turn the vacu um's switch to "on," place it in the new cubby and hook up the vacuum's hose to the saw through a hole in the back. Screw an outlet strip to the bottom of the case and run the strip's cord through a hole in the back. Plug Craftsman's Automatic Power Switch into the outlet strip and plug in the saw. Now screw the partition and false front in place to conceal the vacuum. Huge Wings The wings are the last thing to do. Begin by gluing and nailing 1/4"-thick solid wood edge trim to one end of the wings. This edging gives the piano hinge some meat to bite into. Finish the wings by applying the 1/2" x 11/2" trim to the other three edges. Study the diagram on the previous page to see how the wings are supported. First apply the upright ledges to the uprights. Cut the 2" radii on the brackets and then attach them in place. Cut the swing arms, braces and flip-out supports. The swing arm and brace need a half-lap joint that makes a "T" shape. Attach the continuous hinge to the top of the "T." The best way to cut this joint is with a dado continued on page 34 There is a lot of aluminum channel out there these days, but I chose this T-track because a 1/4"-20 bolt head will fit in the channel. It comes predrilled and countersunk from Woodcraft (item #141961, $14.99, 800-225-1153 or www.woodcraft.com) and machines nicely. You'll probably have to file down some screws that pop out from the other side. 32 I Popular Woodworking October 2002 |


