Popular Woodworking 2002-12 № 131, страница 84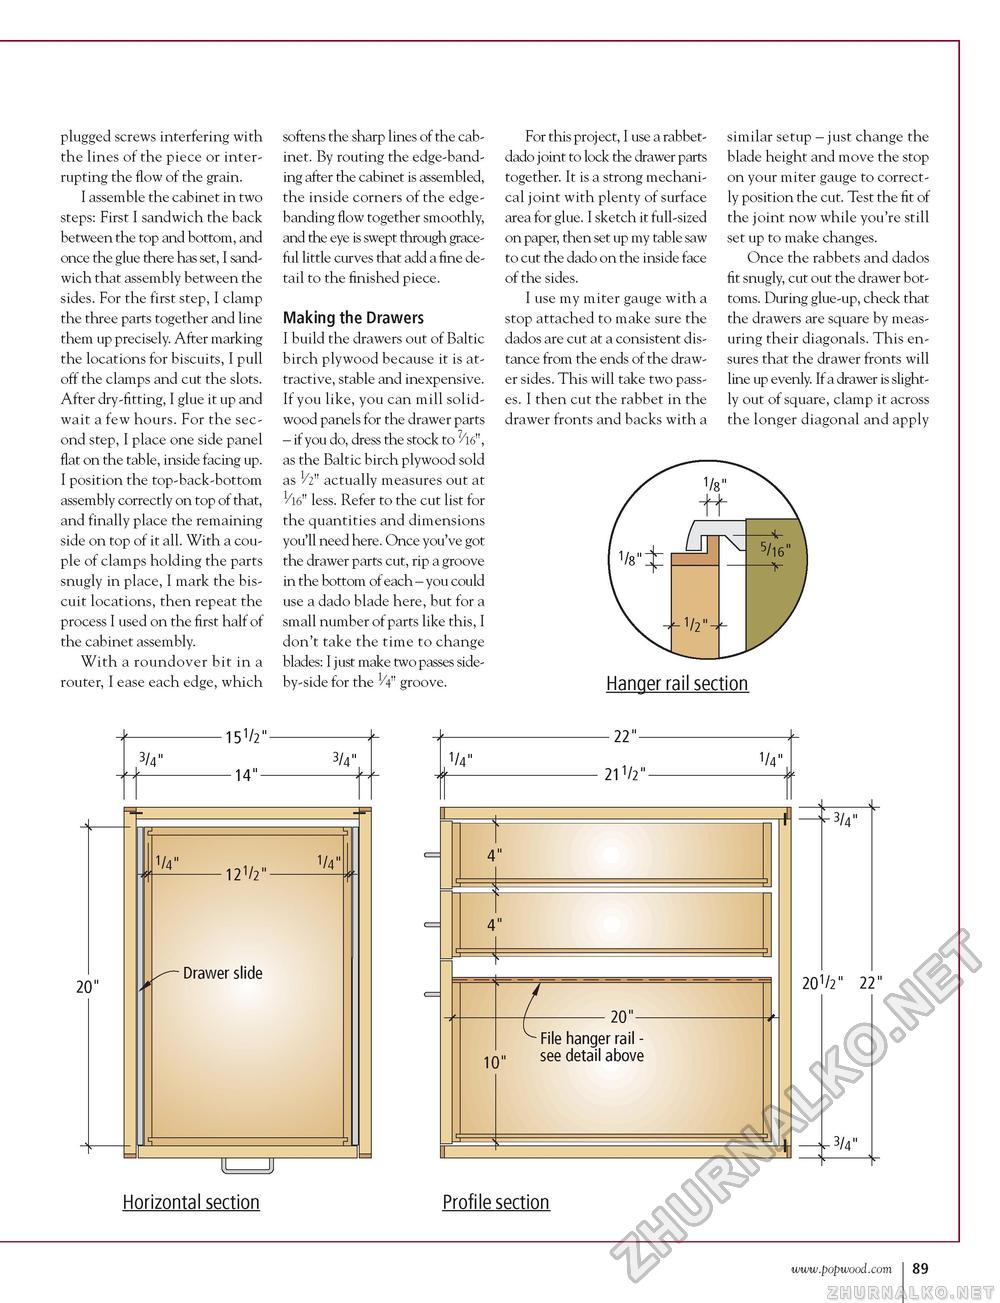
plugged screws interfering with the lines of the piece or interrupting the flow of the grain. I assemble the cabinet in two steps: First I sandwich the back between the top and bottom, and once the glue there has set, I sandwich that assembly between the sides. For the first step, I clamp the three parts together and line them up precisely. After marking the locations for biscuits, I pull off the clamps and cut the slots. After dry-fitting, I glue it up and wait a few hours. For the second step, I place one side panel flat on the table, inside facing up. I position the top-back-bottom assembly correctly on top of that, and finally place the remaining side on top of it all. With a couple of clamps holding the parts snugly in place, I mark the biscuit locations, then repeat the process I used on the first half of the cabinet assembly. With a roundover bit in a router, I ease each edge, which softens the sharp lines of the cabinet. By routing the edge-banding after the cabinet is assembled, the inside corners of the edge-banding flow together smoothly, and the eye is swept through graceful little curves that add a fine detail to the finished piece. Making the Drawers I build the drawers out of Baltic birch plywood because it is attractive, stable and inexpensive. If you like, you can mill solid-wood panels for the drawer parts - if you do, dress the stock to 7/l6", as the Baltic birch plywood sold as 1/2" actually measures out at 1/l6" less. Refer to the cut list for the quantities and dimensions you'll need here. Once you've got the drawer parts cut, rip a groove in the bottom of each - you could use a dado blade here, but for a small number of parts like this, I don't take the time to change blades: I just make two passes side-by-side for the V4" groove. For this project, I use a rabbet-dado joint to lock the drawer parts together. It is a strong mechanical joint with plenty of surface area for glue. I sketch it full-sized on paper, then set up my table saw to cut the dado on the inside face of the sides. I use my miter gauge with a stop attached to make sure the dados are cut at a consistent distance from the ends of the drawer sides. This will take two passes. I then cut the rabbet in the drawer fronts and backs with a similar setup - just change the blade height and move the stop on your miter gauge to correctly position the cut. Test the fit of the joint now while you're still set up to make changes. Once the rabbets and dados fit snugly, cut out the drawer bottoms. During glue-up, check that the drawers are square by measuring their diagonals. This ensures that the drawer fronts will line up evenly. If a drawer is slightly out of square, clamp it across the longer diagonal and apply 1/8"
Hanger rail section 1/4" 4" 4" — 22"— 211/2 "- 1/4" 10" -20"- File hanger rail -see detail above 3/4" 201/2" 22" t- 3/4" Horizontal section Profile section |
||||||||||||


