clearance at the back edge for cables and wires. An easy way to create that space is to rip 2" off the back side of the adjustable shelf, then glue two wings to the back of the shelf at both ends. (Use biscuits to hold these wings in place, of course!)
Cut out an opening in the upper part of the back panel for cable and wire access. Then mount the back panel by first adding a frame around the inside edges of the opening to create a 1/2" lip. This essentially creates a shop-made wire grommet.
Cut a panel to fit in the cutout
from the back of the cabinet and attach it with screws. Now screw the back in place on the case.
Use small magnetic catches to hold the doors closed. These are mounted so that both the top and bottom doors use the same magnet; the top door overlays the top half of each magnet, while the bottom door overlays the bottom half of each magnet.
These catches are one of the few things you can't install in this project using your biscuit joiner. But just give the biscuit people some time and I bet they'll come up with a way. PW
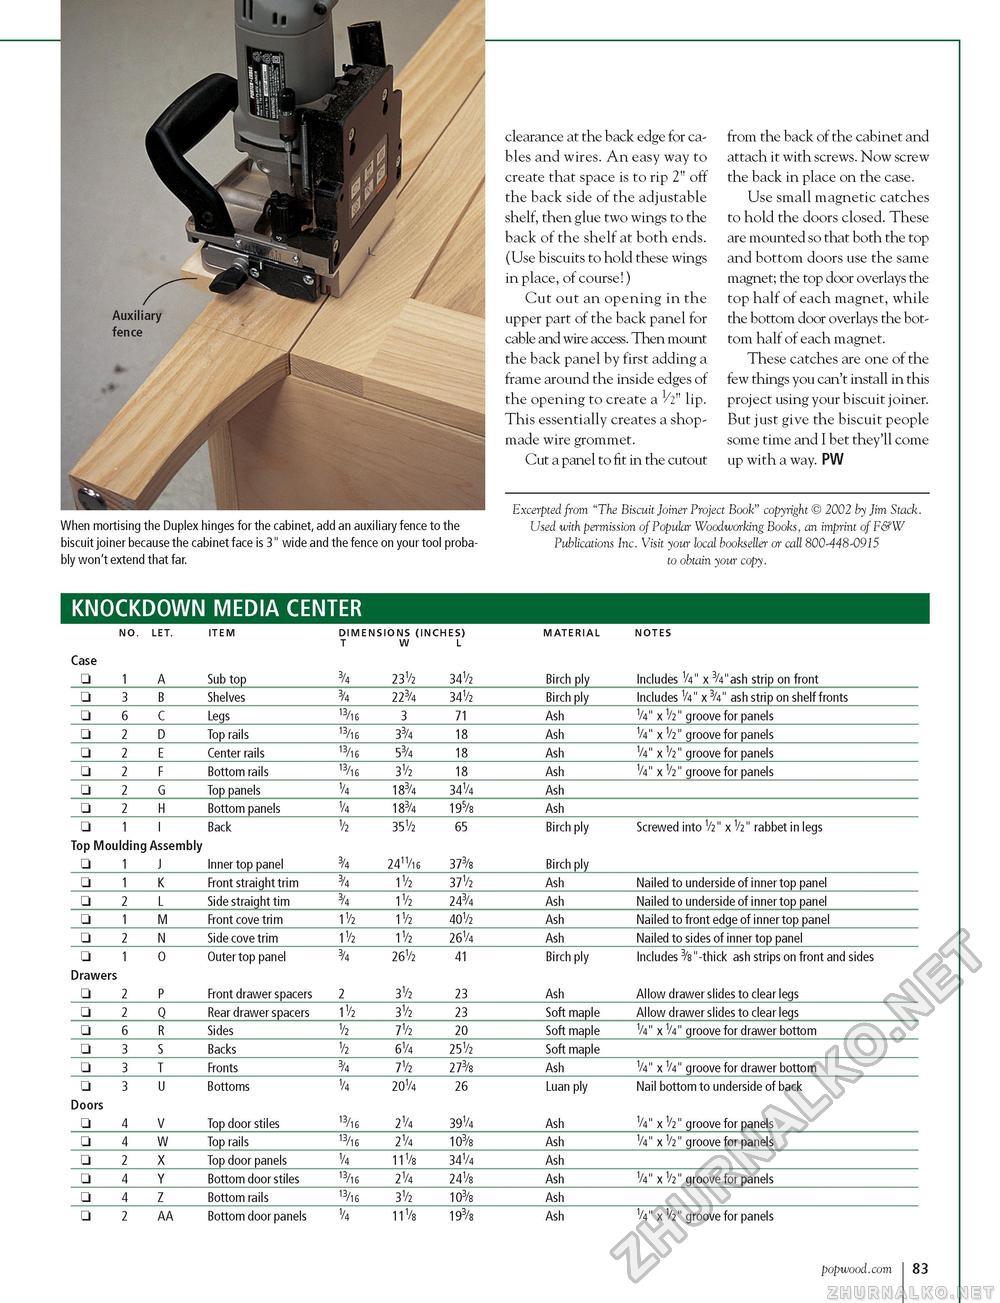
When mortising the Duplex hinges for the cabinet, add an auxiliary fence to the biscuit joiner because the cabinet face is 3" wide and the fence on your tool probably won't extend that far.
Excerpted from "The Biscuit Joiner Project Book" copyright © 2002 by Jim Stack. Used with permission of Popular Woodworking Books, an imprint of F&W Publications Inc. Visit your local bookseller or call 800-448-0915 to obtain your copy.
KNOCKDOWN MEDIA CENTER
|
NO. LET. |
ITEM |
DIMENSIONS (INCHES) T W L |
MATERIAL |
NOTES |
|
Case
□ 1 |
A |
Sub top |
3/4 |
2312 |
3412 |
Birch ply |
Includes V4" x 3A"ash strip on front |
|
□ 3 B |
Shelves |
3/4 |
223/4 |
3412 |
Birch ply |
Includes V4" x3/4" ash strip on shelffronts |
|
□ 6 C |
Legs |
13/16 |
3 |
71 |
Ash |
I4" x V2" groove for panels |
|
□2 |
D |
Top rails |
13/16 |
33 4 |
18 |
Ash |
I4" x V2" groove for panels |
|
□2 |
! E |
Center rails |
13/16 |
53/4 |
18 |
Ash |
I4" x 12" groove for panels |
|
□2 |
! F |
Bottom rails |
13/16 |
312 |
18 |
Ash |
I4" x I2" groove for panels |
|
□2 |
! G |
Top panels |
14 |
183/4 |
3414 |
Ash |
|
|
□2 |
! H |
Bottom panels |
14 |
183/4 |
195/b |
Ash |
|
|
□ 1 I
Top Moulding Assembly
□ 1 J |
Back
Inner top panel |
12 3/4 |
35V2
24"/16 |
65
373/8 |
Birch ply Birch ply |
Screwed into I2" x V2" rabbet in legs |
|
□1 |
K |
Front straight trim |
3/4 |
112 |
3712 |
Ash |
Nailed to underside of inner top panel |
|
□2 |
! L |
Side straight tim |
3/4 |
112 |
243/4 |
Ash |
Nailed to underside of inner top panel |
|
□1 |
M |
Front cove trim |
1/2 |
112 |
40I2 |
Ash |
Nailed to front edge of inner top panel |
|
□2 |
! N |
Side cove trim |
1/2 |
112 |
2614 |
Ash |
Nailed to sides of inner top panel |
|
□1 Drawers
□2 |
O
! P |
Outer top panel Front drawer spacers |
3/4 2 |
2612 312 |
41
23 |
Birch ply Ash |
Includes 3/s "-thick ash strips on front and sides Allow drawer slides to clear legs |
|
□2 |
! Q |
Rear drawer spacers |
1/2 |
312 |
23 |
Soft maple |
Allow drawer slides to clear legs |
|
□ 6 R |
Sides |
12 |
712 |
20 |
Soft maple |
I4" x V4" groove for drawer bottom |
|
□ 3 S |
Backs |
12 |
614 |
2512 |
Soft maple |
|
|
□ 3 T |
Fronts |
3/4 |
712 |
273/8 |
Ash |
I4" x V4" groove for drawer bottom |
|
□ 3 U Doors
□ 4 V |
Bottoms Top door stiles |
14 13/16 |
2014 214 |
26 3914 |
Luan ply Ash |
Nail bottom to underside of back I4" x I2" groove for panels |
|
□ 4 W |
Top rails |
13/16 |
214 |
103/8 |
Ash |
I4" x 12" groove for panels |
|
□2 |
! X |
Top door panels |
14 |
111 8 |
3414 |
Ash |
|
|
□ 4 Y |
Bottom door stiles |
13/16 |
214 |
24V8 |
Ash |
I4" x 12" groove for panels |
|
□ 4 Z |
Bottom rails |
13/16 |
312 |
103/8 |
Ash |
|
|
□2 |
AA |
Bottom door panels |
14 |
111 8 |
193/b |
Ash |
I4" x I2" groove for panels |
popwood.com 83


