Popular Woodworking 2003-06 № 134, страница 60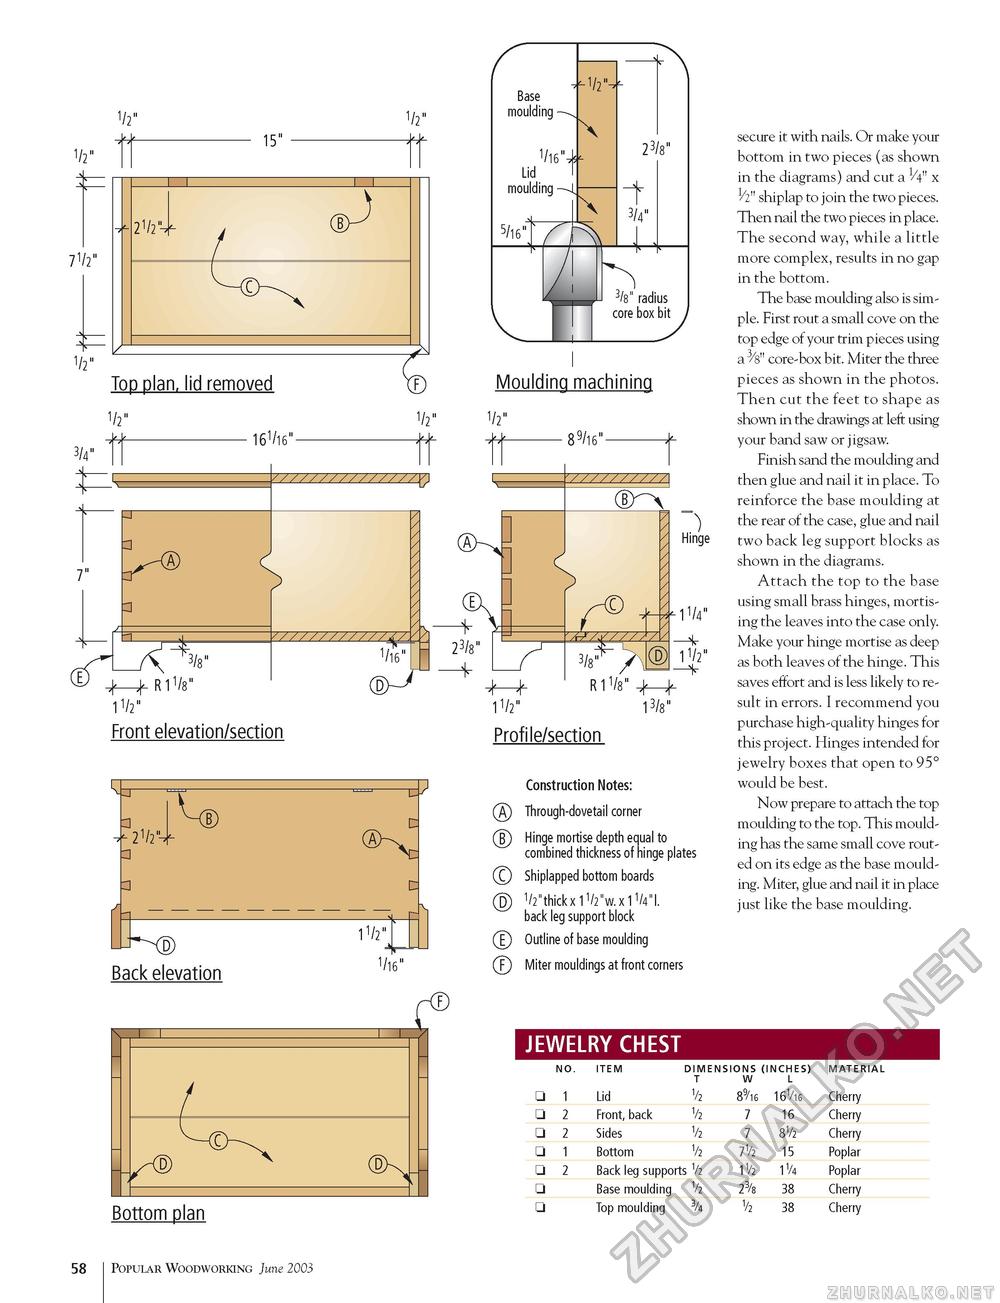
1/2" 1/2" 15" 1/2" -k-k- 71/2" "T 1/2"
Top plan, lid removed 1/2" Base moulding - V16"4 Lid moulding -4. -1/2", Moulding machining 1/2" 1/2" Hinge ■vh-K R 11/8" 11/2" Front elevation/section 21/2" Back elevation 11/2" 1/16 11/4" 11/2" 3/8" R 11/8" -)(—)(. 13/8" Profile/section Construction Notes: (A) Through-dovetail corner (B) Hinge mortise depth equal to combined thickness of hinge plates © Shiplapped bottom boards (D 1/2 "thick x 11/2"w. x 11/4"l. back leg support block (T) Outline of base moulding F Miter mouldings at front corners JEWELRY CHEST secure it with nails. Or make your bottom in two pieces (as shown in the diagrams) and cut a V4" x 1/2n shiplap to join the two pieces. Then nail the two pieces in place. The second way, while a little more complex, results in no gap in the bottom. The base moulding also is simple. First rout a small cove on the top edge of your trim pieces using a 3/8" core-box bit. Miter the three pieces as shown in the photos. Then cut the feet to shape as shown in the drawings at left using your band saw or jigsaw. Finish sand the moulding and then glue and nail it in place. To reinforce the base moulding at the rear of the case, glue and nail two back leg support blocks as shown in the diagrams. Attach the top to the base using small brass hinges, mortising the leaves into the case only. Make your hinge mortise as deep as both leaves of the hinge. This saves effort and is less likely to result in errors. I recommend you purchase high-quality hinges for this project. Hinges intended for jewelry boxes that open to 95° would be best. Now prepare to attach the top moulding to the top. This moulding has the same small cove routed on its edge as the base moulding. Miter, glue and nail it in place just like the base moulding. Bottom plan
A 58 Popular Woodworking June 2003 |
|||||||||||||||||||||||||||||||||||||||||||||||||||||||||||||||||||||


