Popular Woodworking 2003-08 № 135, страница 32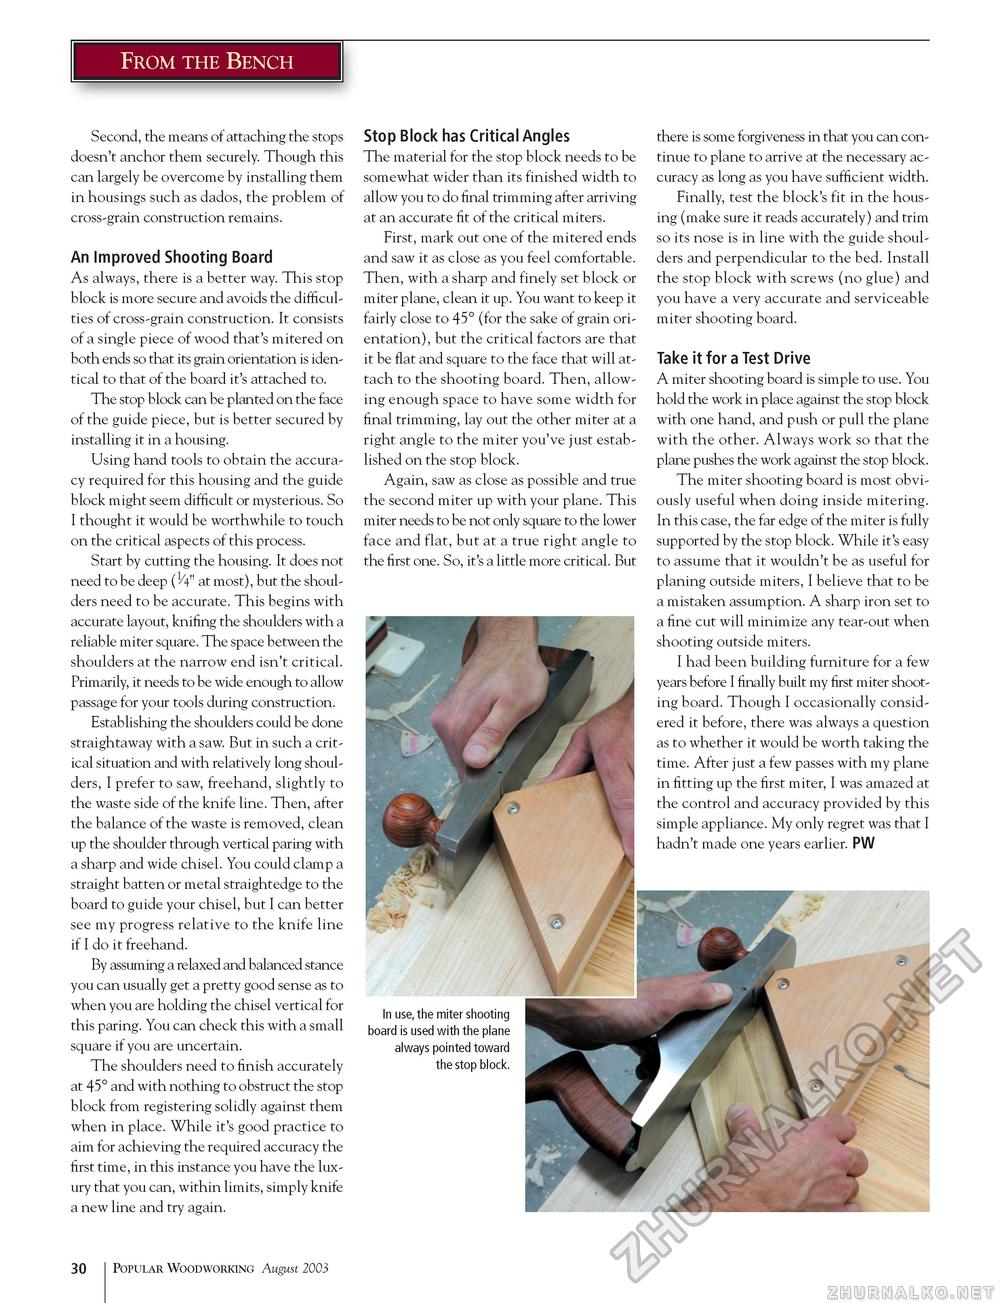
From the Bench Second, the means of attaching the stops doesn't anchor them securely. Though this can largely be overcome by installing them in housings such as dados, the problem of cross-grain construction remains. An Improved Shooting Board As always, there is a better way. This stop block is more secure and avoids the difficulties of cross-grain construction. It consists of a single piece of wood that's mitered on both ends so that its grain orientation is identical to that of the board it's attached to. The stop block can be planted on the face of the guide piece, but is better secured by installing it in a housing. Using hand tools to obtain the accuracy required for this housing and the guide block might seem difficult or mysterious. So I thought it would be worthwhile to touch on the critical aspects of this process. Start by cutting the housing. It does not need to be deep (H" at most), but the shoulders need to be accurate. This begins with accurate layout, knifing the shoulders with a reliable miter square. The space between the shoulders at the narrow end isn't critical. Primarily, it needs to be wide enough to allow passage for your tools during construction. Establishing the shoulders could be done straightaway with a saw. But in such a critical situation and with relatively long shoulders, I prefer to saw, freehand, slightly to the waste side of the knife line. Then, after the balance of the waste is removed, clean up the shoulder through vertical paring with a sharp and wide chisel. You could clamp a straight batten or metal straightedge to the board to guide your chisel, but I can better see my progress relative to the knife line if I do it freehand. By assuming a relaxed and balanced stance you can usually get a pretty good sense as to when you are holding the chisel vertical for this paring. You can check this with a small square if you are uncertain. The shoulders need to finish accurately at 45° and with nothing to obstruct the stop block from registering solidly against them when in place. While it's good practice to aim for achieving the required accuracy the first time, in this instance you have the luxury that you can, within limits, simply knife a new line and try again. Stop Block has Critical Angles The material for the stop block needs to be somewhat wider than its finished width to allow you to do final trimming after arriving at an accurate fit of the critical miters. First, mark out one of the mitered ends and saw it as close as you feel comfortable. Then, with a sharp and finely set block or miter plane, clean it up. You want to keep it fairly close to 45° (for the sake of grain orientation), but the critical factors are that it be flat and square to the face that will attach to the shooting board. Then, allowing enough space to have some width for final trimming, lay out the other miter at a right angle to the miter you've just established on the stop block. Again, saw as close as possible and true the second miter up with your plane. This miter needs to be not only square to the lower face and flat, but at a true right angle to the first one. So, it's a little more critical. But there is some forgiveness in that you can continue to plane to arrive at the necessary accuracy as long as you have sufficient width. Finally, test the block's fit in the housing (make sure it reads accurately) and trim so its nose is in line with the guide shoulders and perpendicular to the bed. Install the stop block with screws (no glue) and you have a very accurate and serviceable miter shooting board. Take it for a Test Drive A miter shooting board is simple to use. You hold the work in place against the stop block with one hand, and push or pull the plane with the other. Always work so that the plane pushes the work against the stop block. The miter shooting board is most obviously useful when doing inside mitering. In this case, the far edge of the miter is fully supported by the stop block. While it's easy to assume that it wouldn't be as useful for planing outside miters, I believe that to be a mistaken assumption. A sharp iron set to a fine cut will minimize any tear-out when shooting outside miters. I had been building furniture for a few years before I finally built my first miter shooting board. Though I occasionally considered it before, there was always a question as to whether it would be worth taking the time. After just a few passes with my plane in fitting up the first miter, I was amazed at the control and accuracy provided by this simple appliance. My only regret was that I hadn't made one years earlier. PW In use, the miter shooting board is used with the plane always pointed toward the stop block. 30 Popular Woodworking August 2003 |


