Popular Woodworking 2003-10 № 136, страница 39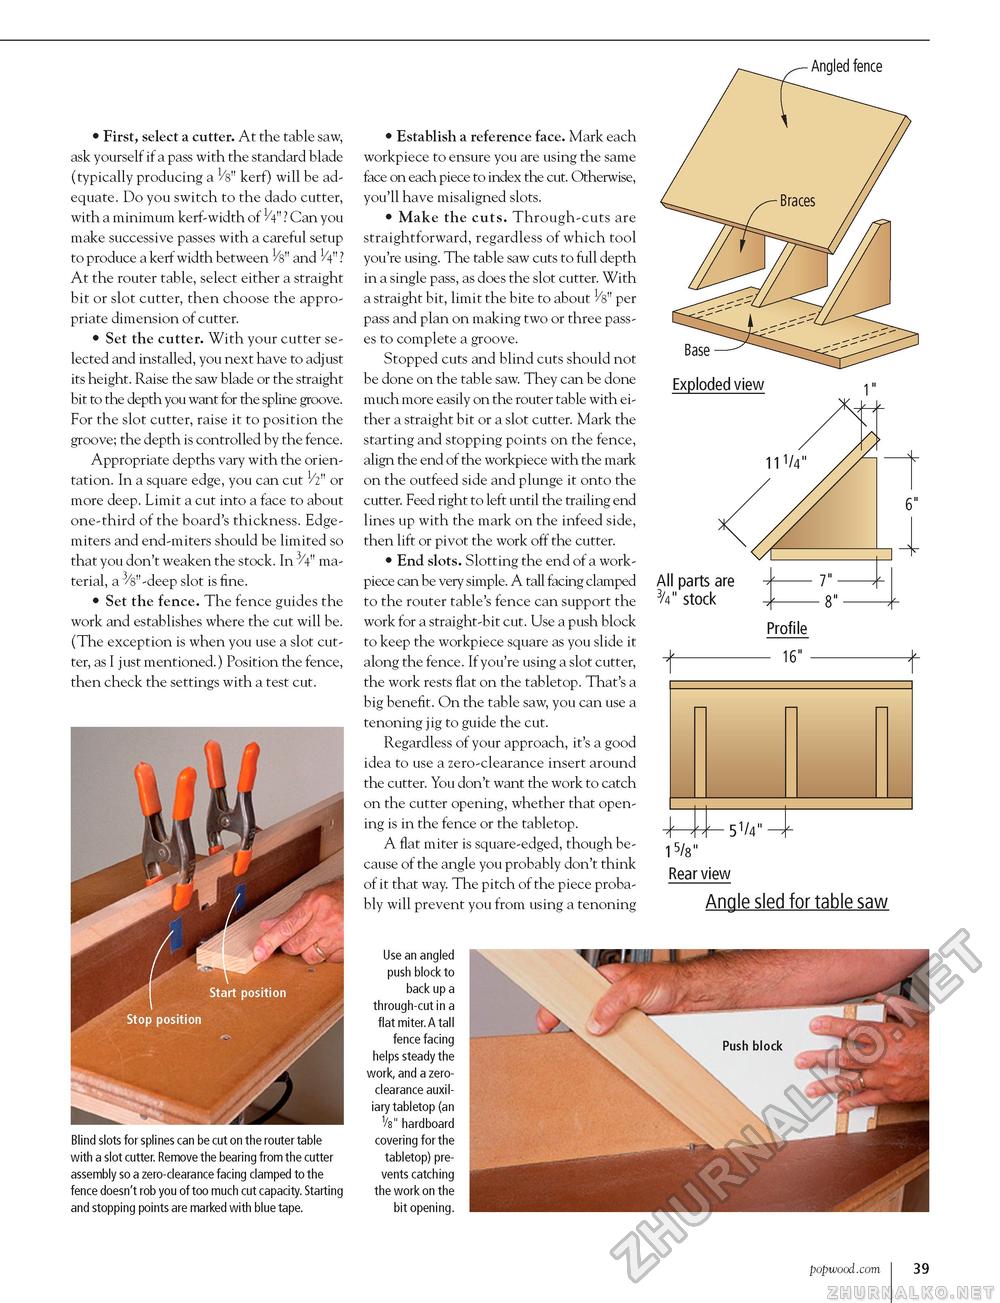
• First, select a cutter. At the table saw, ask yourself if a pass with the standard blade (typically producing a V8" kerf) will be adequate. Do you switch to the dado cutter, with a minimum kerf-width of 1/4"? Can you make successive passes with a careful setup to produce a kerf width between V&" and H"? At the router table, select either a straight bit or slot cutter, then choose the appropriate dimension of cutter. • Set the cutter. With your cutter selected and installed, you next have to adjust its height. Raise the saw blade or the straight bit to the depth you want for the spline groove. For the slot cutter, raise it to position the groove; the depth is controlled by the fence. Appropriate depths vary with the orientation. In a square edge, you can cut 1/2" or more deep. Limit a cut into a face to about one-third of the board's thickness. Edge-miters and end-miters should be limited so that you don't weaken the stock. In 3/4" material, a 3/8"-deep slot is fine. • Set the fence. The fence guides the work and establishes where the cut will be. (The exception is when you use a slot cutter, as I just mentioned.) Position the fence, then check the settings with a test cut. Blind slots for splines can be cut on the router table with a slot cutter. Remove the bearing from the cutter assembly so a zero-clearance facing clamped to the fence doesn't rob you of too much cut capacity. Starting and stopping points are marked with blue tape. • Establish a reference face. Mark each workpiece to ensure you are using the same face on each piece to index the cut. Otherwise, you'll have misaligned slots. • Make the cuts. Through-cuts are straightforward, regardless of which tool you're using. The table saw cuts to full depth in a single pass, as does the slot cutter. With a straight bit, limit the bite to about 1/8" per pass and plan on making two or three passes to complete a groove. Stopped cuts and blind cuts should not be done on the table saw. They can be done much more easily on the router table with either a straight bit or a slot cutter. Mark the starting and stopping points on the fence, align the end of the workpiece with the mark on the outfeed side and plunge it onto the cutter. Feed right to left until the trailing end lines up with the mark on the infeed side, then lift or pivot the work off the cutter. • End slots. Slotting the end of a work-piece can be very simple. A tall facing clamped to the router table's fence can support the work for a straight-bit cut. Use a push block to keep the workpiece square as you slide it along the fence. If you're using a slot cutter, the work rests flat on the tabletop. That's a big benefit. On the table saw, you can use a tenoning jig to guide the cut. Regardless of your approach, it's a good idea to use a zero-clearance insert around the cutter. You don't want the work to catch on the cutter opening, whether that opening is in the fence or the tabletop. A flat miter is square-edged, though because of the angle you probably don't think of it that way. The pitch of the piece probably will prevent you from using a tenoning All parts are -7" V stock -jf-8" Profile "f- 16"-f 15/8" Rear view Angle sled for table saw Use an angled push block to back up a through-cut in a flat miter.A tall fence facing helps steady the work, and a zero-clearance auxiliary tabletop (an 1/8" hardboard covering for the tabletop) prevents catching the work on the bit opening. popwood.com 39 |
||||||||||||||||||||||||||||


