Popular Woodworking 2003-10 № 136, страница 40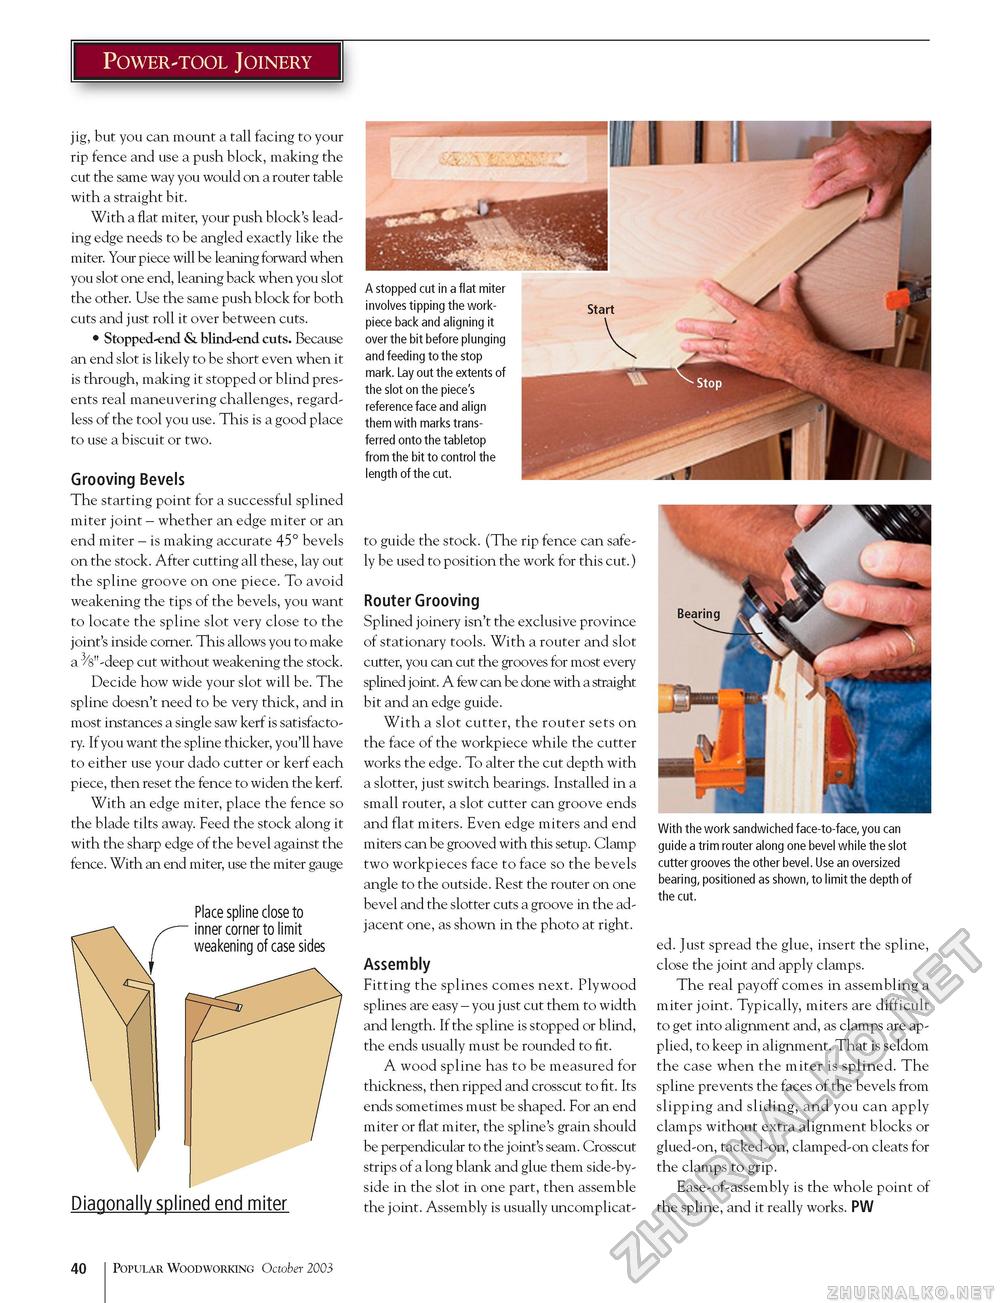
Power-tool Joinery jig, but you can mount a tall facing to your rip fence and use a push block, making the cut the same way you would on a router table with a straight bit. With a flat miter, your push block's leading edge needs to be angled exactly like the miter. Your piece will be leaning forward when you slot one end, leaning back when you slot the other. Use the same push block for both cuts and just roll it over between cuts. • Stopped-end & blind-end cuts. Because an end slot is likely to be short even when it is through, making it stopped or blind presents real maneuvering challenges, regardless of the tool you use. This is a good place to use a biscuit or two. Grooving Bevels The starting point for a successful splined miter joint - whether an edge miter or an end miter - is making accurate 45° bevels on the stock. After cutting all these, lay out the spline groove on one piece. To avoid weakening the tips of the bevels, you want to locate the spline slot very close to the joint's inside corner. This allows you to make a 3/8"-deep cut without weakening the stock. Decide how wide your slot will be. The spline doesn't need to be very thick, and in most instances a single saw kerf is satisfactory. If you want the spline thicker, you'll have to either use your dado cutter or kerf each piece, then reset the fence to widen the kerf. With an edge miter, place the fence so the blade tilts away. Feed the stock along it with the sharp edge of the bevel against the fence. With an end miter, use the miter gauge Place spline close to A stopped cut in a flat miter involves tipping the work-piece back and aligning it over the bit before plunging and feeding to the stop mark. Lay out the extents of the slot on the piece's reference face and align them with marks transferred onto the tabletop from the bit to control the length of the cut. With the work sandwiched face-to-face, you can guide a trim router along one bevel while the slot cutter grooves the other bevel. Use an oversized bearing, positioned as shown, to limit the depth of the cut. to guide the stock. (The rip fence can safely be used to position the work for this cut.) Router Grooving Splined joinery isn't the exclusive province of stationary tools. With a router and slot cutter, you can cut the grooves for most every splined joint. A few can be done with a straight bit and an edge guide. With a slot cutter, the router sets on the face of the workpiece while the cutter works the edge. To alter the cut depth with a slotter, just switch bearings. Installed in a small router, a slot cutter can groove ends and flat miters. Even edge miters and end miters can be grooved with this setup. Clamp two workpieces face to face so the bevels angle to the outside. Rest the router on one bevel and the slotter cuts a groove in the adjacent one, as shown in the photo at right. Assembly Fitting the splines comes next. Plywood splines are easy - you just cut them to width and length. If the spline is stopped or blind, the ends usually must be rounded to fit. A wood spline has to be measured for thickness, then ripped and crosscut to fit. Its ends sometimes must be shaped. For an end miter or flat miter, the spline's grain should be perpendicular to the joint's seam. Crosscut strips of a long blank and glue them side-by-side in the slot in one part, then assemble the joint. Assembly is usually uncomplicat ed. Just spread the glue, insert the spline, close the joint and apply clamps. The real payoff comes in assembling a miter joint. Typically, miters are difficult to get into alignment and, as clamps are applied, to keep in alignment. That is seldom the case when the miter is splined. The spline prevents the faces of the bevels from slipping and sliding, and you can apply clamps without extra alignment blocks or glued-on, tacked-on, clamped-on cleats for the clamps to grip. Ease-of-assembly is the whole point of the spline, and it really works. PW 40 Popular Woodworking October 2003 |


