Popular Woodworking 2003-12 № 138, страница 41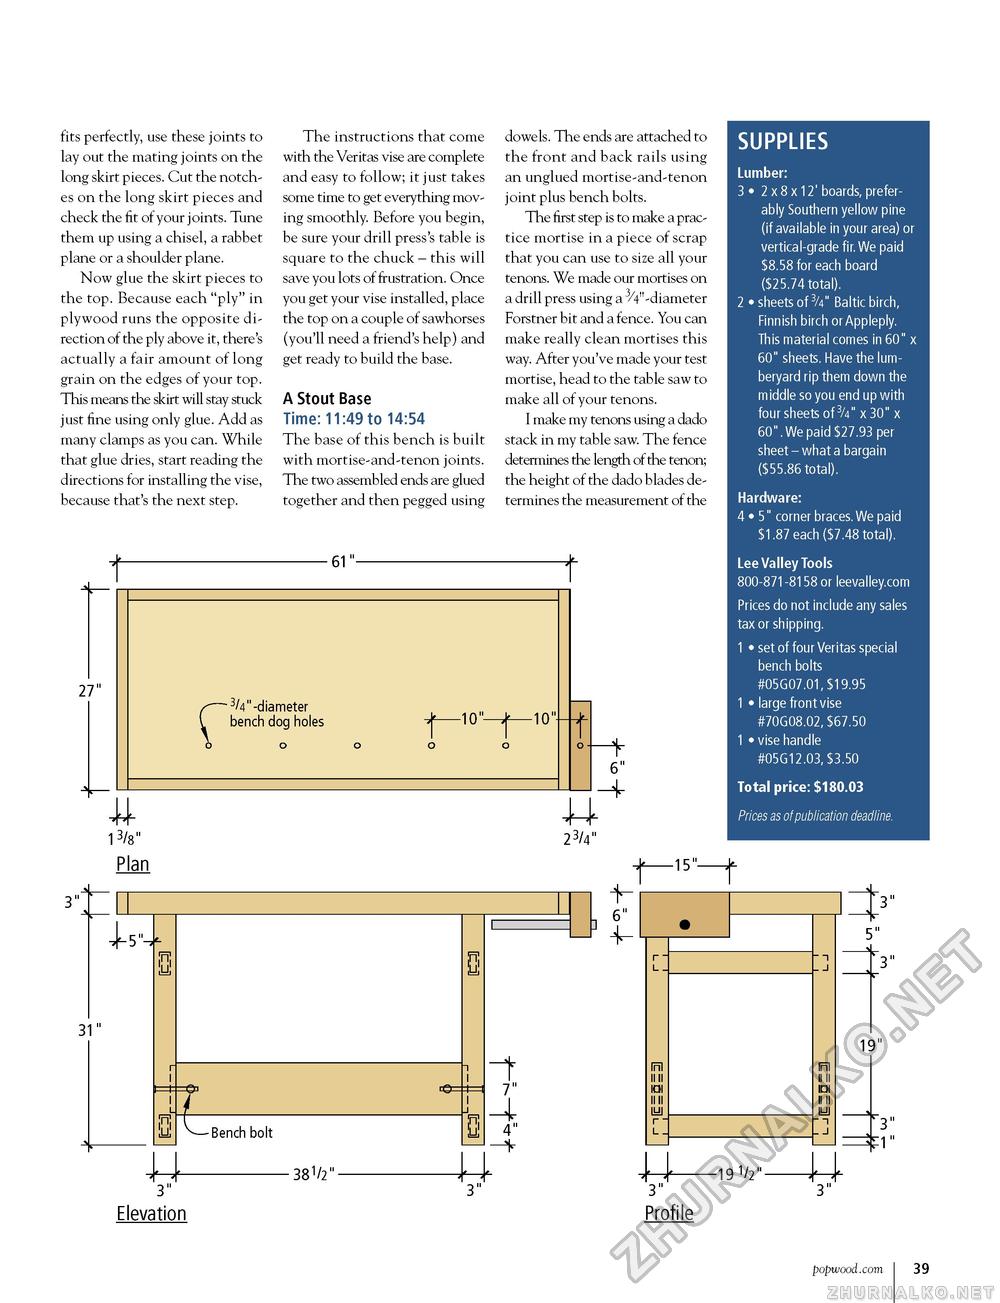
SUPPLIES Lumber: 3 • 2 x 8 x 12' boards, prefer ably Southern yellow pine (if available in your area) or vertical-grade fir. We paid $8.58 for each board ($25.74 total). 2 • sheets of 3/4" Baltic birch, Finnish birch or Appleply. This material comes in 60" x 60" sheets. Have the lumberyard rip them down the middle so you end up with four sheets of 3/4" x 30" x 60".We paid $27.93 per sheet- what a bargain ($55.86 total). Hardware: 4 • 5" corner braces. We paid $1.87 each ($7.48 total). Lee Valley Tools 800-871-8158 or leevalley.com Prices do not include any sales tax or shipping. 1 • set of four Veritas special bench bolts #05G07.01, $19.95 1 • large front vise #70G08.02, $67.50 1 • vise handle #05G12.03, $3.50 Total price: $180.03 Prices as of publication deadline. fits perfectly, use these joints to lay out the mating joints on the long skirt pieces. Cut the notches on the long skirt pieces and check the fit of your joints. Tune them up using a chisel, a rabbet plane or a shoulder plane. Now glue the skirt pieces to the top. Because each "ply" in plywood runs the opposite direction of the ply above it, there's actually a fair amount of long grain on the edges of your top. This means the skirt will stay stuck just fine using only glue. Add as many clamps as you can. While that glue dries, start reading the directions for installing the vise, because that's the next step. The instructions that come with the Veritas vise are complete and easy to follow; it just takes some time to get everything moving smoothly. Before you begin, be sure your drill press's table is square to the chuck - this will save you lots of frustration. Once you get your vise installed, place the top on a couple of sawhorses (you'll need a friend's help) and get ready to build the base. A Stout Base Time: 11:49 to 14:54 The base of this bench is built with mortise-and-tenon joints. The two assembled ends are glued together and then pegged using dowels. The ends are attached to the front and back rails using an unglued mortise-and-tenon joint plus bench bolts. The first step is to make a practice mortise in a piece of scrap that you can use to size all your tenons. We made our mortises on a drill press using a 3/4"-diameter Forstner bit and a fence. You can make really clean mortises this way. After you've made your test mortise, head to the table saw to make all of your tenons. I make my tenons using a dado stack in my table saw. The fence determines the length of the tenon; the height of the dado blades determines the measurement of the ■ 61"- 27" 4 13/8" Plan 3" 31" u 3" Elevation 3/4"-diameter bench dog holes -Bench bolt ■ 381/2" ^-10"-^- -10" 7" 4" u 3" w 23/4" 6" 6" -15"- u 3" Profile -19 1/2"- Iril IIII IDI IIII iy ■ 1 . j 3" 3" 5" 3" 19" u -3. ^1" popwood.com 39 |


