Popular Woodworking 2004-02 № 139, страница 41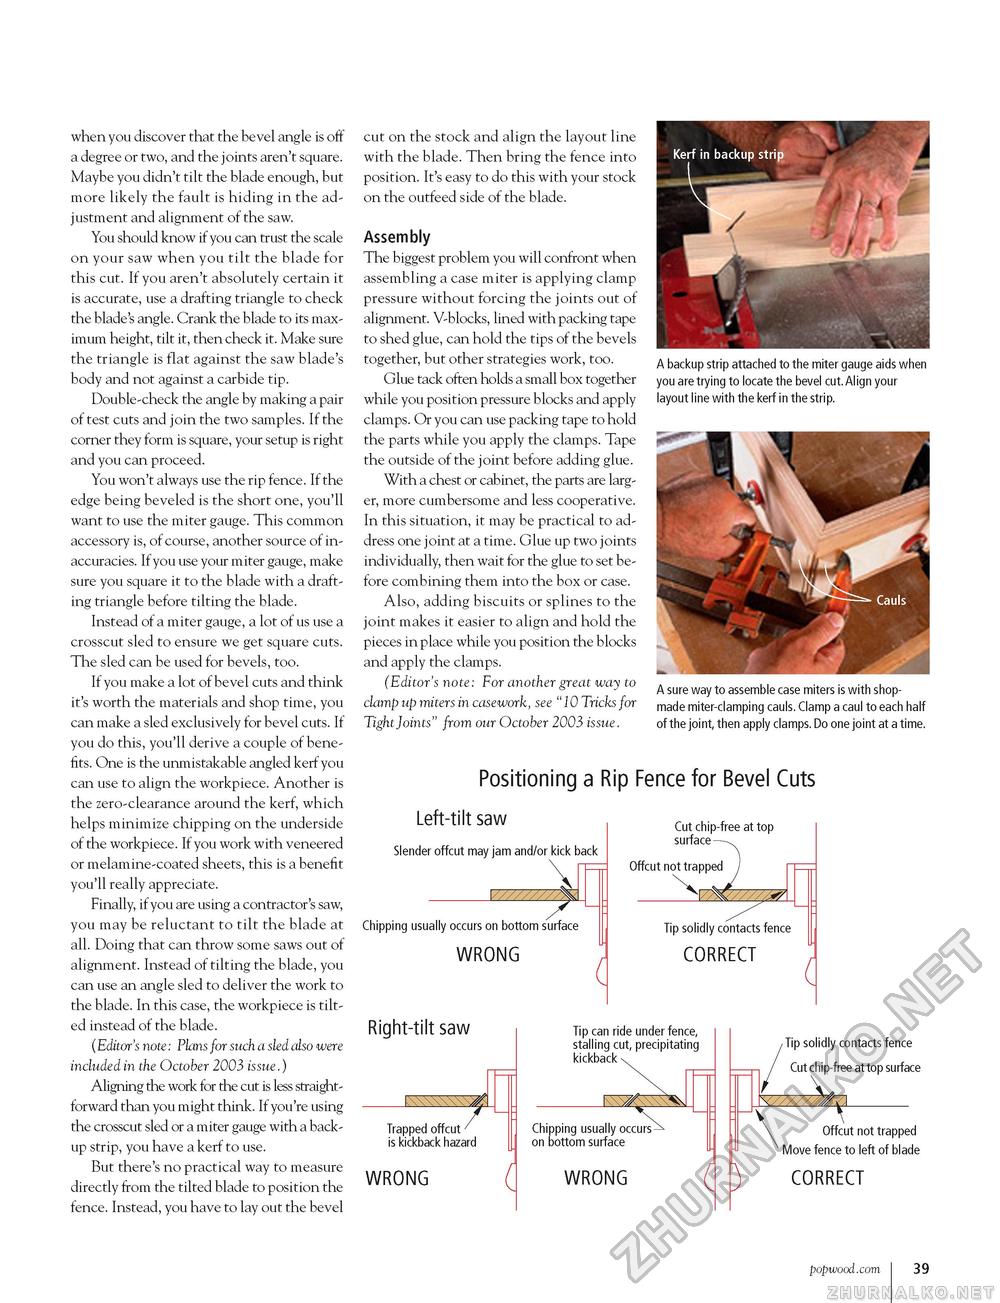
when you discover that the bevel angle is off a degree or two, and the joints aren't square. Maybe you didn't tilt the blade enough, but more likely the fault is hiding in the adjustment and alignment of the saw. You should know if you can trust the scale on your saw when you tilt the blade for this cut. If you aren't absolutely certain it is accurate, use a drafting triangle to check the blade's angle. Crank the blade to its maximum height, tilt it, then check it. Make sure the triangle is flat against the saw blade's body and not against a carbide tip. Double-check the angle by making a pair of test cuts and join the two samples. If the corner they form is square, your setup is right and you can proceed. You won't always use the rip fence. If the edge being beveled is the short one, you'll want to use the miter gauge. This common accessory is, of course, another source of inaccuracies. If you use your miter gauge, make sure you square it to the blade with a drafting triangle before tilting the blade. Instead of a miter gauge, a lot of us use a crosscut sled to ensure we get square cuts. The sled can be used for bevels, too. If you make a lot of bevel cuts and think it's worth the materials and shop time, you can make a sled exclusively for bevel cuts. If you do this, you'll derive a couple of benefits. One is the unmistakable angled kerf you can use to align the workpiece. Another is the zero-clearance around the kerf, which helps minimize chipping on the underside of the workpiece. If you work with veneered or melamine-coated sheets, this is a benefit you'll really appreciate. Finally, if you are using a contractor's saw, you may be reluctant to tilt the blade at all. Doing that can throw some saws out of alignment. Instead of tilting the blade, you can use an angle sled to deliver the work to the blade. In this case, the workpiece is tilted instead of the blade. (Editor's note: Plans for such a sled also were included in the October 2003 issue.) Aligning the work for the cut is less straightforward than you might think. If you're using the crosscut sled or a miter gauge with a backup strip, you have a kerf to use. But there's no practical way to measure directly from the tilted blade to position the fence. Instead, you have to lay out the bevel cut on the stock and align the layout line with the blade. Then bring the fence into position. It's easy to do this with your stock on the outfeed side of the blade. Assembly The biggest problem you will confront when assembling a case miter is applying clamp pressure without forcing the joints out of alignment. V-blocks, lined with packing tape to shed glue, can hold the tips of the bevels together, but other strategies work, too. Glue tack often holds a small box together while you position pressure blocks and apply clamps. Or you can use packing tape to hold the parts while you apply the clamps. Tape the outside of the joint before adding glue. With a chest or cabinet, the parts are larger, more cumbersome and less cooperative. In this situation, it may be practical to address one joint at a time. Glue up two joints individually, then wait for the glue to set before combining them into the box or case. Also, adding biscuits or splines to the joint makes it easier to align and hold the pieces in place while you position the blocks and apply the clamps. (Editor's note: For another great way to clamp up miters in casework, see "10 Tricks for Tight Joints" from our October 2003 issue. A backup strip attached to the miter gauge aids when you are trying to locate the bevel cut.Align your layout line with the kerf in the strip. A sure way to assemble case miters is with shop-made miter-clamping cauls. Clamp a caul to each half of the joint, then apply clamps. Do one joint at a time. Positioning a Rip Fence for Bevel Cuts Left-tilt saw Slender offcut may jam and/or kick back XI Chipping usually occurs on bottom surface WRONG Cut chip-free at top surface Offcut not trapped Tip solidly contacts fence CORRECT Right-tilt saw Tip can ride under fence, stalling cut, precipitating kickback Trapped offcut is kickback hazard Tip solidly contacts fence Cut chip-free at top surface X Chipping usually occurs on bottom surface Offcut not trapped Move fence to left of blade CORRECT popwood.com 39 |


