Popular Woodworking 2004-02 № 139, страница 67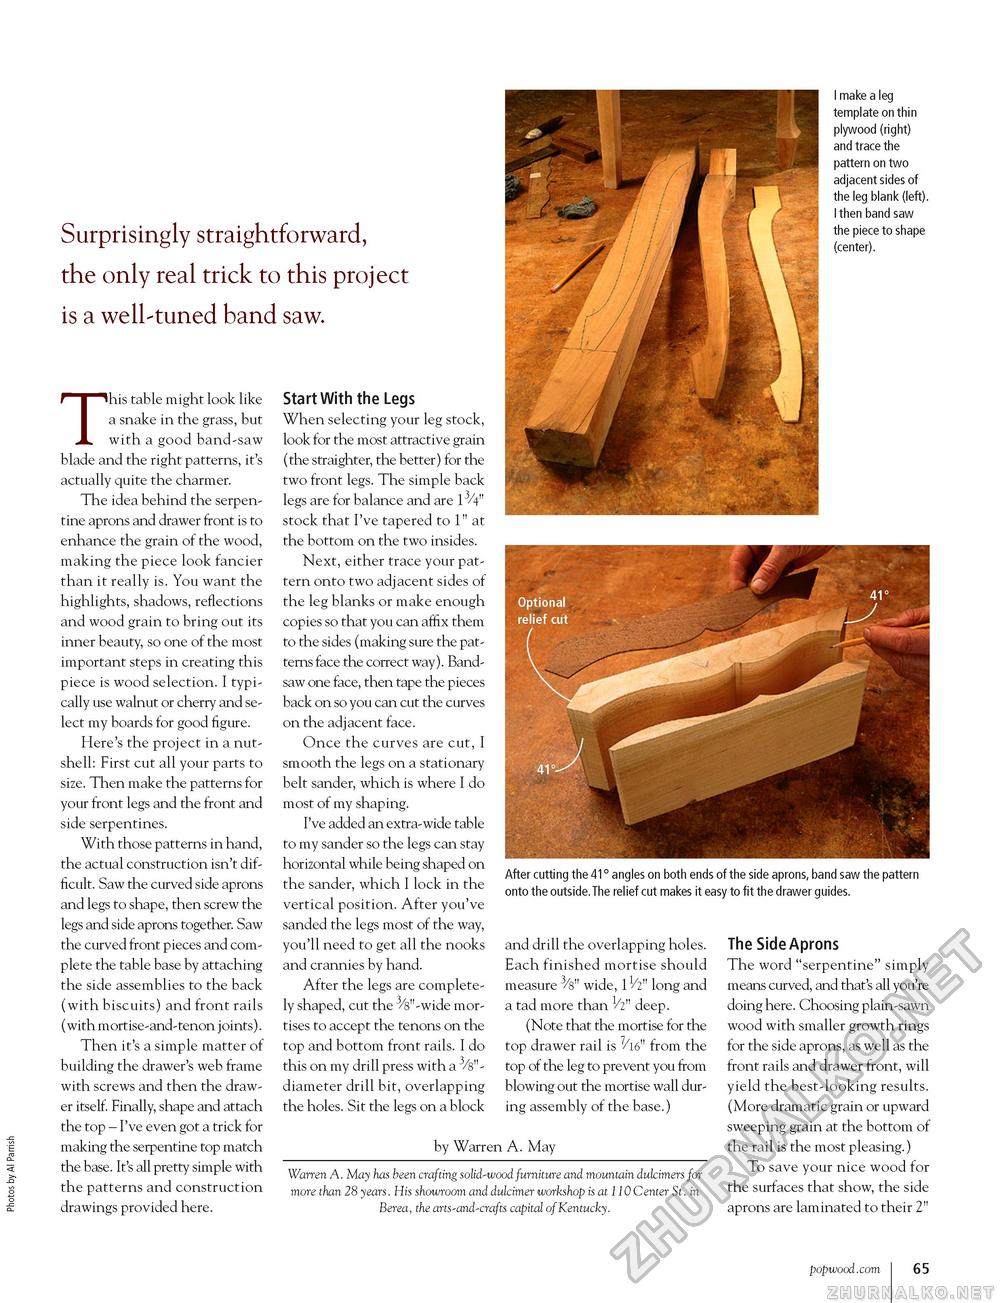
Surprisingly straightforward, the only real trick to this project is a well-tuned band saw. This table might look like a snake in the grass, but with a good band-saw blade and the right patterns, it's actually quite the charmer. The idea behind the serpentine aprons and drawer front is to enhance the grain of the wood, making the piece look fancier than it really is. You want the highlights, shadows, reflections and wood grain to bring out its inner beauty, so one of the most important steps in creating this piece is wood selection. I typically use walnut or cherry and select my boards for good figure. Here's the project in a nutshell: First cut all your parts to size. Then make the patterns for your front legs and the front and side serpentines. With those patterns in hand, the actual construction isn't difficult. Saw the curved side aprons and legs to shape, then screw the legs and side aprons together. Saw the curved front pieces and complete the table base by attaching the side assemblies to the back (with biscuits) and front rails (with mortise-and-tenon joints). Then it's a simple matter of building the drawer's web frame with screws and then the drawer itself. Finally, shape and attach the top - I've even got a trick for making the serpentine top match the base. It's all pretty simple with the patterns and construction drawings provided here. Start With the Legs When selecting your leg stock, look for the most attractive grain (the straighter, the better) for the two front legs. The simple back legs are for balance and are stock that I've tapered to 1" at the bottom on the two insides. Next, either trace your pattern onto two adjacent sides of the leg blanks or make enough copies so that you can affix them to the sides (making sure the patterns face the correct way). Band-saw one face, then tape the pieces back on so you can cut the curves on the adjacent face. Once the curves are cut, I smooth the legs on a stationary belt sander, which is where I do most of my shaping. I've added an extra-wide table to my sander so the legs can stay horizontal while being shaped on the sander, which I lock in the vertical position. After you've sanded the legs most of the way, you'll need to get all the nooks and crannies by hand. After the legs are completely shaped, cut the 3/8"-wide mortises to accept the tenons on the top and bottom front rails. I do this on my drill press with a 3/8"-diameter drill bit, overlapping the holes. Sit the legs on a block I make a leg template on thin plywood (right) and trace the pattern on two adjacent sides of the leg blank (left). I then band saw the piece to shape (center).
After cutting the 41° angles on both ends of the side aprons, band saw the pattern onto the outside.The relief cut makes it easy to fit the drawer guides. and drill the overlapping holes. Each finished mortise should measure /8" wide, long and a tad more than 1/2" deep. (Note that the mortise for the top drawer rail is from the top of the leg to prevent you from blowing out the mortise wall during assembly of the base.) by Warren A. May Warren A. May has been crafting solid-wood furniture and mountain dulcimers for more than 28 years. His showroom and dulcimer workshop is at 110 Center St. in Berea, the arts-and-crafts capital of Kentucky. The Side Aprons The word "serpentine" simply means curved, and that's all you're doing here. Choosing plain-sawn wood with smaller growth rings for the side aprons, as well as the front rails and drawer front, will yield the best-looking results. (More dramatic grain or upward sweeping grain at the bottom of the rail is the most pleasing.) To save your nice wood for the surfaces that show, the side aprons are laminated to their 2" popwood.com 65 |


