Popular Woodworking 2004-02 № 139, страница 80
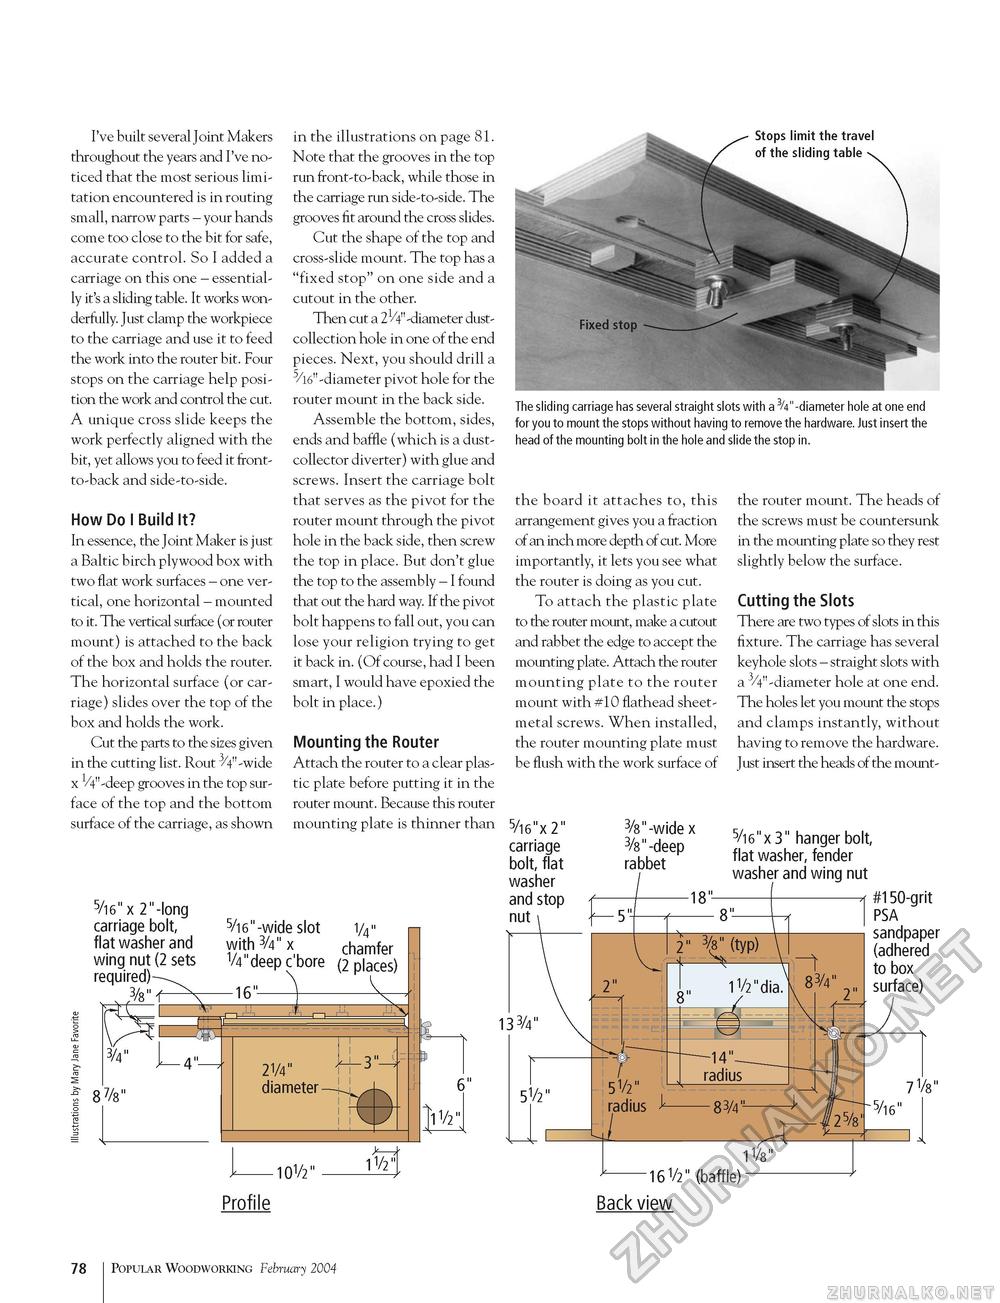
I've built several Joint Makers throughout the years and I've noticed that the most serious limitation encountered is in routing small, narrow parts - your hands come too close to the bit for safe, accurate control. So I added a carriage on this one - essentially it's a sliding table. It works wonderfully. Just clamp the workpiece to the carriage and use it to feed the work into the router bit. Four stops on the carriage help position the work and control the cut. A unique cross slide keeps the work perfectly aligned with the bit, yet allows you to feed it front-to-back and side-to-side. How Do I Build It? In essence, the Joint Maker is just a Baltic birch plywood box with two flat work surfaces - one vertical, one horizontal - mounted to it. The vertical surface (or router mount) is attached to the back of the box and holds the router. The horizontal surface (or carriage) slides over the top of the box and holds the work. Cut the parts to the sizes given in the cutting list. Rout 3/4"-wide x VV'-deep grooves in the top surface of the top and the bottom surface of the carriage, as shown in the illustrations on page 81. Note that the grooves in the top run front-to-back, while those in the carriage run side-to-side. The grooves fit around the cross slides. Cut the shape of the top and cross-slide mount. The top has a "fixed stop" on one side and a cutout in the other. Then cut a 21/4" -diameter dust-collection hole in one of the end pieces. Next, you should drill a 5/l6"-diameter pivot hole for the router mount in the back side. Assemble the bottom, sides, ends and baffle (which is a dust-collector diverter) with glue and screws. Insert the carriage bolt that serves as the pivot for the router mount through the pivot hole in the back side, then screw the top in place. But don't glue the top to the assembly - I found that out the hard way. If the pivot bolt happens to fall out, you can lose your religion trying to get it back in. (Of course, had I been smart, I would have epoxied the bolt in place.) Mounting the Router Attach the router to a clear plastic plate before putting it in the router mount. Because this router mounting plate is thinner than 5/i6" x 2"-long carriage bolt, flat washer and wing nut (2 sets required) 3/8" f 3/4" 8 %" 5/i6"-wide slot i/4" with , 3/4" x chamfer V4 deep c bore (2 places) The sliding carriage has several straight slots with a 3/4"-diameter hole at one end for you to mount the stops without having to remove the hardware. Just insert the head of the mounting bolt in the hole and slide the stop in. the board it attaches to, this arrangement gives you a fraction of an inch more depth of cut. More importantly, it lets you see what the router is doing as you cut. To attach the plastic plate to the router mount, make a cutout and rabbet the edge to accept the mounting plate. Attach the router mounting plate to the router mount with #10 flathead sheet-metal screws. When installed, the router mounting plate must be flush with the work surface of the router mount. The heads of the screws must be countersunk in the mounting plate so they rest slightly below the surface. Cutting the Slots There are two types of slots in this fixture. The carriage has several keyhole slots - straight slots with a 3/4"-diameter hole at one end. The holes let you mount the stops and clamps instantly, without having to remove the hardware. Just insert the heads of the mount- 5/i6"x 2" 3/8"-widex 5/ ,, _„, , .. carriage ^.-^p ^^eh^e^ bolt, flat washer and stop nut rabbet flat washer, fender washer and wing nut #150-grit PSA sandpaper (adhered to box surface) 10V2" 13 3/4" 7V8" -I6V2" (baffle) Profile Back view 78 Popular Woodworking February 2004 |


