Popular Woodworking 2004-06 № 141, страница 20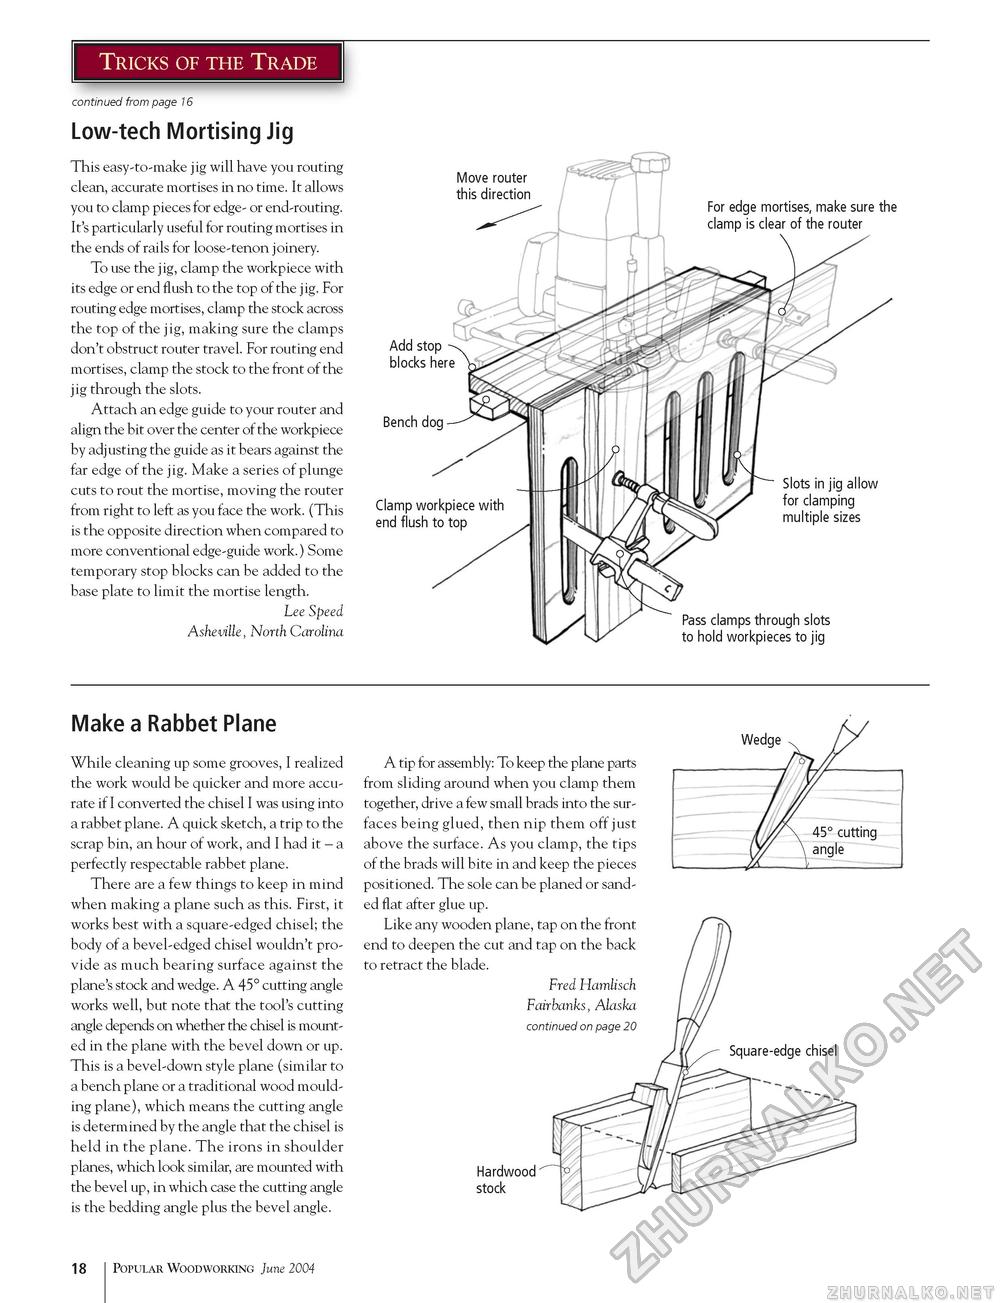
Tricks of the Trade continued from page 16 Low-tech Mortising Jig This easy-to-make jig will have you routing clean, accurate mortises in no time. It allows you to clamp pieces for edge- or end-routing. It's particularly useful for routing mortises in the ends of rails for loose-tenon joinery. To use the jig, clamp the workpiece with its edge or end flush to the top of the jig. For routing edge mortises, clamp the stock across the top of the jig, making sure the clamps don't obstruct router travel. For routing end mortises, clamp the stock to the front of the jig through the slots. Attach an edge guide to your router and align the bit over the center of the workpiece by adjusting the guide as it bears against the far edge of the jig. Make a series of plunge cuts to rout the mortise, moving the router from right to left as you face the work. (This is the opposite direction when compared to more conventional edge-guide work.) Some temporary stop blocks can be added to the base plate to limit the mortise length. Lee Speed Asheville, North Carolina Make a Rabbet Plane While cleaning up some grooves, I realized the work would be quicker and more accurate if I converted the chisel I was using into a rabbet plane. A quick sketch, a trip to the scrap bin, an hour of work, and I had it - a perfectly respectable rabbet plane. There are a few things to keep in mind when making a plane such as this. First, it works best with a square-edged chisel; the body of a bevel-edged chisel wouldn't provide as much bearing surface against the plane's stock and wedge. A 45° cutting angle works well, but note that the tool's cutting angle depends on whether the chisel is mounted in the plane with the bevel down or up. This is a bevel-down style plane (similar to a bench plane or a traditional wood moulding plane), which means the cutting angle is determined by the angle that the chisel is held in the plane. The irons in shoulder planes, which look similar, are mounted with the bevel up, in which case the cutting angle is the bedding angle plus the bevel angle. A tip for assembly: To keep the plane parts from sliding around when you clamp them together, drive a few small brads into the surfaces being glued, then nip them off just above the surface. As you clamp, the tips of the brads will bite in and keep the pieces positioned. The sole can be planed or sanded flat after glue up. Like any wooden plane, tap on the front end to deepen the cut and tap on the back to retract the blade. Fred Hamlisch Fairbanks, Alaska Square-edge chisel continued on page 20 Hardwood stock 18 Popular Woodworking June 2004 |


