Popular Woodworking 2004-06 № 141, страница 32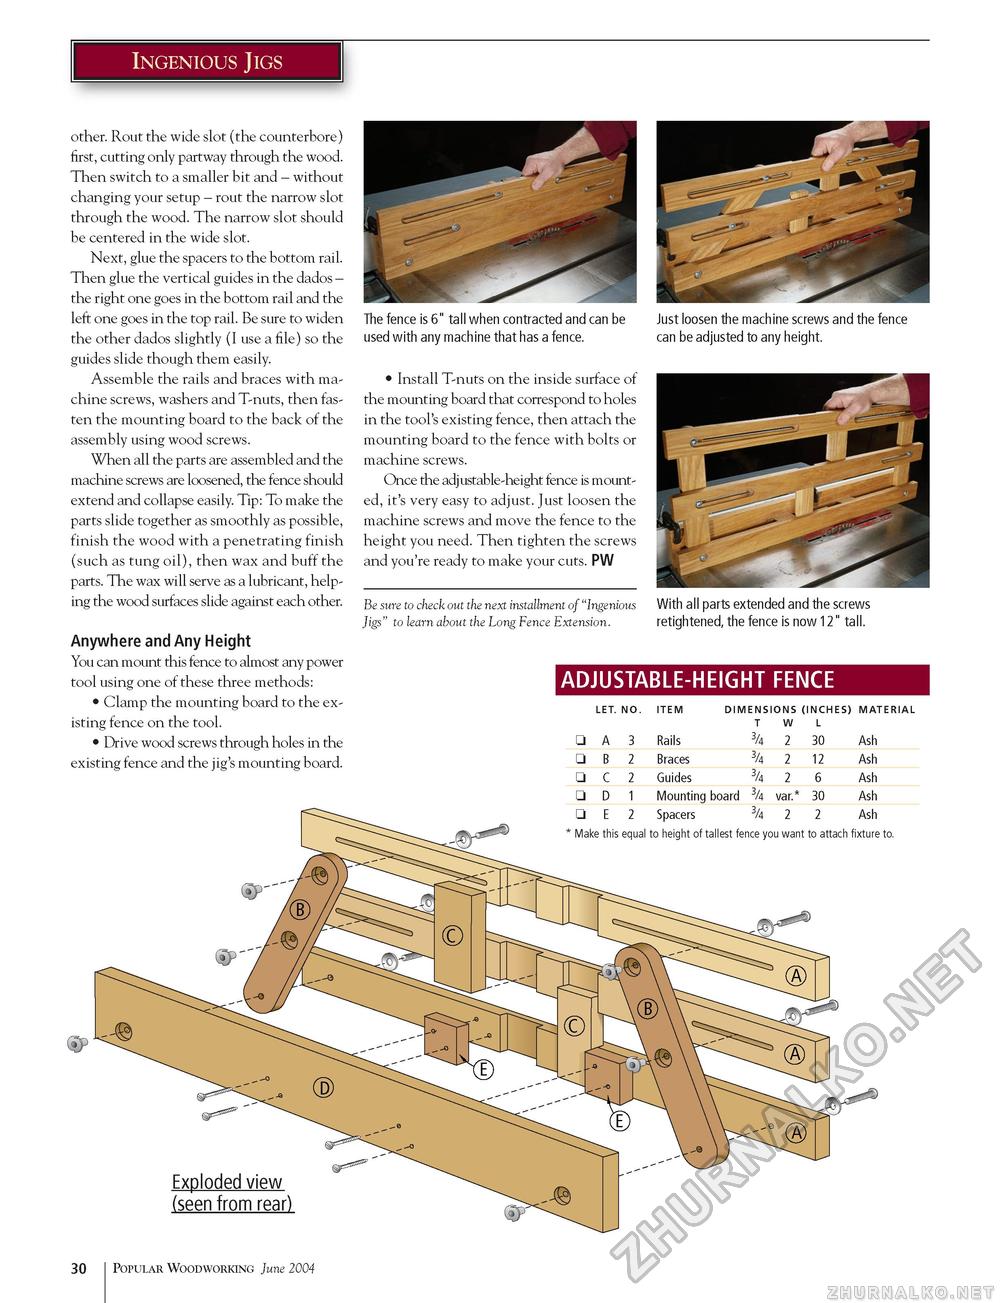
Ingenious Jigs other. Rout the wide slot (the counterbore) first, cutting only partway through the wood. Then switch to a smaller bit and - without changing your setup - rout the narrow slot through the wood. The narrow slot should be centered in the wide slot. Next, glue the spacers to the bottom rail. Then glue the vertical guides in the dados -the right one goes in the bottom rail and the left one goes in the top rail. Be sure to widen the other dados slightly (I use a file) so the guides slide though them easily. Assemble the rails and braces with machine screws, washers and T-nuts, then fasten the mounting board to the back of the assembly using wood screws. When all the parts are assembled and the machine screws are loosened, the fence should extend and collapse easily. Tip: To make the parts slide together as smoothly as possible, finish the wood with a penetrating finish (such as tung oil), then wax and buff the parts. The wax will serve as a lubricant, helping the wood surfaces slide against each other. Anywhere and Any Height You can mount this fence to almost any power tool using one of these three methods: • Clamp the mounting board to the existing fence on the tool. • Drive wood screws through holes in the existing fence and the jig's mounting board. Install T-nuts on the inside surface of the mounting board that correspond to holes in the tool's existing fence, then attach the mounting board to the fence with bolts or machine screws. Once the adjustable-height fence is mounted, it's very easy to adjust. Just loosen the machine screws and move the fence to the height you need. Then tighten the screws and you're ready to make your cuts. PW Be sure to check out the next installment of "Ingenious Jigs" to learn about the Long Fence Extension. With all parts extended and the screws retightened, the fence is now 12" tall. ADJUSTABLE-HEIGHT FENCE LET. NO. ITEM DIMENSIONS (INCHES) MATERIAL W L □ A □ B □ C 2 □ D □ E Rails 3/4 2 30 Braces 3/4 2 12 Guides 3/4 2 6 Mounting board 3/4 var.* 30 Spacers 3/4 2 2 Ash Ash Ash Ash Ash Make this equal to height of tallest fence you want to attach fixture to. Exploded view (seen from rear) 30 Popular Woodworking June 2004 |


