Popular Woodworking 2004-06 № 141, страница 71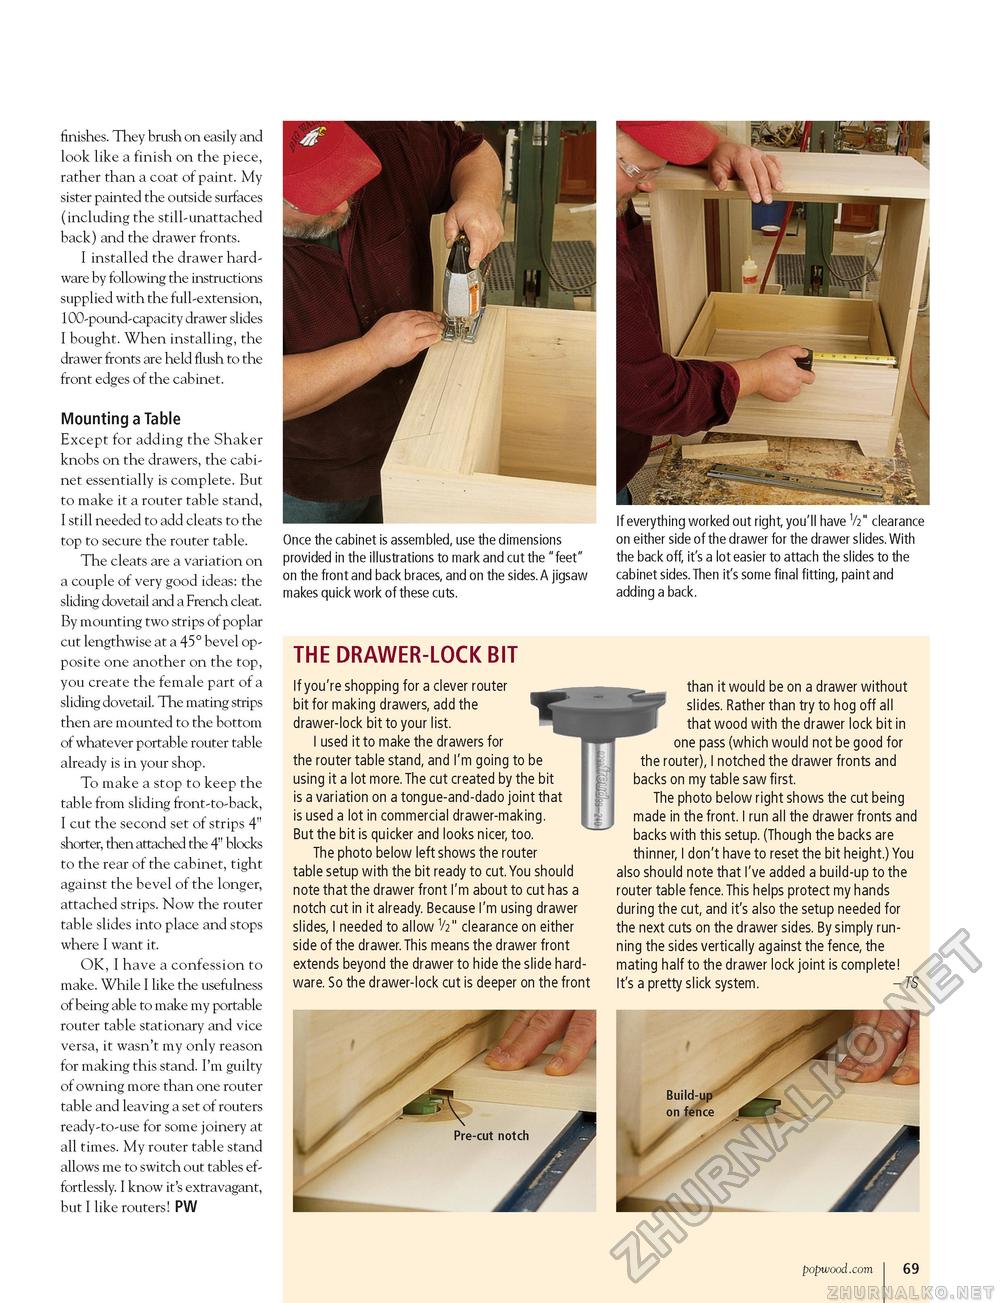
finishes. They brush on easily and look like a finish on the piece, rather than a coat of paint. My sister painted the outside surfaces (including the still-unattached back) and the drawer fronts. I installed the drawer hardware by following the instructions supplied with the full-extension, 100-pound-capacity drawer slides I bought. When installing, the drawer fronts are held flush to the front edges of the cabinet. Mounting a Table Except for adding the Shaker knobs on the drawers, the cabinet essentially is complete. But to make it a router table stand, I still needed to add cleats to the top to secure the router table. The cleats are a variation on a couple of very good ideas: the sliding dovetail and a French cleat. By mounting two strips of poplar cut lengthwise at a 45° bevel opposite one another on the top, you create the female part of a sliding dovetail. The mating strips then are mounted to the bottom of whatever portable router table already is in your shop. To make a stop to keep the table from sliding front-to-back, I cut the second set of strips 4" shorter, then attached the 4" blocks to the rear of the cabinet, tight against the bevel of the longer, attached strips. Now the router table slides into place and stops where I want it. OK, I have a confession to make. While I like the usefulness of being able to make my portable router table stationary and vice versa, it wasn't my only reason for making this stand. I'm guilty of owning more than one router table and leaving a set of routers ready-to-use for some joinery at all times. My router table stand allows me to switch out tables effortlessly. I know it's extravagant, but I like routers! PW Once the cabinet is assembled, use the dimensions provided in the illustrations to mark and cut the "feet" on the front and back braces, and on the sides. A jigsaw makes quick work of these cuts. If everything worked out right, you'll have V2" clearance on either side of the drawer for the drawer slides. With the back off, it's a lot easier to attach the slides to the cabinet sides. Then it's some final fitting, paint and adding a back. THE DRAWER-LOCK BIT If you're shopping for a clever router bit for making drawers, add the drawer-lock bit to your list. I used it to make the drawers for the router table stand, and I'm going to be using it a lot more. The cut created by the bit is a variation on a tongue-and-dado joint that is used a lot in commercial drawer-making. But the bit is quicker and looks nicer, too. The photo below left shows the router table setup with the bit ready to cut. You should note that the drawer front I'm about to cut has a notch cut in it already. Because I'm using drawer slides, I needed to allow V2" clearance on either side of the drawer. This means the drawer front extends beyond the drawer to hide the slide hardware. So the drawer-lock cut is deeper on the front than it would be on a drawer without slides. Rather than try to hog off all that wood with the drawer lock bit in one pass (which would not be good for the router), I notched the drawer fronts and backs on my table saw first. The photo below right shows the cut being made in the front. I run all the drawer fronts and backs with this setup. (Though the backs are thinner, I don't have to reset the bit height.) You also should note that I've added a build-up to the router table fence. This helps protect my hands during the cut, and it's also the setup needed for the next cuts on the drawer sides. By simply running the sides vertically against the fence, the mating half to the drawer lock joint is complete! It's a pretty slick system. - TS popwood.com 69 |


