Popular Woodworking 2004-06 № 141, страница 77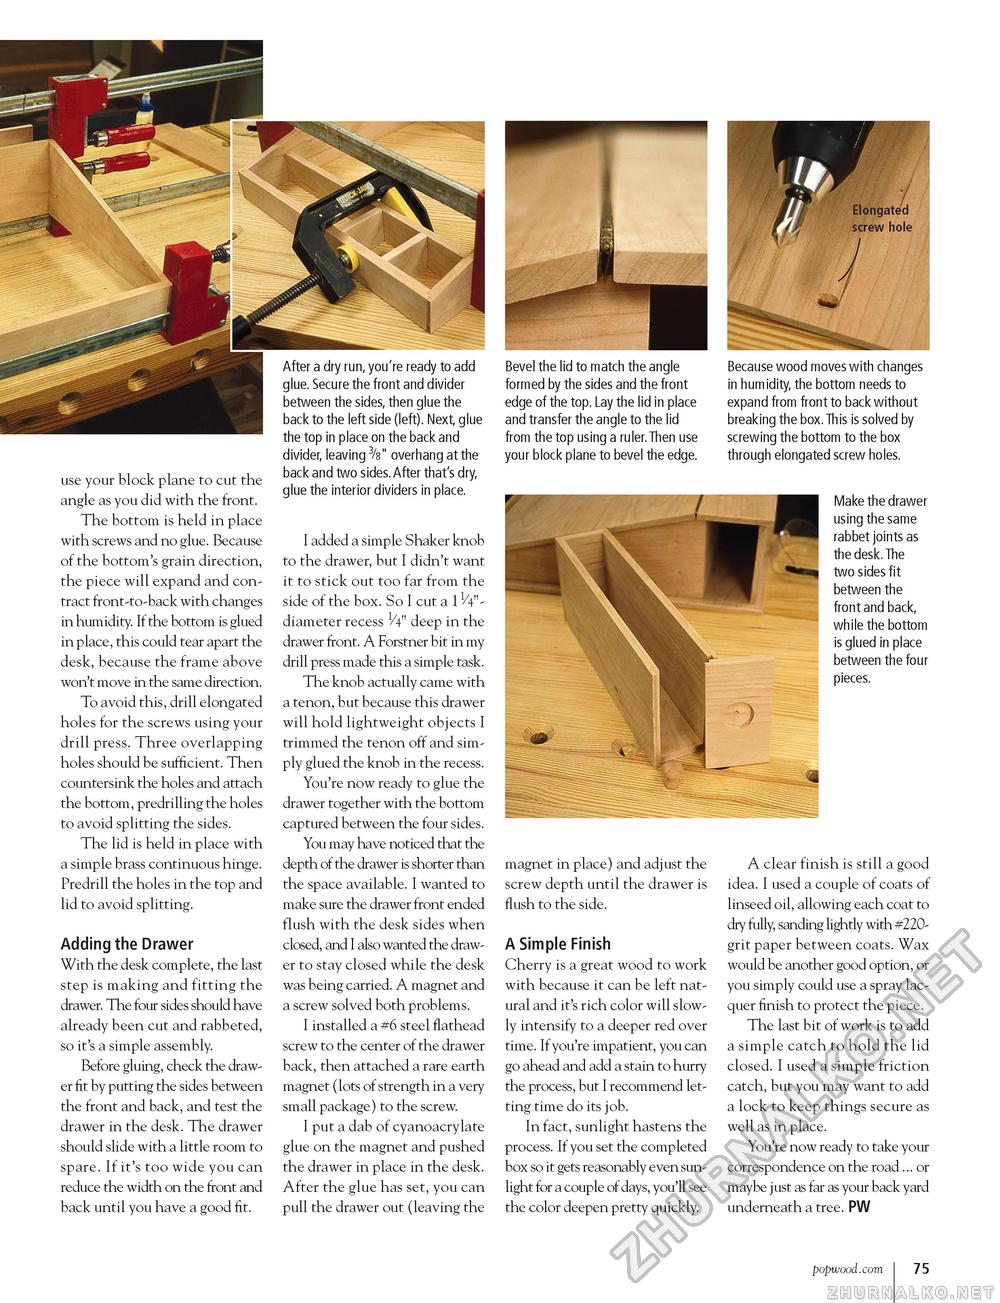
use your block plane to cut the angle as you did with the front. The bottom is held in place with screws and no glue. Because of the bottom's grain direction, the piece will expand and contract front-to-back with changes in humidity. If the bottom is glued in place, this could tear apart the desk, because the frame above won't move in the same direction. To avoid this, drill elongated holes for the screws using your drill press. Three overlapping holes should be sufficient. Then countersink the holes and attach the bottom, predrilling the holes to avoid splitting the sides. The lid is held in place with a simple brass continuous hinge. Predrill the holes in the top and lid to avoid splitting. Adding the Drawer With the desk complete, the last step is making and fitting the drawer. The four sides should have already been cut and rabbeted, so it's a simple assembly. Before gluing, check the drawer fit by putting the sides between the front and back, and test the drawer in the desk. The drawer should slide with a little room to spare. If it's too wide you can reduce the width on the front and back until you have a good fit. Elongated screw hole After a dry run, you're ready to add glue. Secure the front and divider between the sides, then glue the back to the left side (left). NeXt, glue the top in place on the back and divider, leaving 3/V' overhang at the back and two sides.After that's dry, glue the interior dividers in place. I added a simple Shaker knob to the drawer, but I didn't want it to stick out too far from the side of the box. So I cut a 11/4"-diameter recess V4" deep in the drawer front. A Forstner bit in my drill press made this a simple task. The knob actually came with a tenon, but because this drawer will hold lightweight objects I trimmed the tenon off and simply glued the knob in the recess. You're now ready to glue the drawer together with the bottom captured between the four sides. You may have noticed that the depth of the drawer is shorter than the space available. I wanted to make sure the drawer front ended flush with the desk sides when closed, and I also wanted the drawer to stay closed while the desk was being carried. A magnet and a screw solved both problems. I installed a #6 steel flathead screw to the center of the drawer back, then attached a rare earth magnet (lots of strength in a very small package) to the screw. I put a dab of cyanoacrylate glue on the magnet and pushed the drawer in place in the desk. After the glue has set, you can pull the drawer out (leaving the Bevel the lid to match the angle formed by the sides and the front edge of the top. Lay the lid in place and transfer the angle to the lid from the top using a ruler.Then use your block plane to bevel the edge. Because wood moves with changes in humidity, the bottom needs to eXpand from front to back without breaking the boX.This is solved by screwing the bottom to the boX through elongated screw holes. Make the drawer using the same rabbet joints as the desk. The two sides fit between the front and back, while the bottom is glued in place between the four pieces. magnet in place) and adjust the screw depth until the drawer is flush to the side. A Simple Finish Cherry is a great wood to work with because it can be left natural and it's rich color will slowly intensify to a deeper red over time. If you're impatient, you can go ahead and add a stain to hurry the process, but I recommend letting time do its job. In fact, sunlight hastens the process. If you set the completed box so it gets reasonably even sunlight for a couple of days, you'll see the color deepen pretty quickly. A clear finish is still a good idea. I used a couple of coats of linseed oil, allowing each coat to dry fully, sanding lightly with #220-grit paper between coats. Wax would be another good option, or you simply could use a spray lacquer finish to protect the piece. The last bit of work is to add a simple catch to hold the lid closed. I used a simple friction catch, but you may want to add a lock to keep things secure as well as in place. You're now ready to take your correspondence on the road ... or maybe just as far as your back yard underneath a tree. PW popwood.com 75 |


