Popular Woodworking 2004-06 № 141, страница 83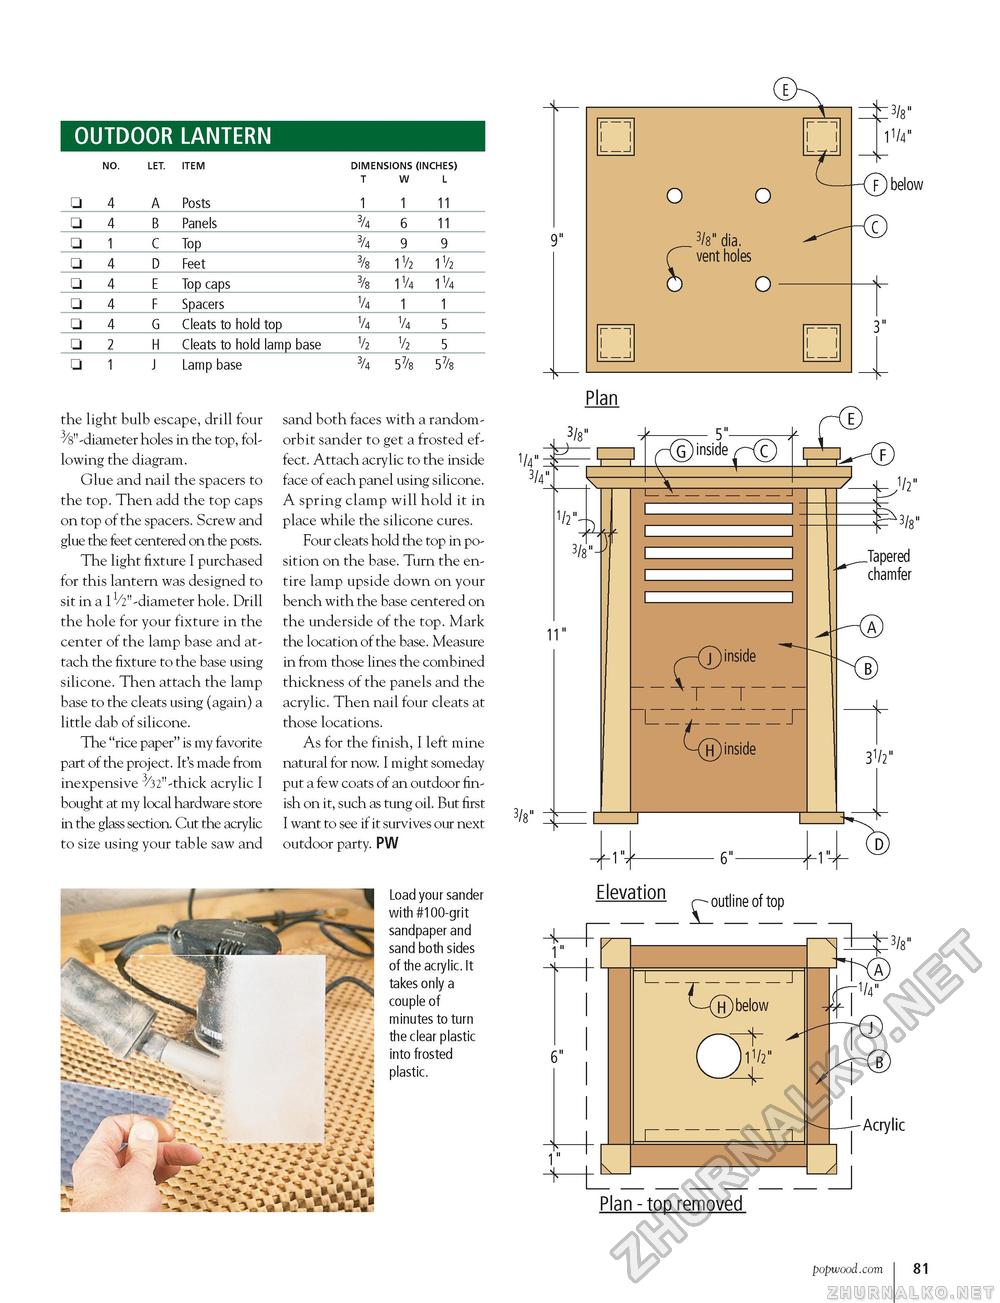
OUTDOOR LANTERN
the light bulb escape, drill four 3/8"-diameter holes in the top, following the diagram. Glue and nail the spacers to the top. Then add the top caps on top of the spacers. Screw and glue the feet centered on the posts. The light fixture I purchased for this lantern was designed to sit in a lVz" -diameter hole. Drill the hole for your fixture in the center of the lamp base and attach the fixture to the base using silicone. Then attach the lamp base to the cleats using (again) a little dab of silicone. The "rice paper" is my favorite part of the project. It's made from inexpensive 3/32"-thick acrylic I bought at my local hardware store in the glass section. Cut the acrylic to size using your table saw and sand both faces with a random-orbit sander to get a frosted effect. Attach acrylic to the inside face of each panel using silicone. A spring clamp will hold it in place while the silicone cures. Four cleats hold the top in position on the base. Turn the entire lamp upside down on your bench with the base centered on the underside of the top. Mark the location of the base. Measure in from those lines the combined thickness of the panels and the acrylic. Then nail four cleats at those locations. As for the finish, I left mine natural for now. I might someday put a few coats of an outdoor finish on it, such as tung oil. But first I want to see if it survives our next outdoor party. PW Load your sander with #100-grit sandpaper and sand both sides of the acrylic. It takes only a couple of minutes to turn the clear plastic into frosted plastic. i---1 I I i___i o 9" 3/8" dia. vent holes o I---1 I I I___I I---1 I I I___I 11/4" 0 below 3" Plan 1/4" ^ 3/4" 3/8" : i i y N 5" G inside O^FF) V- 3/8" 11" J inside 1 7 ~ H inside r 3/8" 9. 1/2" ^3/8" Japered chamfer 31/2" 6"- Elevation 6" I___^____J H below 11/2" JZJ nxA 1/4" ^T® Acrylic Plan - top removed popwood.com 81 |
||||||||||||||||||||||||||||||||||||||||||||||||||||||||||||||||||||||


