Popular Woodworking 2004-08 № 142, страница 33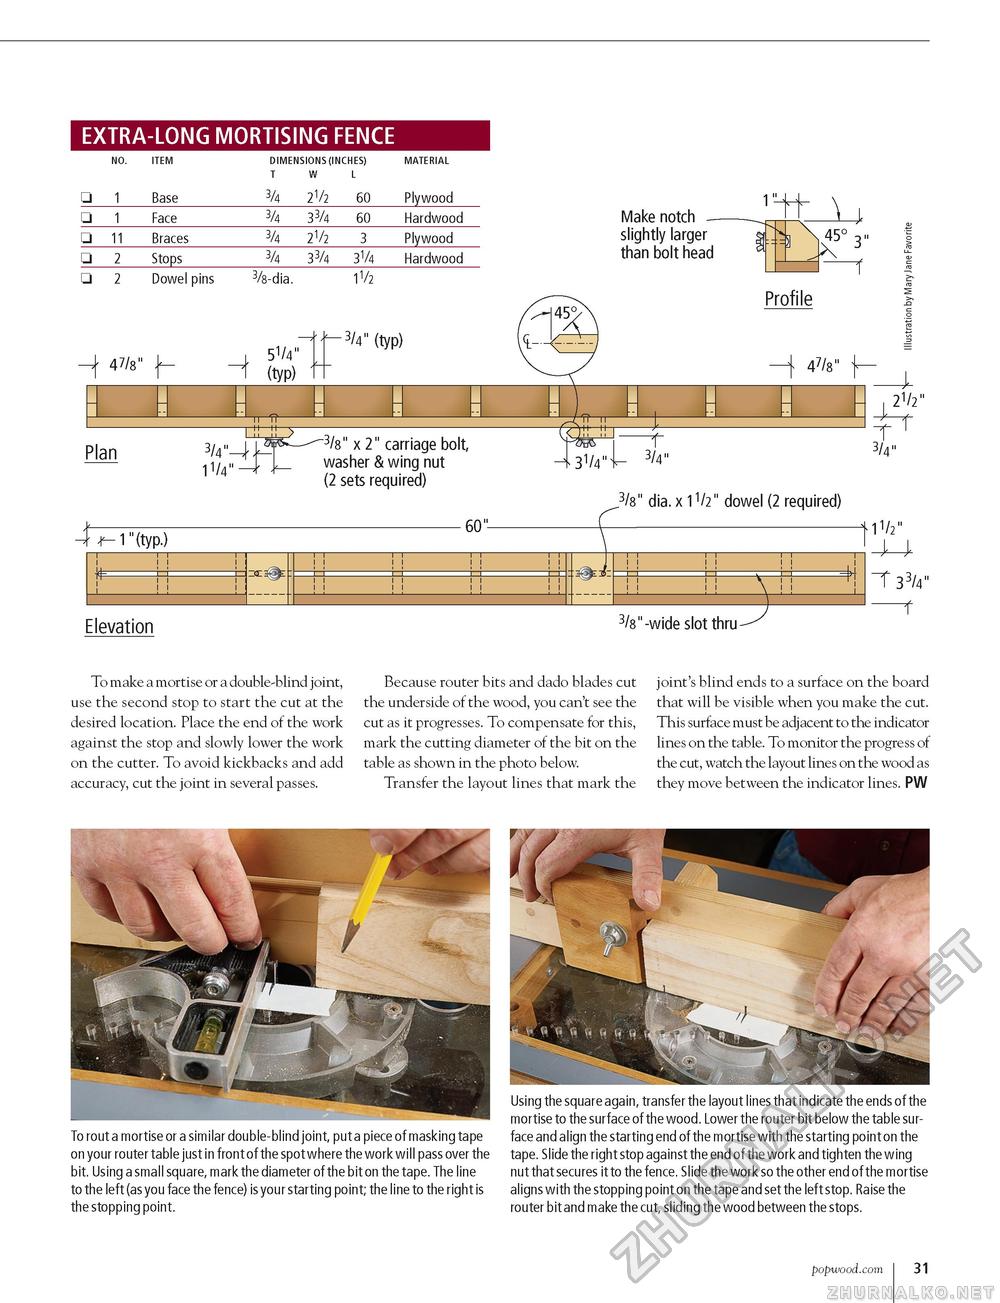
EXTRA-LONG MORTISING FENCE
Make notch — slightly larger than bolt head 47/s" _L 51/4" "i (typ) "3/4" (typ)
Profile 47/8" 4 W I 21/2" 3/4" I I! !! >- X2" carriage bolt, Plan l"(typ.) 3/4^ 11/4"- washer & wing nut (2 sets required) .31/4^ 3/4" J/8" dia. x 1V2" dowel (2 required) ■60-
44 33/4" Elevation 3/8"-wide slot thru- To make a mortise or a double-blind joint, use the second stop to start the cut at the desired location. Place the end of the work against the stop and slowly lower the work on the cutter. To avoid kickbacks and add accuracy, cut the joint in several passes. Because router bits and dado blades cut the underside of the wood, you can't see the cut as it progresses. To compensate for this, mark the cutting diameter of the bit on the table as shown in the photo below. Transfer the layout lines that mark the joint's blind ends to a surface on the board that will be visible when you make the cut. This surface must be adj acent to the indicator lines on the table. To monitor the progress of the cut, watch the layout lines on the wood as they move between the indicator lines. PW To rout a mortise or a similar double-blind joint, put a piece of masking tape on your router table just in front of the spot where the work will pass over the bit. Using a small square, mark the diameter of the bit on the tape. The line to the left (as you face the fence) is your starting point; the line to the right is the stopping point. Using the square again, transfer the layout lines that indicate the ends of the mortise to the surface of the wood. Lower the router bit below the table surface and align the starting end of the mortise with the starting point on the tape. Slide the right stop against the end of the work and tighten the wing nut that secures it to the fence. Slide the work so the other end of the mortise aligns with the stopping point on the tape and set the left stop. Raise the router bit and make the cut, sliding the wood between the stops. popwood.com 31 |
||||||||||||||||||||||||||||||||||||||||||||||||||||||||||||||||||||||||||


