Popular Woodworking 2004-08 № 142, страница 47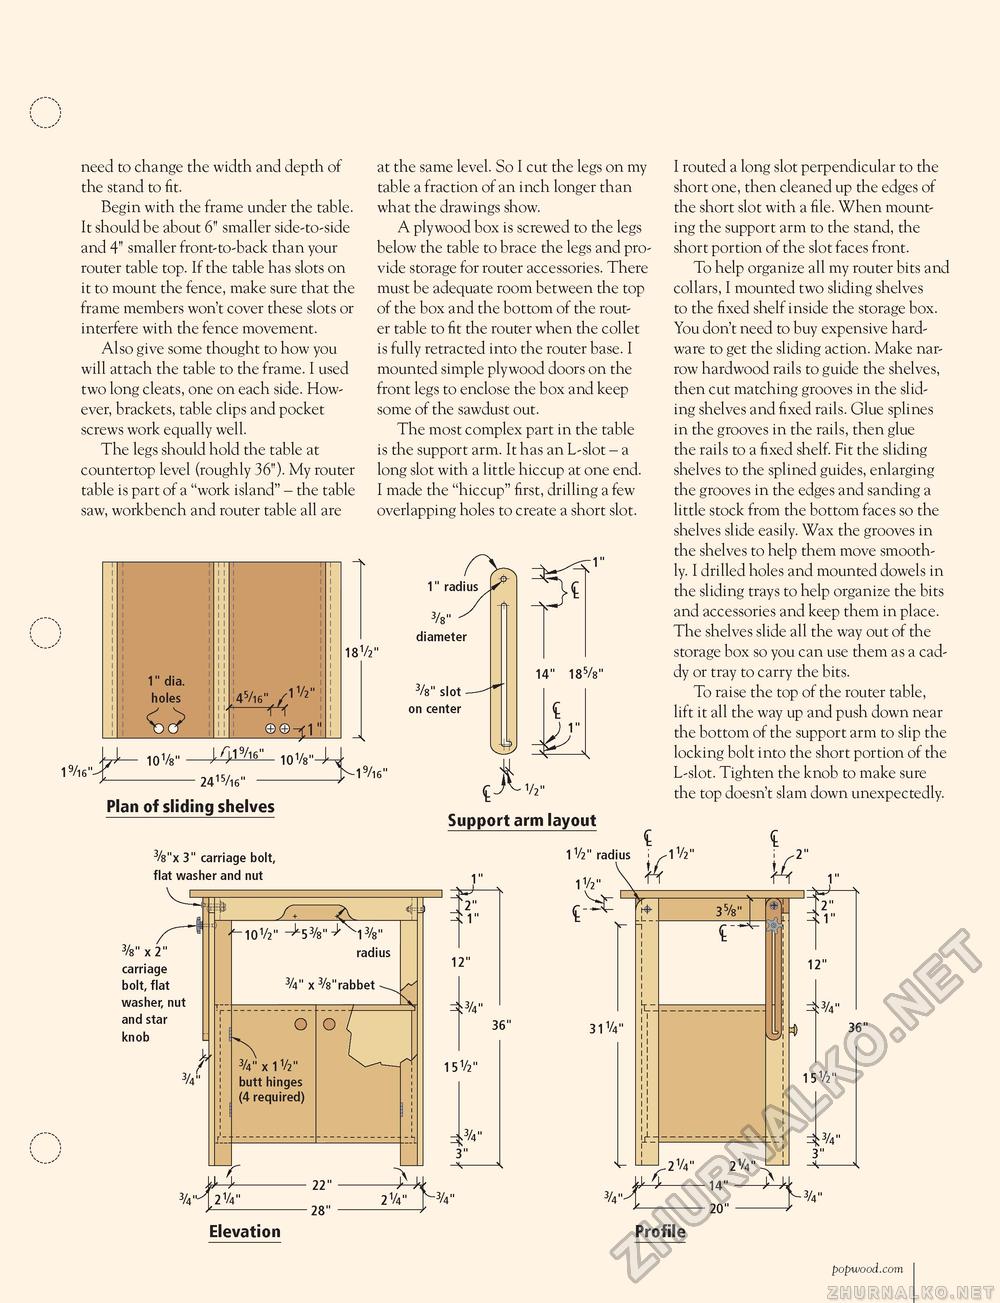
need to change the width and depth of the stand to fit. Begin with the frame under the table. It should be about 6" smaller side-to-side and 4" smaller front-to-back than your router table top. If the table has slots on it to mount the fence, make sure that the frame members won't cover these slots or interfere with the fence movement. Also give some thought to how you will attach the table to the frame. I used two long cleats, one on each side. However, brackets, table clips and pocket screws work equally well. The legs should hold the table at countertop level (roughly 36"). My router table is part of a "work island" - the table saw, workbench and router table all are 1" dia. holes 45/i6"/l1/2" 21 @© at the same level. So I cut the legs on my table a fraction of an inch longer than what the drawings show. A plywood box is screwed to the legs below the table to brace the legs and provide storage for router accessories. There must be adequate room between the top of the box and the bottom of the router table to fit the router when the collet is fully retracted into the router base. I mounted simple plywood doors on the front legs to enclose the box and keep some of the sawdust out. The most complex part in the table is the support arm. It has an L-slot - a long slot with a little hiccup at one end. I made the "hiccup" first, drilling a few overlapping holes to create a short slot. 1" radius 181/2" 3/8" ^ diameter 3/8" Slot -on center 19/16 J— 101/8"-J^9^" 10V8"--14 -2415/16" - Plan of sliding shelves 3/8"x 3" carriage bolt, fiat washer and nut 14" 185/8" ) 1' M9/16" - J^-v2" V2 Support arm layout 1 Vi" radius 1" I routed a long slot perpendicular to the short one, then cleaned up the edges of the short slot with a file. When mounting the support arm to the stand, the short portion of the slot faces front. To help organize all my router bits and collars, I mounted two sliding shelves to the fixed shelf inside the storage box. You don't need to buy expensive hardware to get the sliding action. Make narrow hardwood rails to guide the shelves, then cut matching grooves in the sliding shelves and fixed rails. Glue splines in the grooves in the rails, then glue the rails to a fixed shelf. Fit the sliding shelves to the splined guides, enlarging the grooves in the edges and sanding a little stock from the bottom faces so the shelves slide easily. Wax the grooves in the shelves to help them move smoothly. I drilled holes and mounted dowels in the sliding trays to help organize the bits and accessories and keep them in place. The shelves slide all the way out of the storage box so you can use them as a caddy or tray to carry the bits. To raise the top of the router table, lift it all the way up and push down near the bottom of the support arm to slip the locking bolt into the short portion of the L-slot. Tighten the knob to make sure the top doesn't slam down unexpectedly. 3/8"X2" carriage bolt, fiat washer, nut and star knob 3/4 -101/2" 3/8" 3/s" radius 3/t" x 3/8"rabbet ^ o ^ 3/4" x 1V2" butt hinges (4 required) o 12" 3/4" 151/2" 36" 3/4" 3/4 21/4" 22" 28" 3" ^— 21/4" V 3/4" Elevation Profile popwood.com 47 |


