Popular Woodworking 2004-10 № 143, страница 103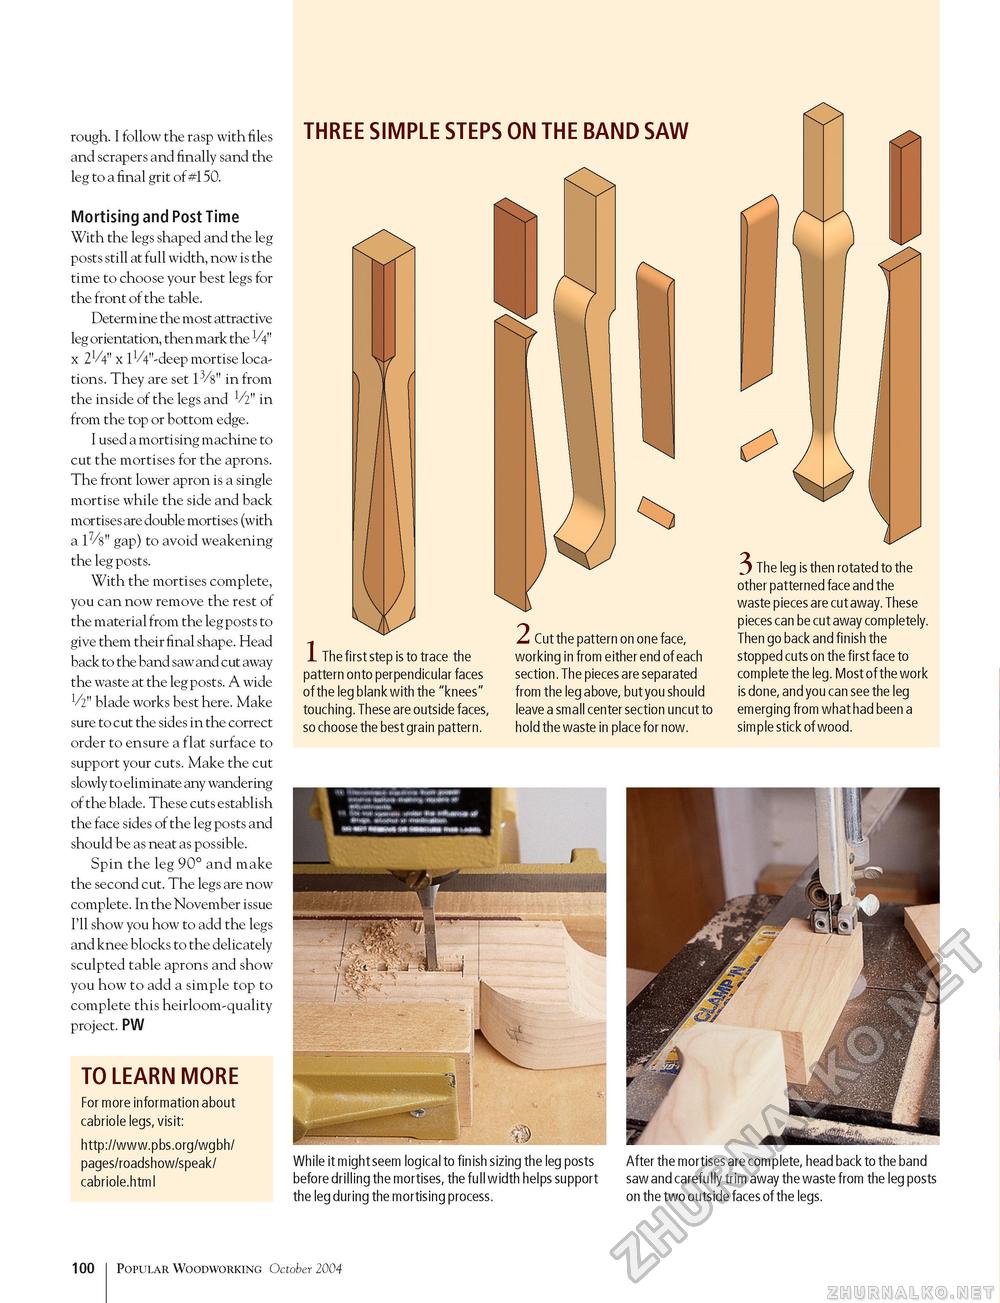
rough. I follow the rasp with files and scrapers and finally sand the leg to a final grit of #150. Mortising and Post Time With the legs shaped and the leg posts still at full width, now is the time to choose your best legs for the front of the table. Determine the most attractive leg orientation, then mark the V4" x 2V4" x lVV'-deep mortise locations. They are set 13/s" in from the inside of the legs and V2" in from the top or bottom edge. I used a mortising machine to cut the mortises for the aprons. The front lower apron is a single mortise while the side and back mortises are double mortises (with a 17/8" gap) to avoid weakening the leg posts. With the mortises complete, you can now remove the rest of the material from the leg posts to give them their final shape. Head back to the band saw and cut away the waste at the leg posts. A wide V2" blade works best here. Make sure to cut the sides in the correct order to ensure a flat surface to support your cuts. Make the cut slowly to eliminate any wandering of the blade. These cuts establish the face sides of the leg posts and should be as neat as possible. Spin the leg 90° and make the second cut. The legs are now complete. In the November issue I'll show you how to add the legs and knee blocks to the delicately sculpted table aprons and show you how to add a simple top to complete this heirloom-quality project. PW TO LEARN MORE For more information about cabriole legs, visit: pages/roadshow/speak/ cabriole.html THREE SIMPLE STEPS ON THE BAND SAW fO 1 The first step is to trace the pattern onto perpendicular faces of the leg blank with the "knees" touching. These are outside faces, so choose the best grain pattern. 1 Cut the pattern on one face, working in from either end of each section. The pieces are separated from the leg above, but you should leave a small center section uncut to hold the waste in place for now. 3 The leg is then rotated to the other patterned face and the waste pieces are cut away. These pieces can be cut away completely. Then go back and finish the stopped cuts on the first face to complete the leg. Most of the work is done, and you can see the leg emerging from what had been a simple stick of wood. While it might seem logical to finish sizing the leg posts before drilling the mortises, the full width helps support the leg during the mortising process. After the mortises are complete, head back to the band saw and carefully trim away the waste from the leg posts on the two outside faces of the legs. 100 Popular Woodworking October 2004 |


