Popular Woodworking 2004-10 № 143, страница 38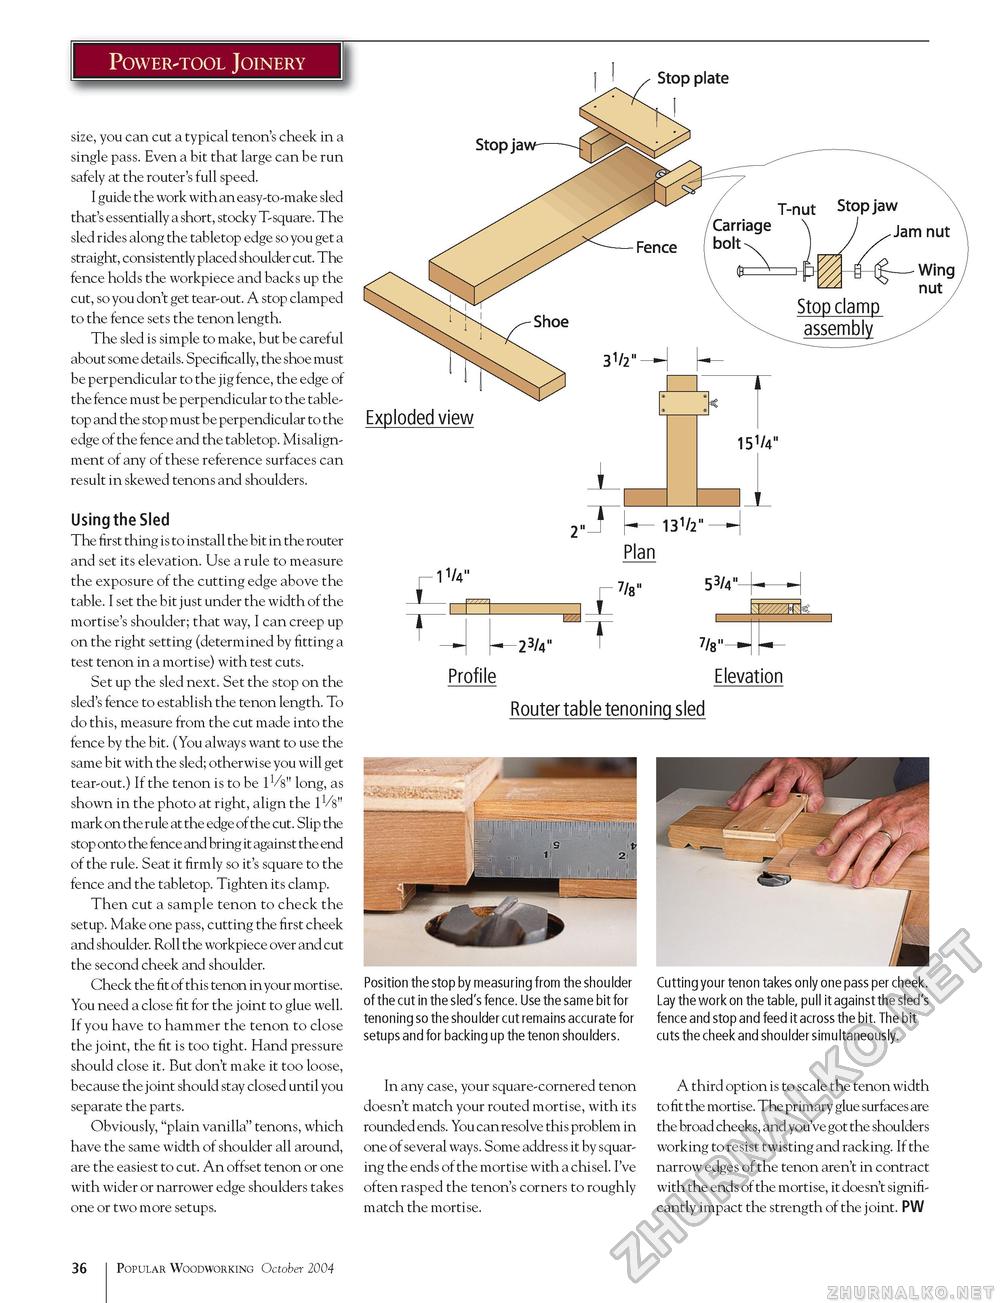
Power-tool Joinery Stop plate Exploded view L 11/4" 131/2" — I Plan 7/8" 53/4" 23/4" T en Vs" Profile Elevation Router table tenoning sled Cutting your tenon takes only one pass per cheek. Lay the work on the table, pull it against the sled's fence and stop and feed it across the bit. The bit cuts the cheek and shoulder simultaneously. size, you can cut a typical tenon's cheek in a single pass. Even a bit that large can be run safely at the router's full speed. I guide the work with an easy-to-make sled that's essentially a short, stocky T-square. The sled rides along the tabletop edge so you get a straight, consistently placed shoulder cut. The fence holds the workpiece and backs up the cut, so you don't get tear-out. A stop clamped to the fence sets the tenon length. The sled is simple to make, but be careful about some details. Specifically, the shoe must be perpendicular to the jig fence, the edge of the fence must be perpendicular to the table-top and the stop must be perpendicular to the edge of the fence and the tabletop. Misalignment of any of these reference surfaces can result in skewed tenons and shoulders. Using the Sled The first thing is to install the bit in the router and set its elevation. Use a rule to measure the exposure of the cutting edge above the table. I set the bit just under the width of the mortise's shoulder; that way, I can creep up on the right setting (determined by fitting a test tenon in a mortise) with test cuts. Set up the sled next. Set the stop on the sled's fence to establish the tenon length. To do this, measure from the cut made into the fence by the bit. (You always want to use the same bit with the sled; otherwise you will get tear-out.) If the tenon is to be lVs" long, as shown in the photo at right, align the lVs" mark on the rule at the edge of the cut. Slip the stop onto the fence and bring it against the end of the rule. Seat it firmly so it's square to the fence and the tabletop. Tighten its clamp. Then cut a sample tenon to check the setup. Make one pass, cutting the first cheek and shoulder. Roll the workpiece over and cut the second cheek and shoulder. Check the fit of this tenon in your mortise. You need a close fit for the joint to glue well. If you have to hammer the tenon to close the joint, the fit is too tight. Hand pressure should close it. But don't make it too loose, because the joint should stay closed until you separate the parts. Obviously, "plain vanilla" tenons, which have the same width of shoulder all around, are the easiest to cut. An offset tenon or one with wider or narrower edge shoulders takes one or two more setups. Position the stop by measuring from the shoulder of the cut in the sled's fence. Use the same bit for tenoning so the shoulder cut remains accurate for setups and for backing up the tenon shoulders. In any case, your square-cornered tenon doesn't match your routed mortise, with its rounded ends. You can resolve this problem in one of several ways. Some address it by squaring the ends of the mortise with a chisel. I've often rasped the tenon's corners to roughly match the mortise. A third option is to scale the tenon width to fit the mortise. The primary glue surfaces are the broad cheeks, and you've got the shoulders working to resist twisting and racking. If the narrow edges of the tenon aren't in contract with the ends of the mortise, it doesn't significantly impact the strength of the joint. PW 36 Popular Woodworking October 2004 |


