Popular Woodworking 2004-11 № 144, страница 105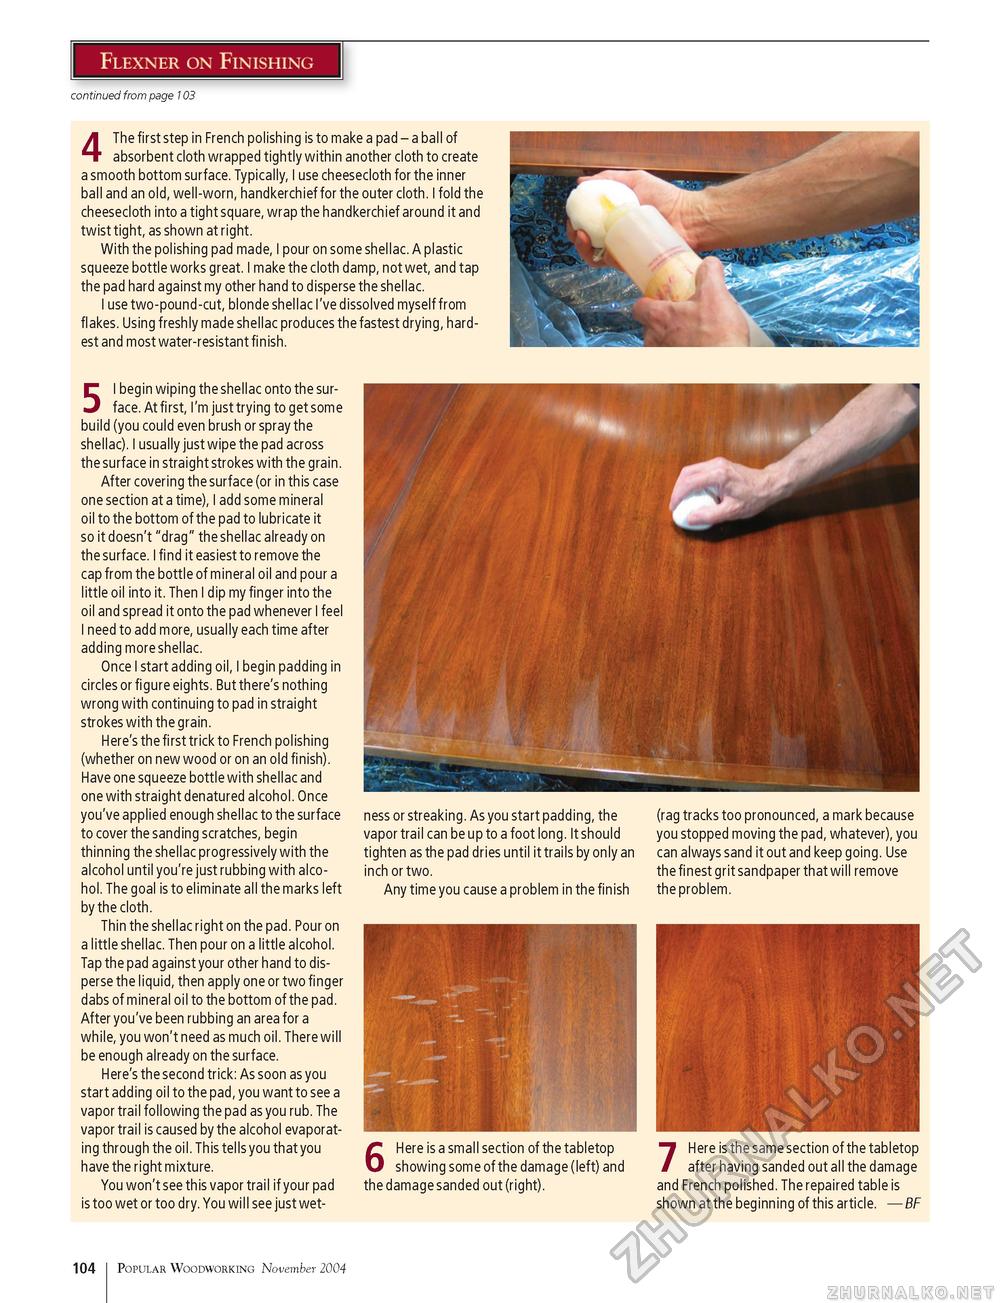
Flexner on Finishing continued from page 103 4 The first step in French polishing is to make a pad - a ball of absorbent cloth wrapped tightly within another cloth to create a smooth bottom surface. Typically, I use cheesecloth for the inner ball and an old, well-worn, handkerchief for the outer cloth. I fold the cheesecloth into a tight square, wrap the handkerchief around it and twist tight, as shown at right. With the polishing pad made, I pour on some shellac. A plastic squeeze bottle works great. I make the cloth damp, not wet, and tap the pad hard against my other hand to disperse the shellac. I use two-pound-cut, blonde shellac I've dissolved myself from flakes. Using freshly made shellac produces the fastest drying, hardest and most water-resistant finish. 5 I begin wiping the shellac onto the surface. At first, I'm just trying to get some build (you could even brush or spray the shellac). I usually just wipe the pad across the surface in straight strokes with the grain. After covering the surface (or in this case one section at a time), I add some mineral oil to the bottom of the pad to lubricate it so it doesn't "drag" the shellac already on the surface. I find it easiest to remove the cap from the bottle of mineral oil and pour a little oil into it. Then I dip my finger into the oil and spread it onto the pad whenever I feel I need to add more, usually each time after adding more shellac. Once I start adding oil, I begin padding in circles or figure eights. But there's nothing wrong with continuing to pad in straight strokes with the grain. Here's the first trick to French polishing (whether on new wood or on an old finish). Have one squeeze bottle with shellac and one with straight denatured alcohol. Once you've applied enough shellac to the surface to cover the sanding scratches, begin thinning the shellac progressively with the alcohol until you're just rubbing with alcohol. The goal is to eliminate all the marks left by the cloth. Thin the shellac right on the pad. Pour on a little shellac. Then pour on a little alcohol. Tap the pad against your other hand to disperse the liquid, then apply one or two finger dabs of mineral oil to the bottom of the pad. After you've been rubbing an area for a while, you won't need as much oil. There will be enough already on the surface. Here's the second trick: As soon as you start adding oil to the pad, you want to see a vapor trail following the pad as you rub. The vapor trail is caused by the alcohol evaporating through the oil. This tells you that you have the right mixture. You won't see this vapor trail if your pad is too wet or too dry. You will see just wet ness or streaking. As you start padding, the vapor trail can be up to a foot long. It should tighten as the pad dries until it trails by only an inch or two. Any time you cause a problem in the finish (rag tracks too pronounced, a mark because you stopped moving the pad, whatever), you can always sand it out and keep going. Use the finest grit sandpaper that will remove the problem. 6 Here is a small section of the tabletop ^ Here is the same section of the tabletop showing some of the damage (left) and # after having sanded out all the damage the damage sanded out (right). and French polished. The repaired table is shown at the beginning of this article. —BF 104 Popular Woodworking November 2004 |


