Popular Woodworking 2004-11 № 144, страница 60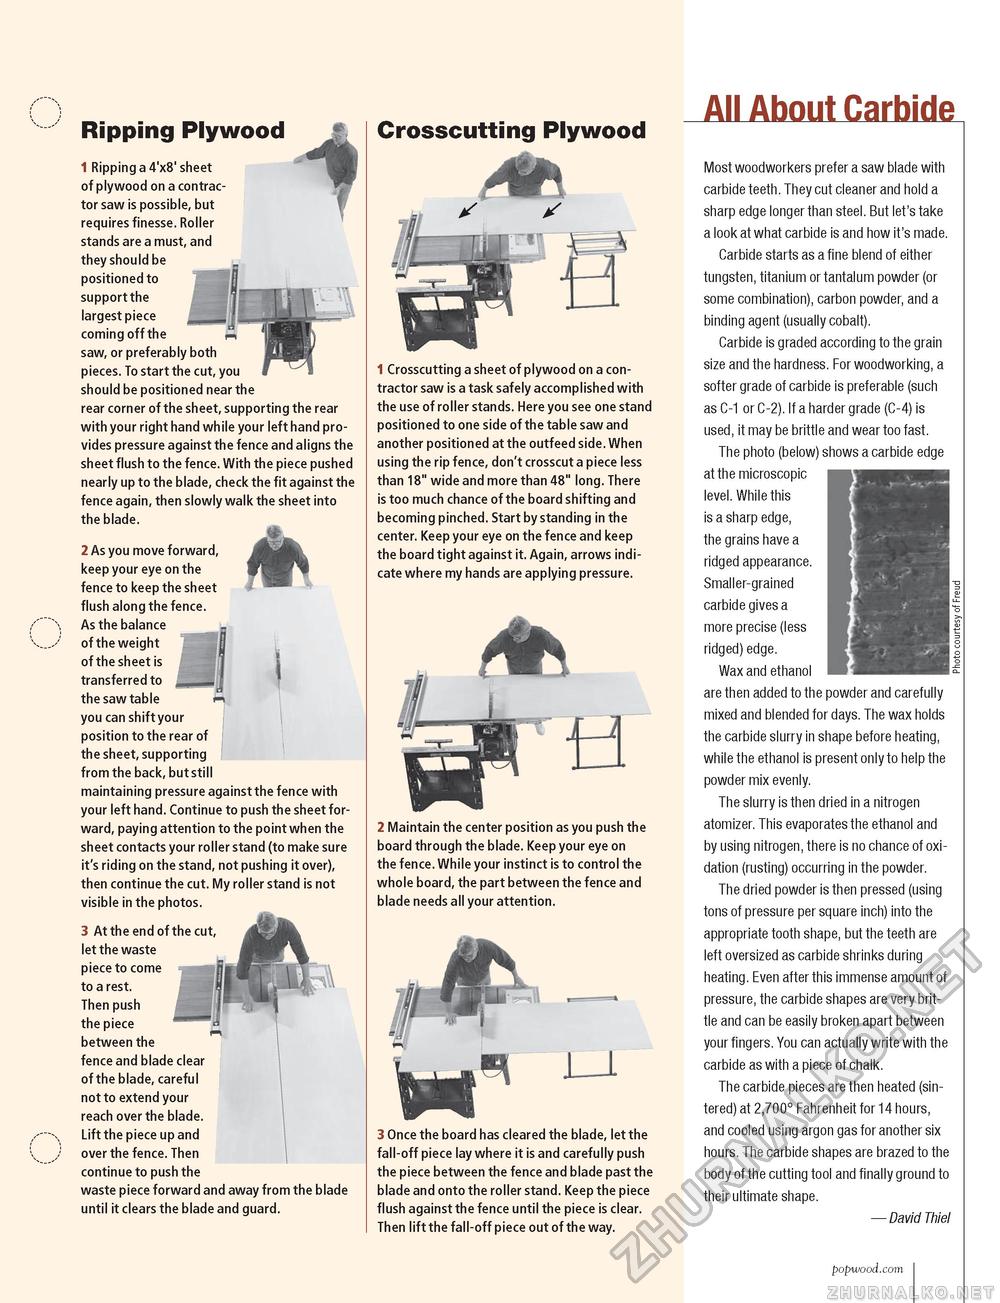
Ripping Plywood 1 Ripping a 4'x8'sheet of plywood on a contractor saw is possible, but requires finesse. Roller stands are a must, and they should be positioned to support the largest piece coming off the saw, or preferably both pieces. To start the cut, you should be positioned near the rear corner of the sheet, supporting the rear with your right hand while your left hand provides pressure against the fence and aligns the sheet flush to the fence. With the piece pushed nearly up to the blade, check the fit against the fence again, then slowly walk the sheet into the blade. ilk i 2 As you move forward, keep your eye on the fence to keep the sheet flush along the fence. As the balance of the weight of the sheet is transferred to the saw table you can shiftyour position to the rear of the sheet, supporting from the back, but still maintaining pressure against the fence with your left hand. Continue to push the sheet forward, paying attention to the point when the sheet contacts your roller stand (to make sure it's riding on the stand, not pushing it over), then continue the cut. My roller stand is not visible in the photos. 3 Attheendofthecut, let the waste piece to come to a rest. Then push the piece i between the fence and blade clear of the blade, careful not to extend your reach over the blade. Lift the piece up and over the fence. Then continue to push the waste piece forward and away from the blade until it clears the blade and guard. Crosscutting Plywood 1 Crosscutting a sheet of plywood on a contractor saw is a task safely accomplished with the use of roller stands. Here you see one stand positioned to one side of the table saw and another positioned at the outfeed side. When using the rip fence, don't crosscut a piece less than 18" wide and more than 48" long. There is too much chance of the board shifting and becoming pinched. Start by standing in the center. Keep your eye on the fence and keep the board tight against it. Again, arrows indicate where my hands are applying pressure. 2 Maintain the center position as you push the board through the blade. Keep your eye on the fence. While your instinct is to control the whole board, the part between the fence and blade needs all your attention. 3 Once the board has cleared the blade, let the fall-off piece lay where it is and carefully push the piece between the fence and blade past the blade and onto the roller stand. Keep the piece flush against the fence until the piece is clear. Then lift the fall-off piece out of the way. All About Carbide Most woodworkers prefer a saw blade with carbide teeth. They cut cleaner and hold a sharp edge longer than steel. But let's take a look at what carbide is and how it's made. Carbide starts as a fine blend of either tungsten, titanium or tantalum powder (or some combination), carbon powder, and a binding agent (usually cobalt). Carbide is graded according to the grain size and the hardness. For woodworking, a softer grade of carbide is preferable (such as C-1 or C-2). If a harder grade (C-4) is used, it may be brittle and wear too fast. The photo (below) shows a carbide edge at the microscopic level. While this is a sharp edge, the grains have a ridged appearance. Smaller-grained carbide gives a more precise (less ridged) edge. Wax and ethanol are then added to the powder and carefully mixed and blended for days. The wax holds the carbide slurry in shape before heating, while the ethanol is present only to help the powder mix evenly. The slurry is then dried in a nitrogen atomizer. This evaporates the ethanol and by using nitrogen, there is no chance of oxidation (rusting) occurring in the powder. The dried powder is then pressed (using tons of pressure per square inch) into the appropriate tooth shape, but the teeth are left oversized as carbide shrinks during heating. Even after this immense amount of pressure, the carbide shapes are very brittle and can be easily broken apart between your fingers. You can actually write with the carbide as with a piece of chalk. The carbide pieces are then heated (sintered) at 2,700° Fahrenheit for 14 hours, and cooled using argon gas for another six hours. The carbide shapes are brazed to the body of the cutting tool and finally ground to their ultimate shape. — David Thiel popwood.com 60 |


