Popular Woodworking 2004-11 № 144, страница 96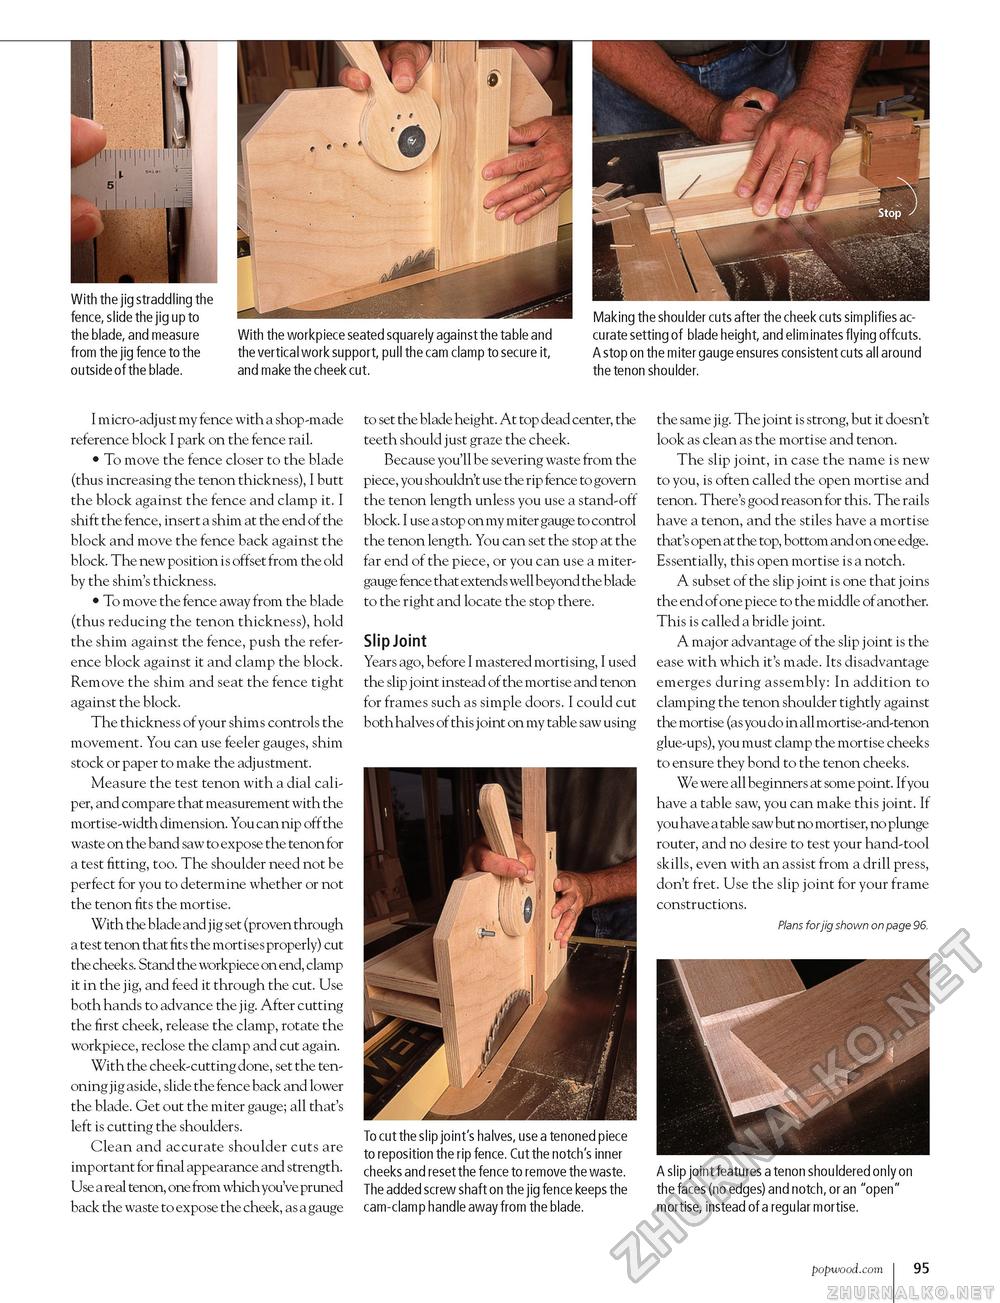
With the jig straddling the fence, slide the jig up to the blade, and measure from the jig fence to the outside of the blade. With the workpiece seated squarely against the table and the vertical work support, pull the cam clamp to secure it, and make the cheek cut. Making the shoulder cuts after the cheek cuts simplifies accurate setting of blade height, and elim inates flying offcuts. A stop on the miter gauge ensures consistent cuts all around the tenon shoulder. I micro-adjust my fence with a shop-made reference block I park on the fence rail. • To move the fence closer to the blade (thus increasing the tenon thickness), I butt the block against the fence and clamp it. I shift the fence, insert a shim at the end of the block and move the fence back against the block. The new position is offset from the old by the shim's thickness. • To move the fence away from the blade (thus reducing the tenon thickness), hold the shim against the fence, push the reference block against it and clamp the block. Remove the shim and seat the fence tight against the block. The thickness of your shims controls the movement. You can use feeler gauges, shim stock or paper to make the adjustment. Measure the test tenon with a dial cali-per, and compare that measurement with the mortise-width dimension. You can nip off the waste on the band saw to expose the tenon for a test fitting, too. The shoulder need not be perfect for you to determine whether or not the tenon fits the mortise. With the blade and j ig set (proven through a te st tenon that fits the mortise s properly) cut the cheeks. Stand the workpiece on end, clamp it in the jig, and feed it through the cut. Use both hands to advance the j ig. After cutting the first cheek, release the clamp, rotate the workpiece, reclose the clamp and cut again. With the cheek-cutting done, set the tenoning jig aside, slide the fence back and lower the blade. Get out the miter gauge; all that's left is cutting the shoulders. Clean and accurate shoulder cuts are important for final appearance and strength. Use a real tenon, one from which you've pruned back the waste to expose the cheek, as a gauge to set the blade height. At top dead center, the teeth should just graze the cheek. Because you'll be severing waste from the piece, you shouldn't use the rip fence to govern the tenon length unless you use a stand-off block. I use a stop on my miter gauge to control the tenon length. You can set the stop at the far end of the piece, or you can use a miter-gauge fence that extends well beyond the blade to the right and locate the stop there. Slip Joint Years ago, before I mastered mortising, I used the slip joint instead of the mortise and tenon for frames such as simple doors. I could cut both halves of this joint on my table saw using the same jig. The joint is strong, but it doesn't look as clean as the mortise and tenon. The slip joint, in case the name is new to you, is often called the open mortise and tenon. There's good reason for this. The rails have a tenon, and the stiles have a mortise that's open at the top, bottom and on one edge. Essentially, this open mortise is a notch. A subset of the slip joint is one that joins the end of one piece to the middle of another. This is called a bridle joint. A major advantage of the slip joint is the ease with which it's made. Its disadvantage emerges during assembly: In addition to clamping the tenon shoulder tightly against the mortise (as you do in all mortise-and-tenon glue-ups), you must clamp the mortise cheeks to ensure they bond to the tenon cheeks. We were all beginners at some point. If you have a table saw, you can make this joint. If you have a table saw but no morti ser, no plunge router, and no desire to test your hand-tool skills, even with an assist from a drill press, don't fret. Use the slip joint for your frame constructions. Plans for jig shown on page 96. To cut the slip joint's halves, use a tenoned piece to reposition the rip fence. Cut the notch's inner cheeks and reset the fence to remove the waste. The added screw shaft on the jig fence keeps the cam-clamp handle away from the blade. A slip joint features a tenon shouldered only on the faces (no edges) and notch, or an "open" mortise, instead of a regular mortise. popwood.com 95 |


