Popular Woodworking 2004-12 № 145, страница 43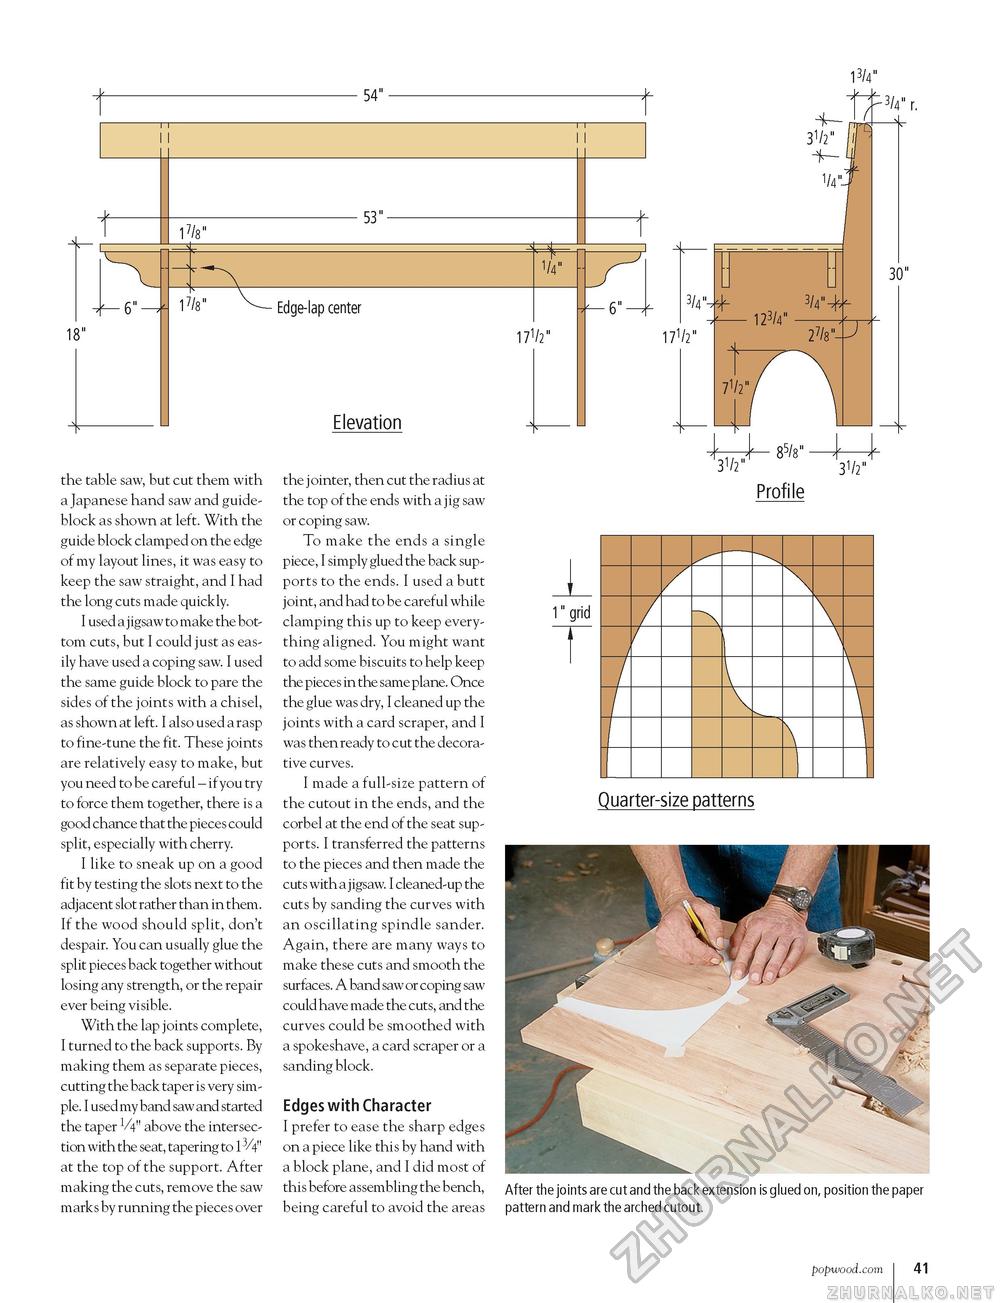
54" 18" the table saw, but cut them with a Japanese hand saw and guide-block as shown at left. With the guide block clamped on the edge of my layout lines, it was easy to keep the saw straight, and I had the long cuts made quickly. I used a j igsaw to make the bottom cuts, but I could just as easily have used a coping saw. I used the same guide block to pare the sides of the joints with a chisel, as shown at left. I also used a rasp to fine-tune the fit. These joints are relatively easy to make, but you need to be careful - if you try to force them together, there is a good chance that the pieces could split, especially with cherry. I like to sneak up on a good fit by testing the slots next to the adjacent slot rather than in them. If the wood should split, don't despair. You can usually glue the split pieces back together without losing any strength, or the repair ever being visible. With the lap joints complete, I turned to the back supports. By making them as separate pieces, cutting the back taper is very simple. I used my band saw and started the taper VV' above the intersection with the seat, tapering to 13/4" at the top of the support. After making the cuts, remove the saw marks by running the pieces over the jointer, then cut the radius at the top of the ends with a jig saw or coping saw. To make the ends a single piece, I simply glued the back supports to the ends. I used a butt joint, and had to be careful while clamping this up to keep everything aligned. You might want to add some biscuits to help keep the pieces in the same plane. Once the glue was dry, I cleaned up the joints with a card scraper, and I was then ready to cut the decorative curves. I made a full-size pattern of the cutout in the ends, and the corbel at the end of the seat supports. I transferred the patterns to the pieces and then made the cuts with a j igsaw. I cleaned-up the cuts by sanding the curves with an oscillating spindle sander. Again, there are many ways to make these cuts and smooth the surfaces. A band saw or coping saw could have made the cuts, and the curves could be smoothed with a spokeshave, a card scraper or a sanding block. Edges with Character I prefer to ease the sharp edges on a piece like this by hand with a block plane, and I did most of this before assembling the bench, being careful to avoid the areas
171/2" 3/4%+ 3/4" JA — 123/4" —k— 85/8" —k-k- 31/2" 31/2" Profile I" grid Quarter-size patterns After the joints are cut and the back extension is glued on, position the paper pattern and mark the arched cutout. popwood.com 41 |
||||||||||||||||||


