Popular Woodworking 2004-12 № 145, страница 69
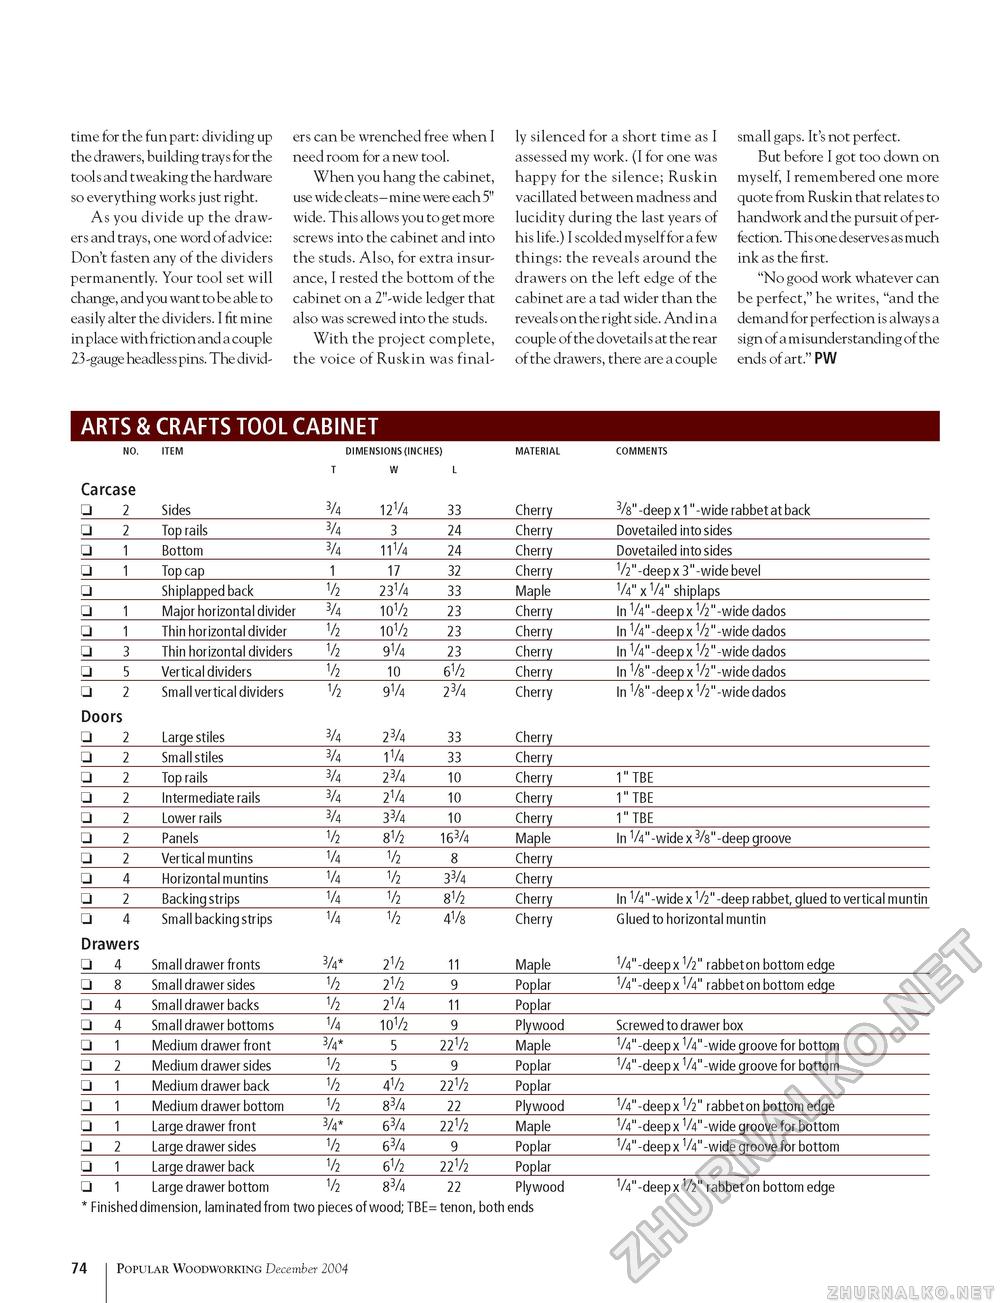
time for the fun part: dividing up the drawers, building trays for the tools and tweaking the hardware so everything works just right. As you divide up the drawers and trays, one word of advice: Don't fasten any of the dividers permanently. Your tool set will change, and you want to be able to easily alter the dividers. I fit mine in place with friction and a couple 23-gauge headless pins. The divid ers can be wrenched free when I need room for a new tool. When you hang the cabinet, use wide cleats - mine were each 5" wide. This allows you to get more screws into the cabinet and into the studs. Also, for extra insurance, I rested the bottom of the cabinet on a 2"-wide ledger that also was screwed into the studs. With the project complete, the voice of Ruskin was final ly silenced for a short time as I assessed my work. (I for one was happy for the silence; Ruskin vacillated between madness and lucidity during the last years of his life.) I scolded myself for a few things: the reveals around the drawers on the left edge of the cabinet are a tad wider than the reveals on the right side. And in a couple of the dovetails at the rear of the drawers, there are a couple small gaps. It's not perfect. But before I got too down on myself, I remembered one more quote from Ruskin that relates to handwork and the pursuit of perfection. This one deserves as much ink as the first. "No good work whatever can be perfect," he writes, "and the demand for perfection is always a sign of a misunderstanding of the ends of art." PW ARTS & CRAFTS TOOL CABINET
□ 1 Large drawer bottom V2 83/4 22 Plywood V4"-deep x V2" rabbet on bottom edge * Finished dimension, laminated from two pieces of wood; TBE= tenon, both ends □ 1 Large drawer bottom V2 83/4 22 Plywood V4"-deep x V2" rabbet on bottom edge * Finished dimension, laminated from two pieces of wood; TBE= tenon, both ends 74 100 Popular Woodworking December 2004 |
|||||||||||||||||||||||||||||||||||||||||||||||||||||||||||||||||||||||||||||||||||||||||||||||||||||||||||||||||||||||||||||||||||||||||||||||||||||||||||||||||||||||||||||||||||||||||||||||||||||||||||||||||||||||||||||||


