Popular Woodworking 2005-04 № 147, страница 40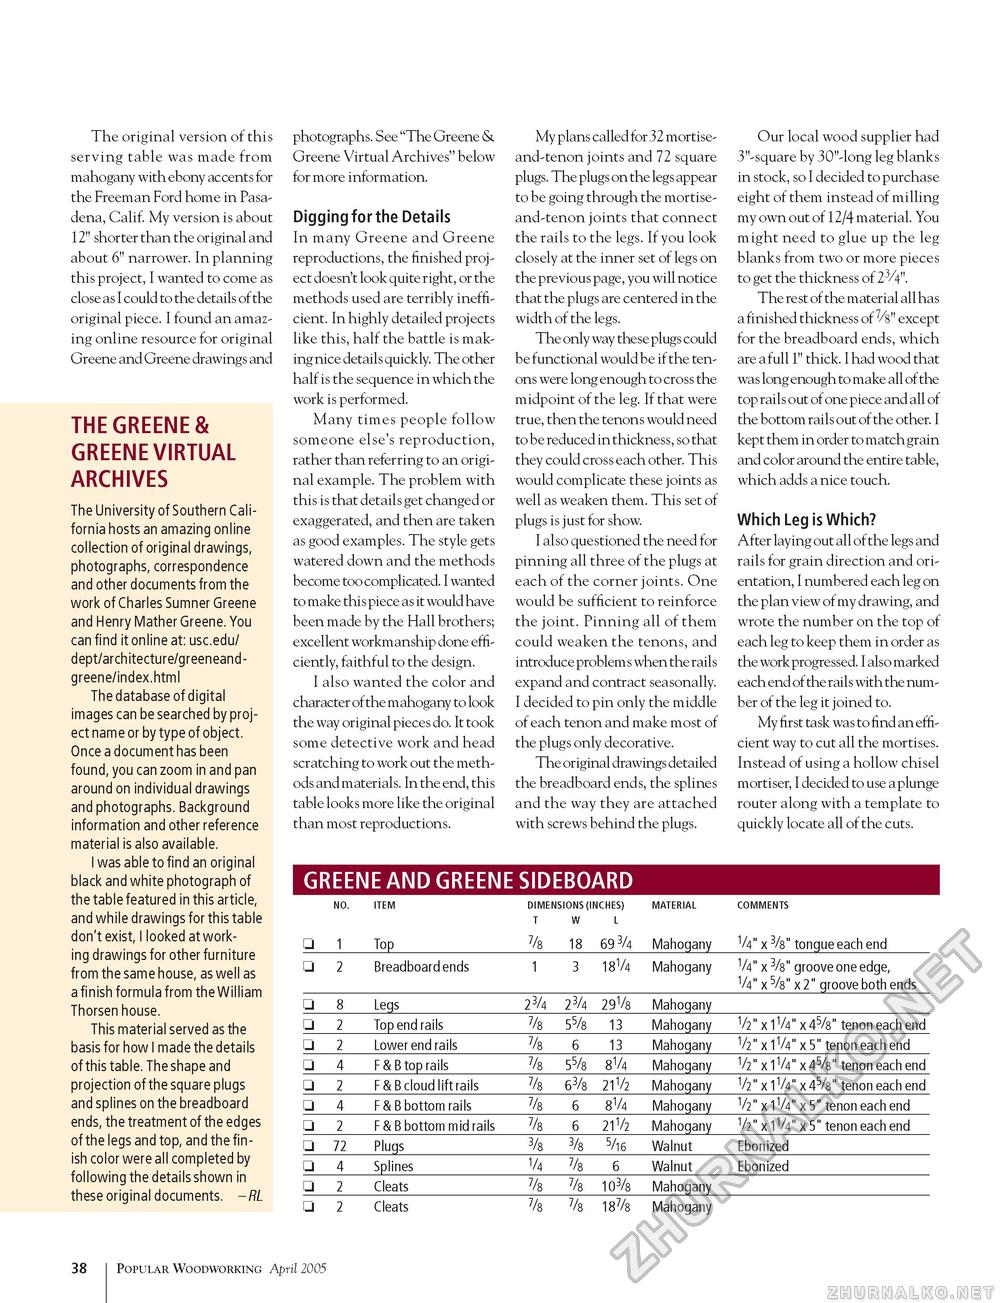
The original version of this serving table was made from mahogany with ebony accents for the Freeman Ford home in Pasadena, Calif. My version is about 12" shorter than the original and about 6" narrower. In planning this project, I wanted to come as close as I could to the details of the original piece. I found an amazing online resource for original Greene and Greene drawings and THE GREENE & GREENE VIRTUAL ARCHIVES The University of Southern California hosts an amazing online collection of original drawings, photographs, correspondence and other documents from the work of Charles Sumner Greene and Henry Mather Greene. You can find it online at: usc.edu/ dept/architecture/greeneand-greene/index.html The database of digital images can be searched by project name or by type of object. Once a document has been found, you can zoom in and pan around on individual drawings and photographs. Background information and other reference material is also available. I was able to find an original black and white photograph of the table featured in this article, and while drawings for this table don't exist, I looked at working drawings for other furniture from the same house, as well as a finish formula from the William Thorsen house. This material served as the basis for how I made the details of this table. The shape and projection of the square plugs and splines on the breadboard ends, the treatment of the edges of the legs and top, and the finish color were all completed by following the details shown in these original documents. - RL photographs. See "The Greene & Greene Virtual Archives" below for more information. Digging for the Details In many Greene and Greene reproductions, the finished project doesn't look quite right, or the methods used are terribly inefficient. In highly detailed projects like this, half the battle is making nice details quickly. The other half is the sequence in which the work is performed. Many times people follow someone else's reproduction, rather than referring to an original example. The problem with this is that details get changed or exaggerated, and then are taken as good examples. The style gets watered down and the methods become too complicated. I wanted to make this piece as it would have been made by the Hall brothers; excellent workmanship done efficiently, faithful to the design. I also wanted the color and character of the mahogany to look the way original pieces do. It took some detective work and head scratching to work out the methods and materials. In the end, this table looks more like the original than most reproductions. My plans called for 32 mortise-and-tenon joints and 72 square plugs. The plugs on the legs appear to be going through the mortise-and-tenon joints that connect the rails to the legs. If you look closely at the inner set of legs on the previous page, you will notice that the plugs are centered in the width of the legs. The only way these plugs could be functional would be if the tenons were long enough to cross the midpoint of the leg. If that were true, then the tenons would need to be reduced in thickness, so that they could cross each other. This would complicate these joints as well as weaken them. This set of plugs is just for show. I also questioned the need for pinning all three of the plugs at each of the corner joints. One would be sufficient to reinforce the joint. Pinning all of them could weaken the tenons, and introduce problems when the rails expand and contract seasonally. I decided to pin only the middle of each tenon and make most of the plugs only decorative. The original drawings detailed the breadboard ends, the splines and the way they are attached with screws behind the plugs. Our local wood supplier had 3"-square by 30"-long leg blanks in stock, so I decided to purchase eight of them instead of milling my own out of 12/4 material. You might need to glue up the leg blanks from two or more pieces to get the thickness of 23/4". The rest of the material all has a finished thickness of 7/s" except for the breadboard ends, which are a full 1" thick. I had wood that was long enough to make all of the top rails out of one piece and all of the bottom rails out of the other. I kept them in order to match grain and color around the entire table, which adds a nice touch. Which Leg is Which? After laying out all of the legs and rails for grain direction and orientation, I numbered each leg on the plan view of my drawing, and wrote the number on the top of each leg to keep them in order as the work progressed. I also marked each end of the rails with the number of the leg it joined to. My first task was to find an efficient way to cut all the mortises. Instead of using a hollow chisel mortiser, I decided to use a plunge router along with a template to quickly locate all of the cuts. GREENE AND GREENE SIDEBOARD
38 1 Popular Woodworking April 2005 |
||||||||||||||||||||||||||||||||||||||||||||||||||||||||||||||||||||||||||||||||||||||||||||||||||||||||||||||||||||||||||||||


