Popular Woodworking 2005-04 № 147, страница 43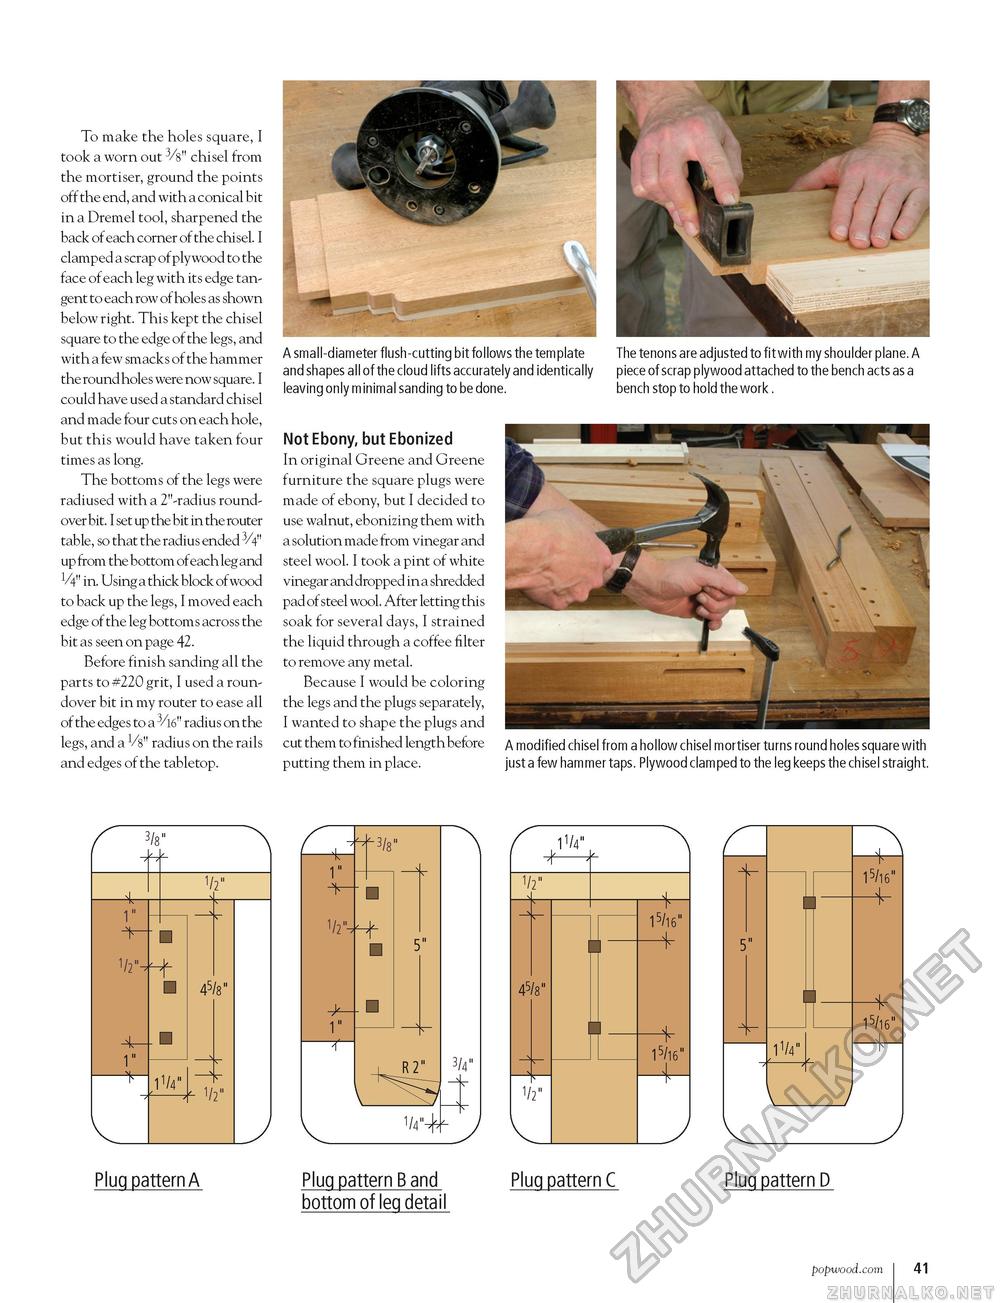
To make the holes square, I took a worn out 3/s" chisel from the mortiser, ground the points off the end, and with a conical bit in a Dremel tool, sharpened the back of each corner of the chisel. I clamped a scrap of plywood to the face of each leg with its edge tangent to each row of holes as shown below right. This kept the chisel square to the edge of the legs, and with a few smacks of the hammer the round holes were now square. I could have used a standard chisel and made four cuts on each hole, but this would have taken four times as long. The bottoms of the legs were radiused with a 2"-radius round-over bit. I set up the bit in the router table, so that the radius ended 3/4" up from the bottom of each leg and V4" in. Using a thick block ofwood to back up the legs, I moved each edge of the leg bottoms across the bit as seen on page 42. Before finish sanding all the parts to #220 grit, I used a roun-dover bit in my router to ease all of the edges to a 3/l6" radius on the legs, and a Vs" radius on the rails and edges of the tabletop. A small-diameter flush-cutting bit follows the template and shapes all of the cloud lifts accurately and identically leaving only minimal sanding to be done. Not Ebony, but Ebonized In original Greene and Greene furniture the square plugs were made of ebony, but I decided to use walnut, ebonizing them with a solution made from vinegar and steel wool. I took a pint of white vinegar and dropped in a shredded pad of steel wool. After letting this soak for several days, I strained the liquid through a coffee filter to remove any metal. Because I would be coloring the legs and the plugs separately, I wanted to shape the plugs and cut them to finished length before putting them in place. The tenons are adjusted to fit with my shoulder plane. A piece of scrap plywood attached to the bench acts as a bench stop to hold the work . A modified chisel from a hollow chisel mortiser turns round holes square with just a few hammer taps. Plywood clamped to the leg keeps the chisel straight. 3/8" -4- 1/2" 1" 1/2" ■ + □ 45/8" ■ ll 1/2" 11/4"
■ 5" R2" 1/4" 3/4" 11/4" 1/2" 45/8" 1/2" ¥ 1 15/16" H- 15/16" -4- 5" I IV4" 15/16" H- H-15/16" Plug pattern A Plug pattern B and bottom of leg detail Plug pattern C Plug pattern D popwood.com 41 |


