Popular Woodworking 2005-04 № 147, страница 61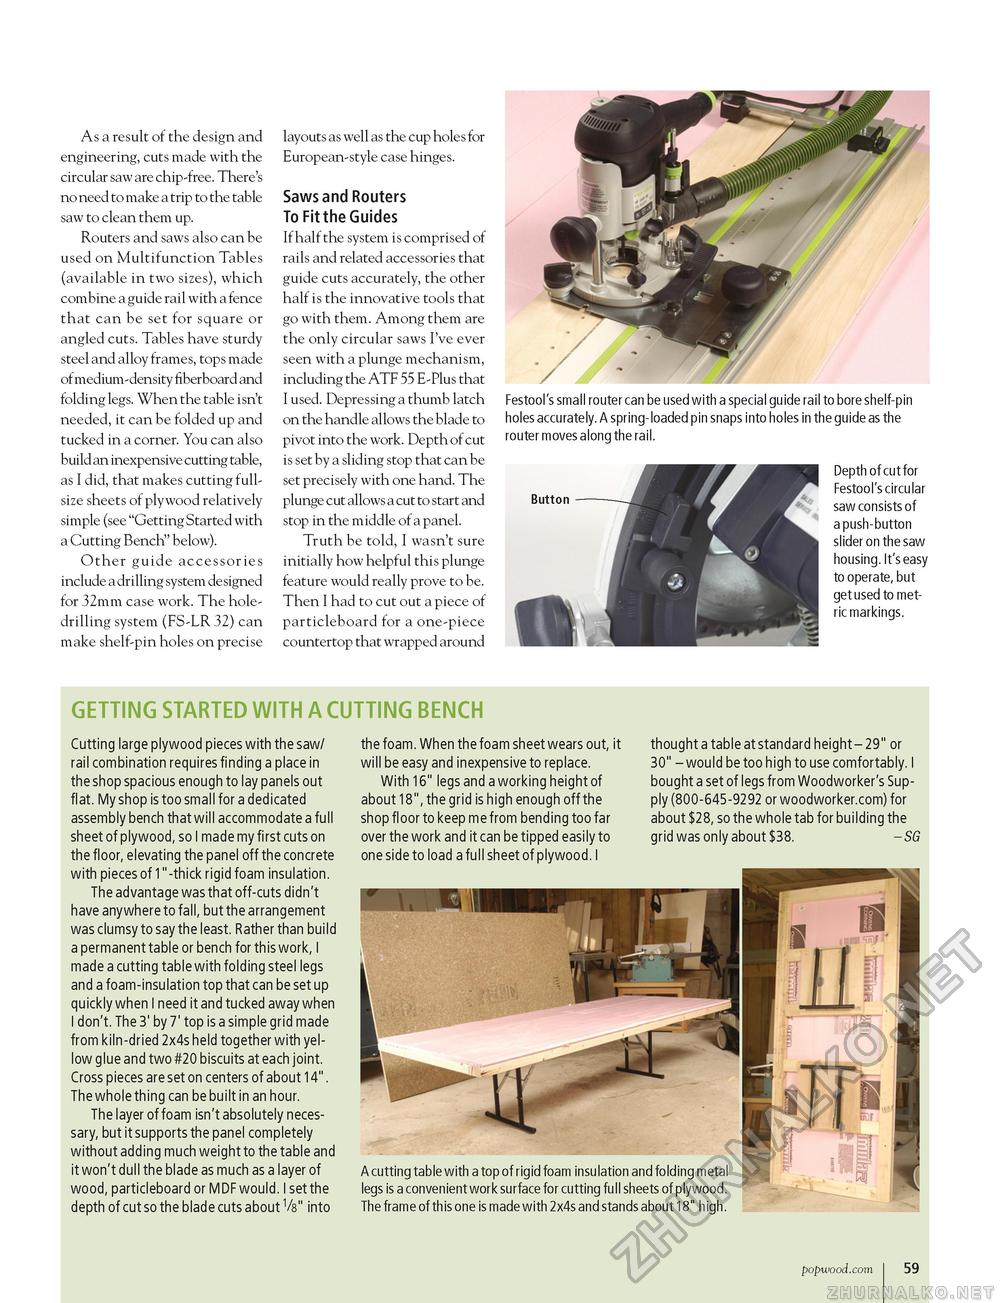
As a result of the design and engineering, cuts made with the circular saw are chip-free. There's no need to make a trip to the table saw to clean them up. Routers and saws also can be used on Multifunction Tables (available in two sizes), which combine a guide rail with a fence that can be set for square or angled cuts. Tables have sturdy steel and alloy frames, tops made of medium-density fiberboard and folding legs. When the table isn't needed, it can be folded up and tucked in a corner. You can also build an inexpensive cutting table, as I did, that makes cutting full-size sheets of plywood relatively simple (see "Getting Started with a Cutting Bench" below). Other guide accessories include a drilling system designed for 32mm case work. The hole-drilling system (FS-LR 32) can make shelf-pin holes on precise layouts as well as the cup holes for European-style case hinges. Saws and Routers To Fit the Guides If half the system is comprised of rails and related accessories that guide cuts accurately, the other half is the innovative tools that go with them. Among them are the only circular saws I've ever seen with a plunge mechanism, including the ATF 55 E-Plus that I used. Depressing a thumb latch on the handle allows the blade to pivot into the work. Depth of cut is set by a sliding stop that can be set precisely with one hand. The plunge cut allows a cut to start and stop in the middle of a panel. Truth be told, I wasn't sure initially how helpful this plunge feature would really prove to be. Then I had to cut out a piece of particleboard for a one-piece countertop that wrapped around Festool's small router can be used with a special guide rail to bore shelf-pin holes accurately. A spring-loaded pin snaps into holes in the guide as the router moves along the rail. Button Depth of cut for Festool's circular saw consists of a push-button slider on the saw housing. It's easy to operate, but get used to metric markings. GETTING STARTED WITH A CUTTING BENCH Cutting large plywood pieces with the saw/ rail combination requires finding a place in the shop spacious enough to lay panels out flat. My shop is too small for a dedicated assembly bench that will accommodate a full sheet of plywood, so I made my first cuts on the floor, elevating the panel off the concrete with pieces of 1"-thick rigid foam insulation. The advantage was that off-cuts didn't have anywhere to fall, but the arrangement was clumsy to say the least. Rather than build a permanent table or bench for this work, I made a cutting table with folding steel legs and a foam-insulation top that can be set up quickly when I need it and tucked away when I don't. The 3' by 7' top is a simple grid made from kiln-dried 2x4s held together with yellow glue and two #20 biscuits at each joint. Cross pieces are set on centers of about 14". The whole thing can be built in an hour. The layer of foam isn't absolutely necessary, but it supports the panel completely without adding much weight to the table and it won't dull the blade as much as a layer of wood, particleboard or MDF would. I set the depth of cut so the blade cuts about Vs" into the foam. When the foam sheet wears out, it will be easy and inexpensive to replace. With 16" legs and a working height of about 18", the grid is high enough off the shop floor to keep me from bending too far over the work and it can be tipped easily to one side to load a full sheet of plywood. I thought a table at standard height - 29" or 30" - would be too high to use comfortably. I bought a set of legs from Woodworker's Supply (800-645-9292 or woodworker.com) for about $28, so the whole tab for building the grid was only about $38. - SG popwood.com 59 |


