Popular Woodworking 2005-04 № 147, страница 86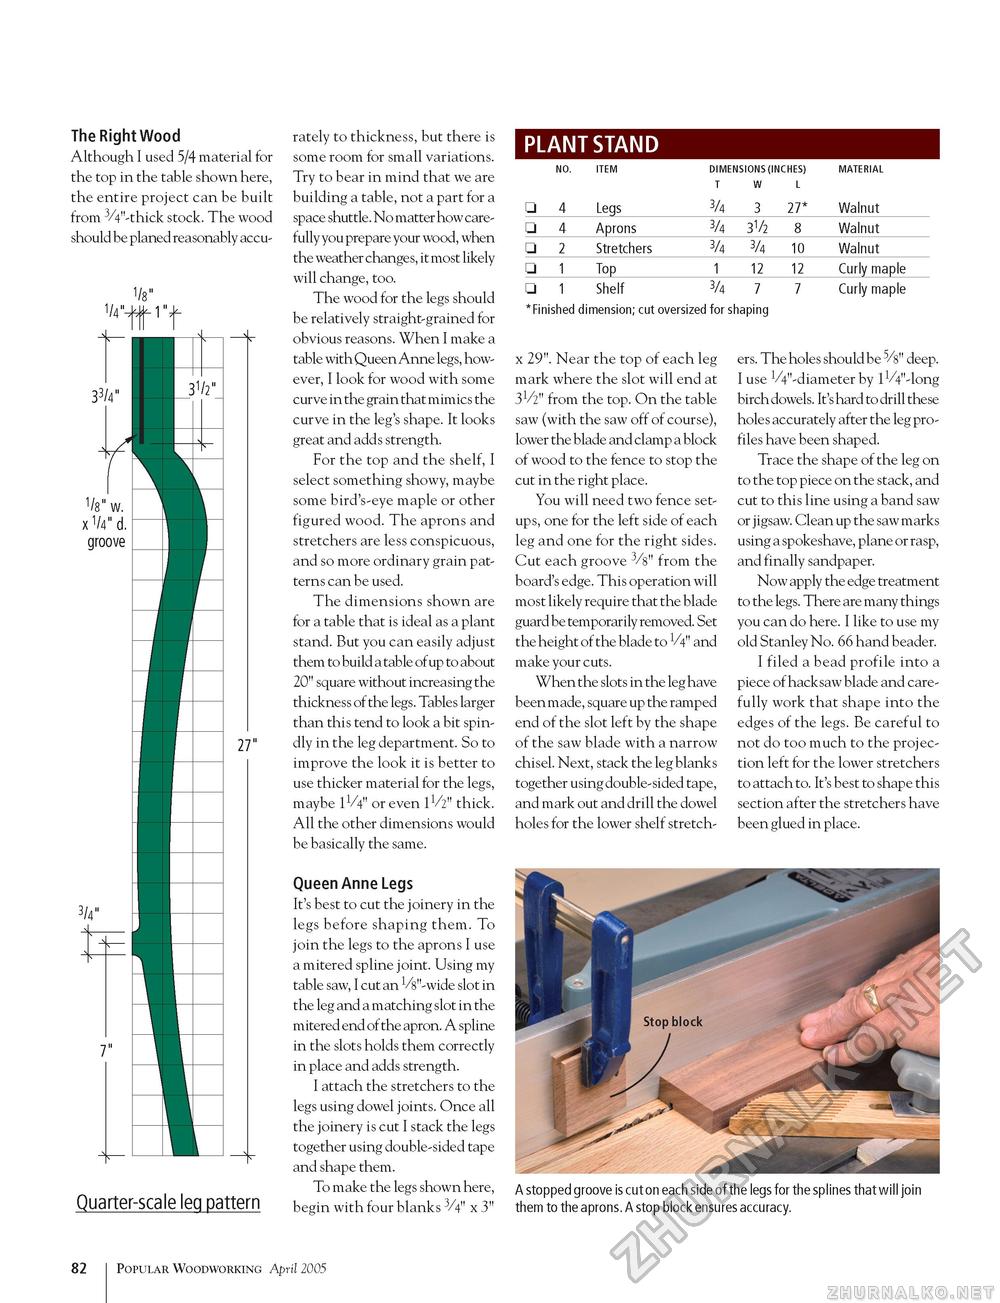
The Right Wood Although I used 5/4 material for the top in the table shown here, the entire project can be built from 3/4"-thick stock. The wood should be planed reasonably accu- 1/8" V W. xV4"d. groove 3/4" 7" 27" Quarter-scale leg pattern rately to thickness, but there is some room for small variations. Try to bear in mind that we are building a table, not a part for a space shuttle. No matter how carefully you prepare your wood, when the weather changes, it most likely will change, too. The wood for the legs should be relatively straight-grained for obvious reasons. When I make a table with Queen Anne legs, however, I look for wood with some curve in the grain that mimics the curve in the leg's shape. It looks great and adds strength. For the top and the shelf, I select something showy, maybe some bird's-eye maple or other figured wood. The aprons and stretchers are less conspicuous, and so more ordinary grain patterns can be used. The dimensions shown are for a table that is ideal as a plant stand. But you can easily adjust them to build a table of up to about 20" square without increasing the thickness of the legs. Tables larger than this tend to look a bit spindly in the leg department. So to improve the look it is better to use thicker material for the legs, maybe IV4" or even lV2" thick. All the other dimensions would be basically the same. Queen Anne Legs It's best to cut the joinery in the legs before shaping them. To join the legs to the aprons I use a mitered spline joint. Using my table saw, I cut an 1/8"-wide slot in the leg and a matching slot in the mitered end of the apron. A spline in the slots holds them correctly in place and adds strength. I attach the stretchers to the legs using dowel joints. Once all the joinery is cut I stack the legs together using double-sided tape and shape them. To make the legs shown here, begin with four blanks 3/4" x 3" PLANT STAND
'Finished dimension; cut oversized for shaping 'Finished dimension; cut oversized for shaping x 29". Near the top of each leg mark where the slot will end at 3V2" from the top. On the table saw (with the saw off of course), lower the blade and clamp a block of wood to the fence to stop the cut in the right place. You will need two fence setups, one for the left side of each leg and one for the right sides. Cut each groove 3/s" from the board's edge. This operation will most likely require that the blade guard be temporarily removed. Set the height of the blade to 1/V" and make your cuts. When the slots in the leg have been made, square up the ramped end of the slot left by the shape of the saw blade with a narrow chisel. Next, stack the leg blanks together using double-sided tape, and mark out and drill the dowel holes for the lower shelf stretch ers. The holes should be 5/s" deep. I use VV-diameter by lVV-long birch dowels. It's hard to drill these holes accurately after the leg profiles have been shaped. Trace the shape of the leg on to the top piece on the stack, and cut to this line using a band saw or jigsaw. Clean up the saw marks using a spokeshave, plane or rasp, and finally sandpaper. Now apply the edge treatment to the legs. There are many things you can do here. I like to use my old Stanley No. 66 hand beader. I filed a bead profile into a piece of hacksaw blade and carefully work that shape into the edges of the legs. Be careful to not do too much to the projection left for the lower stretchers to attach to. It's best to shape this section after the stretchers have been glued in place. A stopped groove is cut on each side of the legs for the splines that will join them to the aprons. A stop block ensures accuracy. 82 1 Popular Woodworking April 2005 |
||||||||||||||||||||||||||||||||||||||||||


