Popular Woodworking 2005-04 № 147, страница 88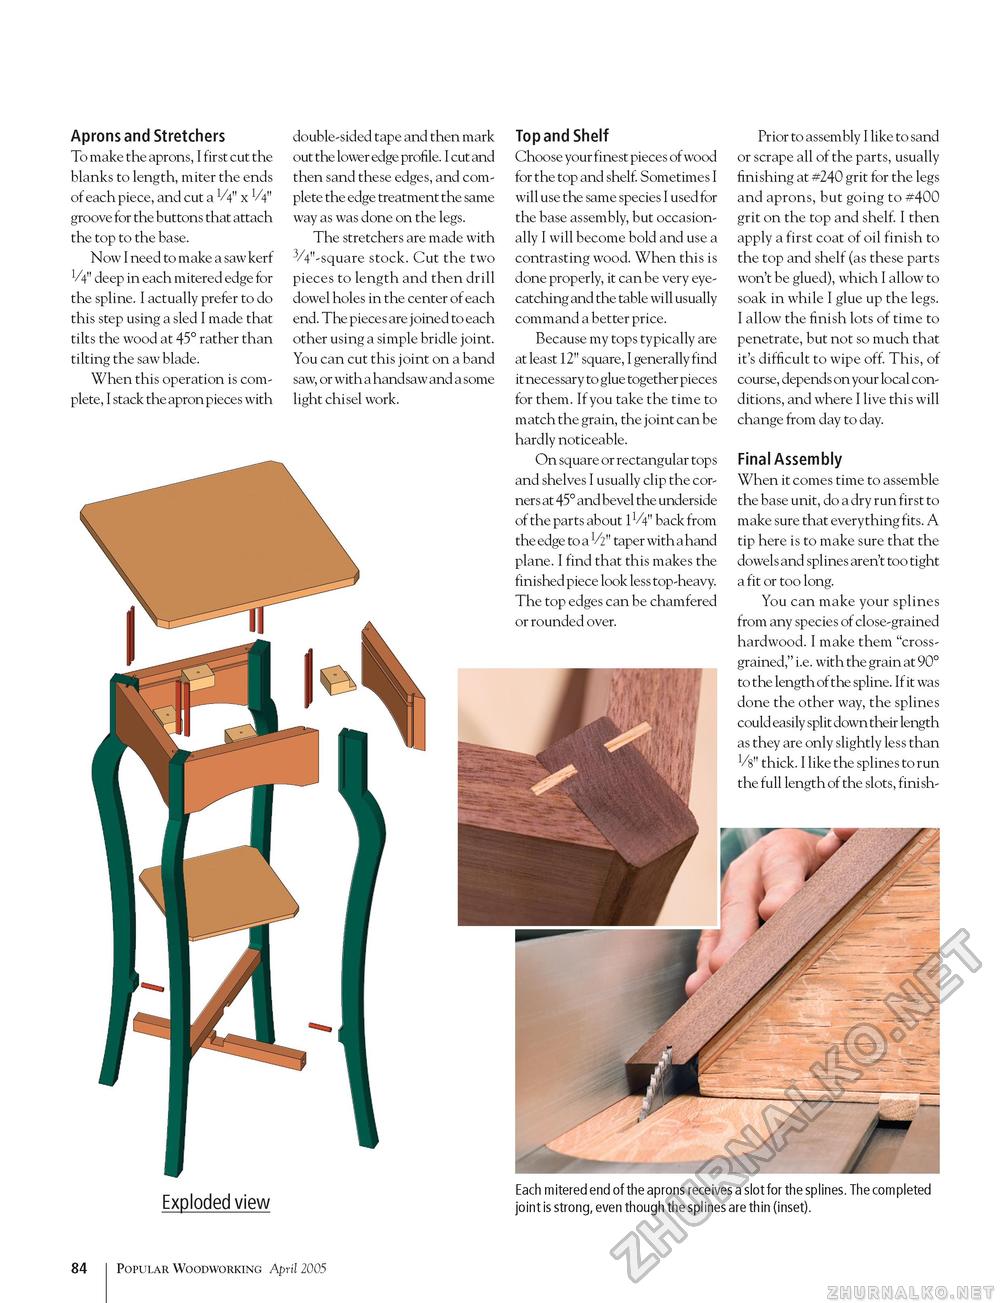
Aprons and Stretchers To make the aprons, I first cut the blanks to length, miter the ends of each piece, and cut a 1/4" x V4" groove for the buttons that attach the top to the base. Now I need to make a saw kerf V4" deep in each mitered edge for the spline. I actually prefer to do this step using a sled I made that tilts the wood at 45° rather than tilting the saw blade. When this operation is complete, I stack the apron pieces with double-sided tape and then mark out the lower edge profile. I cut and then sand these edges, and complete the edge treatment the same way as was done on the legs. The stretchers are made with 3/4"-square stock. Cut the two pieces to length and then drill dowel holes in the center of each end. The pieces are joined to each other using a simple bridle joint. You can cut this joint on a band saw, or with a handsaw and a some light chisel work. Top and Shelf Choose your finest pieces of wood for the top and shelf. Sometimes I will use the same species I used for the base assembly, but occasionally I will become bold and use a contrasting wood. When this is done properly, it can be very eyecatching and the table will usually command a better price. Because my tops typically are at least 12" square, I generally find it necessary to glue together pieces for them. If you take the time to match the grain, the joint can be hardly noticeable. On square or rectangular top s and shelves I usually clip the corners at 45° and bevel the underside of the parts about 1V4" back from the edge to a V2" taper with ahand plane. I find that this makes the finished piece look less top-heavy. The top edges can be chamfered or rounded over. Prior to assembly I like to sand or scrape all of the parts, usually finishing at #240 grit for the legs and aprons, but going to #400 grit on the top and shelf. I then apply a first coat of oil finish to the top and shelf (as these parts won't be glued), which I allow to soak in while I glue up the legs. I allow the finish lots of time to penetrate, but not so much that it's difficult to wipe off. This, of course, depends on your local conditions, and where I live this will change from day to day. Final Assembly When it comes time to assemble the base unit, do a dry run first to make sure that everything fits. A tip here is to make sure that the dowels and splines aren't too tight a fit or too long. You can make your splines from any species of close-grained hardwood. I make them "cross-grained," i.e. with the grain at 90° to the length of the spline. If it was done the other way, the splines could easily split down their length as they are only slightly less than 18" thick. I like the splines to run the full length of the slots, finish- Exploded view Each mitered end of the aprons receives a slot for the splines. The completed joint is strong, even though the splines are thin (inset). 84 1 Popular Woodworking April 2005 |


