Popular Woodworking 2005-04 № 147, страница 92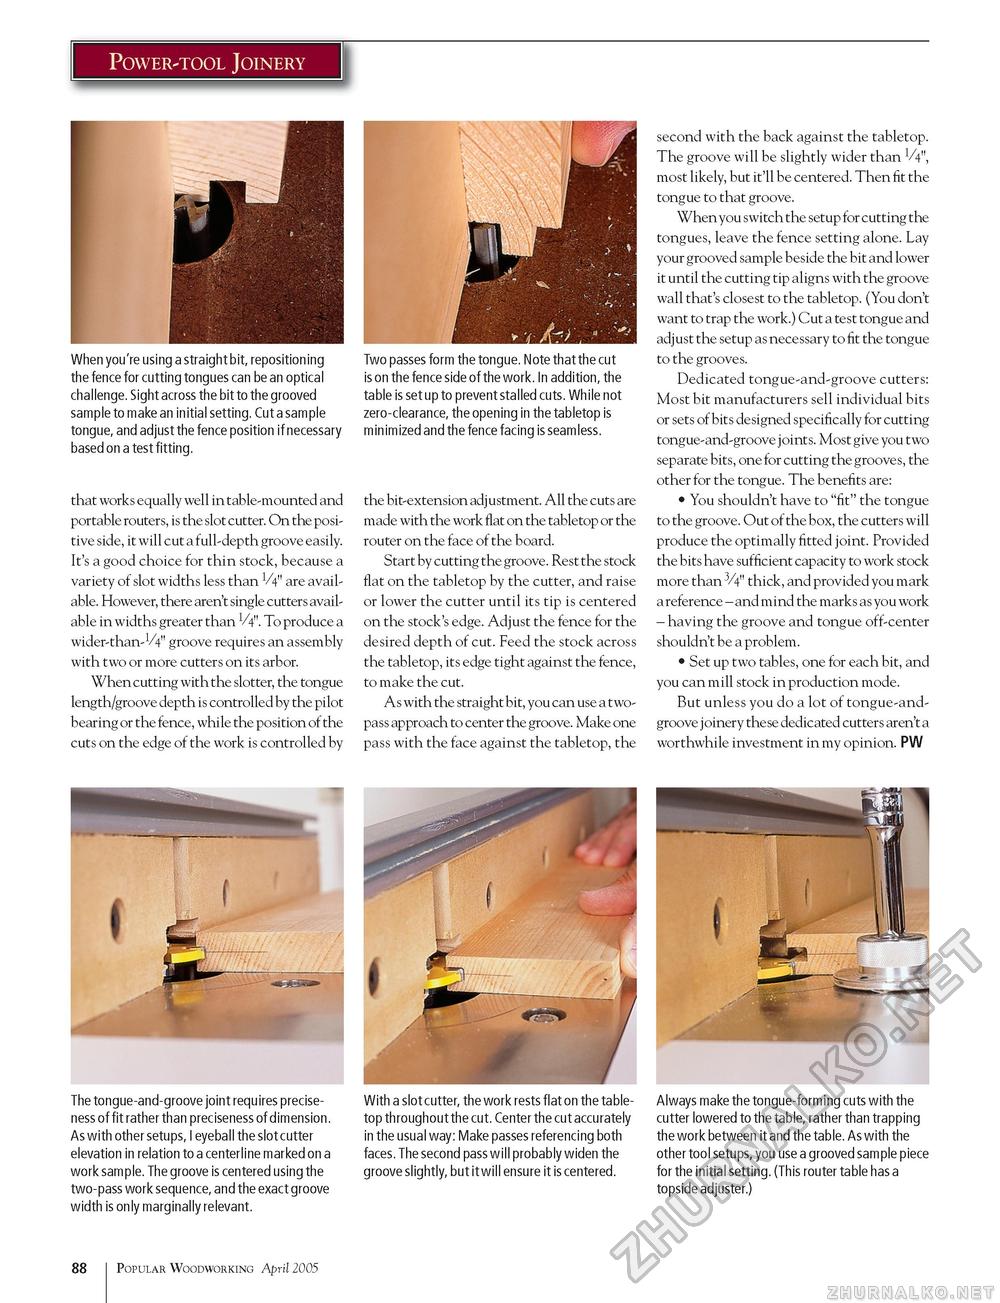
Power-tool Joinery When you're using a straight bit, repositioning the fence for cutting tongues can be an optical challenge. Sight across the bit to the grooved sample to make an initial setting. Cut a sample tongue, and adjust the fence position if necessary based on a test fitting. that works equally well in table-mounted and portable routers, is the slot cutter. On the positive side, it will cut a full-depth groove easily. It's a good choice for thin stock, because a variety of slot widths less than 4" are available. However, there aren't single cutters available in widths greater than 4". To produce a wider-than-VV groove requires an assembly with two or more cutters on its arbor. When cutting with the slotter, the tongue length/groove depth is controlled by the pilot bearing or the fence, while the position of the cuts on the edge of the work is controlled by Two passes form the tongue. Note that the cut is on the fence side of the work. In addition, the table is set up to prevent stalled cuts. While not zero-clearance, the opening in the tabletop is minimized and the fence facing is seamless. the bit-extension adjustment. All the cuts are made with the work flat on the tabletop or the router on the face of the board. Start by cutting the groove. Rest the stock flat on the tabletop by the cutter, and raise or lower the cutter until its tip is centered on the stock's edge. Adjust the fence for the desired depth of cut. Feed the stock across the tabletop, its edge tight against the fence, to make the cut. As with the straight bit, you can use a two-pass approach to center the groove. Make one pass with the face against the tabletop, the second with the back against the tabletop. The groove will be slightly wider than V4", most likely, but it'll be centered. Then fit the tongue to that groove. When you switch the setup for cutting the tongues, leave the fence setting alone. Lay your grooved sample beside the bit and lower it until the cutting tip aligns with the groove wall that's closest to the tabletop. (You don't want to trap the work.) Cut a test tongue and adjust the setup as necessary to fit the tongue to the grooves. Dedicated tongue-and-groove cutters: Most bit manufacturers sell individual bits or sets of bits designed specifically for cutting tongue-and-groove joints. Most give you two separate bits, one for cutting the grooves, the other for the tongue. The benefits are: • You shouldn't have to "fit" the tongue to the groove. Out of the box, the cutters will produce the optimally fitted joint. Provided the bits have sufficient capacity to work stock more than 3/4" thick, and provided you mark a reference - and mind the marks as you work - having the groove and tongue off-center shouldn't be a problem. • Set up two tables, one for each bit, and you can mill stock in production mode. But unless you do a lot of tongue-and-groove j oinery the se dedicated cutters aren't a worthwhile investment in my opinion. PW The tongue-and-groove joint requires precise-ness of fit rather than preciseness of dimension. As with other setups, I eyeball the slot cutter elevation in relation to a centerline marked on a work sample. The groove is centered using the two-pass work sequence, and the exact groove width is only marginally relevant. With a slot cutter, the work rests flat on the table-top throughout the cut. Center the cut accurately in the usual way: Make passes referencing both faces. The second pass will probably widen the groove slightly, but it will ensure it is centered. Always make the tongue-forming cuts with the cutter lowered to the table, rather than trapping the work between it and the table. As with the other tool setups, you use a grooved sample piece for the initial setting. (This router table has a topside adjuster.) 88 Popular Woodworking April 2005 |


