Popular Woodworking 2005-04 № 147, страница 98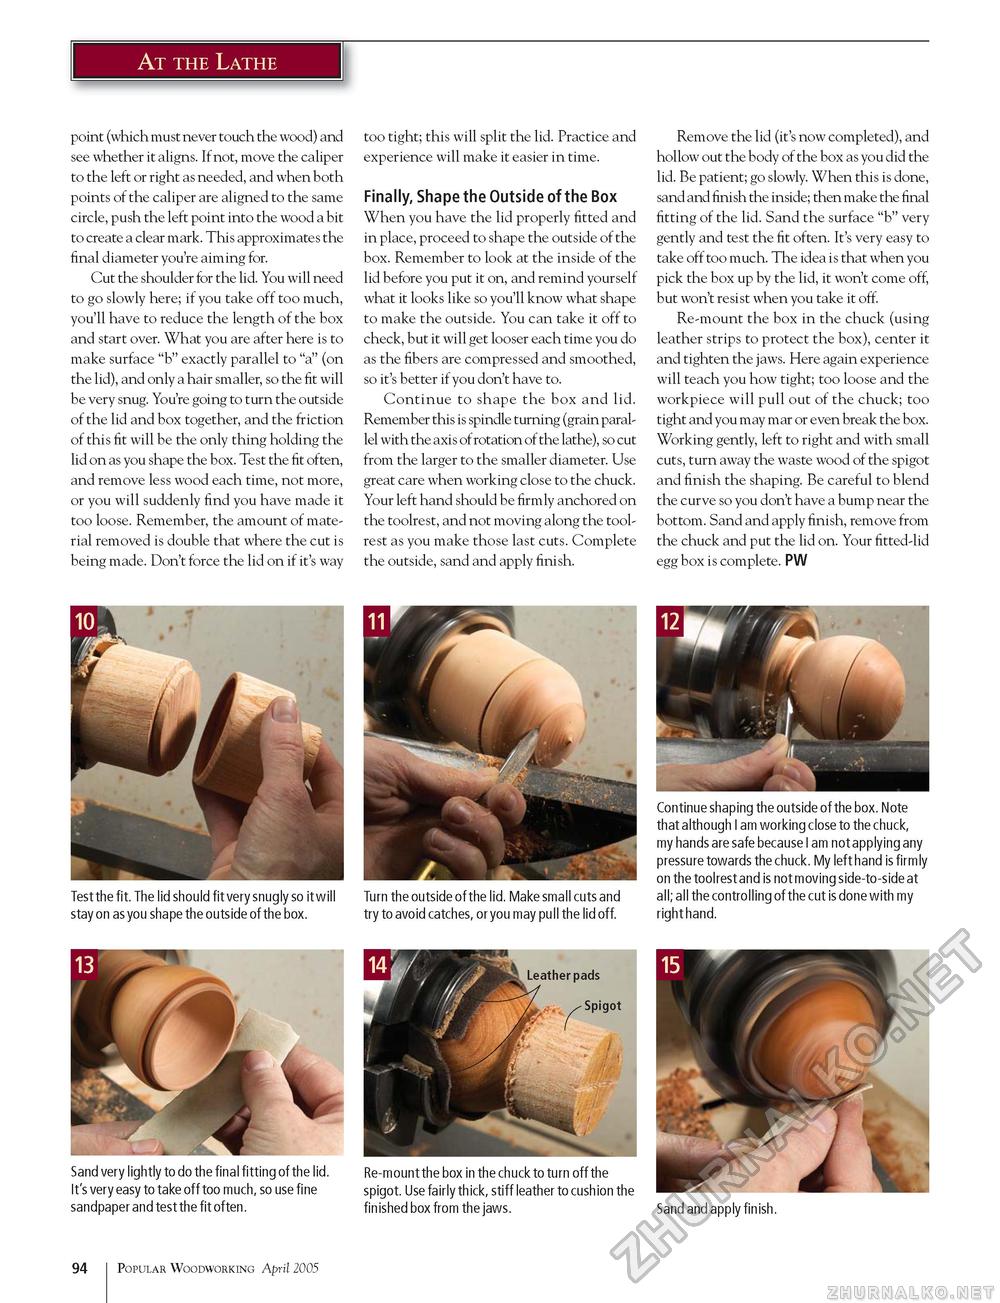
At the Lathe point (which must never touch the wood) and see whether it aligns. If not, move the caliper to the left or right as needed, and when both points of the caliper are aligned to the same circle, push the left point into the wood a bit to create a clear mark. This approximates the final diameter you're aiming for. Cut the shoulder for the lid. You will need to go slowly here; if you take off too much, you'll have to reduce the length of the box and start over. What you are after here is to make surface "b" exactly parallel to "a" (on the lid), and only a hair smaller, so the fit will be very snug. You're going to turn the outside of the lid and box together, and the friction of this fit will be the only thing holding the lid on as you shape the box. Test the fit often, and remove less wood each time, not more, or you will suddenly find you have made it too loose. Remember, the amount of material removed is double that where the cut is being made. Don't force the lid on if it's way Test the fit. The lid should fit very snugly so it will stay on as you shape the outside of the box. Sand very lightly to do the final fitting of the lid. It's very easy to take off too much, so use fine sandpaper and test the fit often. too tight; this will split the lid. Practice and experience will make it easier in time. Finally, Shape the Outside of the Box When you have the lid properly fitted and in place, proceed to shape the outside of the box. Remember to look at the inside of the lid before you put it on, and remind yourself what it looks like so you'll know what shape to make the outside. You can take it off to check, but it will get looser each time you do as the fibers are compressed and smoothed, so it's better if you don't have to. Continue to shape the box and lid. Remember this is spindle turning (grain parallel with the axis of rotation of the lathe), so cut from the larger to the smaller diameter. Use great care when working close to the chuck. Your left hand should be firmly anchored on the toolrest, and not moving along the tool-rest as you make those last cuts. Complete the outside, sand and apply finish. Turn the outside of the lid. Make small cuts and try to avoid catches, or you may pull the lid off. Re-mount the box in the chuck to turn off the spigot. Use fairly thick, stiff leather to cushion the finished box from the jaws. Remove the lid (it's now completed), and hollow out the body of the box as you did the lid. Be patient; go slowly. When this is done, sand and finish the inside; then make the final fitting of the lid. Sand the surface "b" very gently and test the fit often. It's very easy to take off too much. The idea is that when you pick the box up by the lid, it won't come off, but won't resist when you take it off. Re-mount the box in the chuck (using leather strips to protect the box), center it and tighten the jaws. Here again experience will teach you how tight; too loose and the workpiece will pull out of the chuck; too tight and you may mar or even break the box. Working gently, left to right and with small cuts, turn away the waste wood of the spigot and finish the shaping. Be careful to blend the curve so you don't have a bump near the bottom. Sand and apply finish, remove from the chuck and put the lid on. Your fitted-lid egg box is complete. PW Continue shaping the outside of the box. Note that although I am working close to the chuck, my hands are safe because I am not applying any pressure towards the chuck. My left hand is firmly on the toolrest and is not moving side-to-side at all; all the controlling of the cut is done with my right hand. Sand and apply finish. 94 Popular Woodworking April 2005 |


