Popular Woodworking 2005-06 № 148, страница 85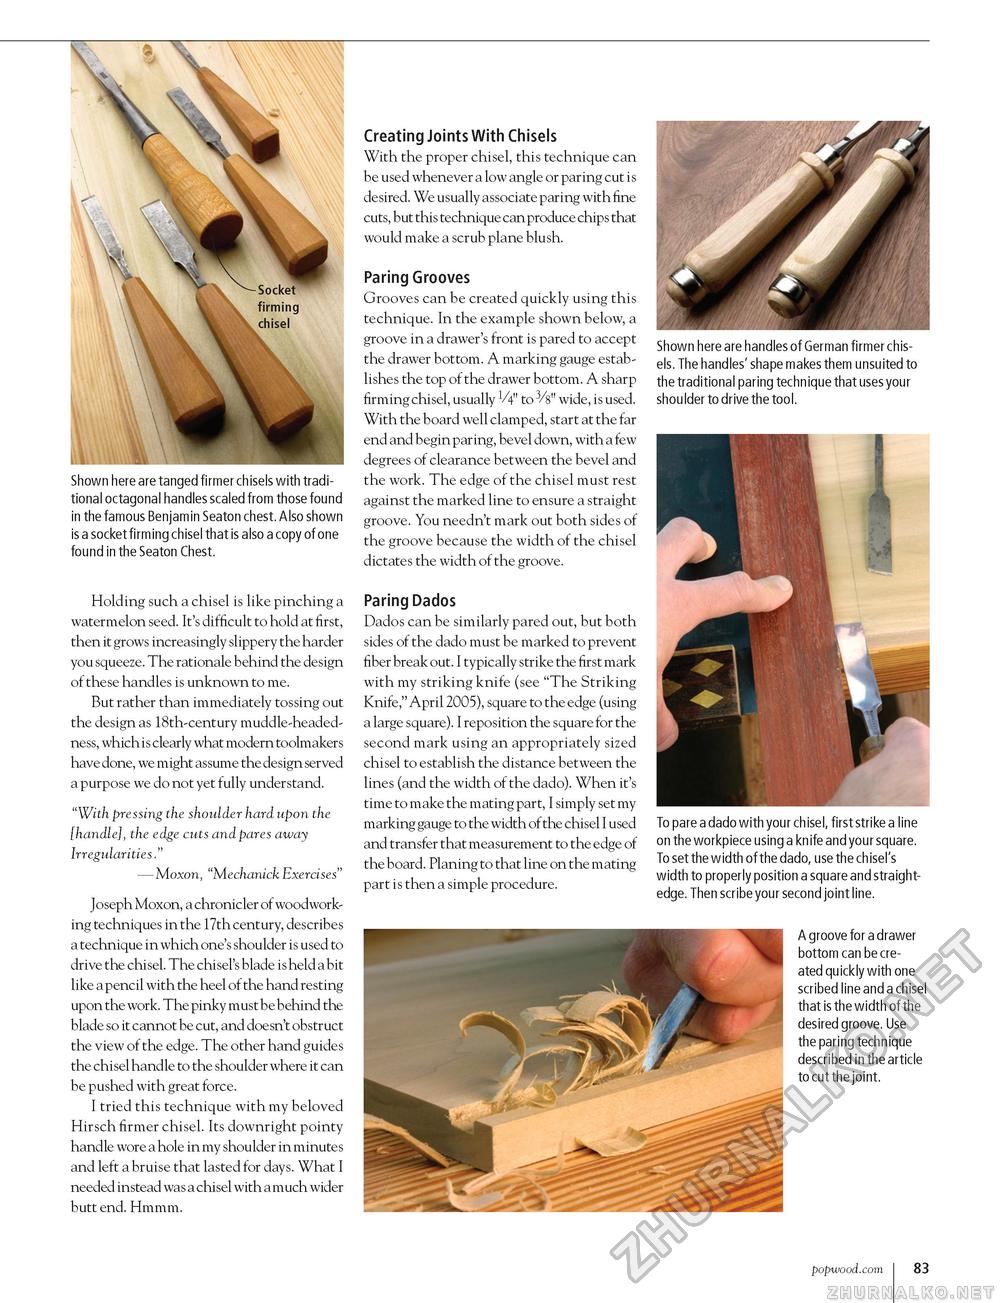
Shown here are tanged firmer chisels with traditional octagonal handles scaled from those found in the famous Benjamin Seaton chest. Also shown is a socket firming chisel that is also a copy of one found in the Seaton Chest. Holding such a chisel is like pinching a watermelon seed. It's difficult to hold at first, then it grows increasingly slippery the harder you squeeze. The rationale behind the design of these handles is unknown to me. But rather than immediately tossing out the design as 18th-century muddle-headed-ness, which is clearly what modern toolmakers have done, we might assume the design served a purpose we do not yet fully understand. "With pressing the shoulder hard upon the [handle], the edge cuts and pares away Irregularities." — Moxon, "Mechanick Exercises" Joseph Moxon, a chronicler of woodworking techniques in the 17th century, describes a technique in which one's shoulder is used to drive the chisel. The chisel's blade is held a bit like a pencil with the heel of the hand resting upon the work. The pinky must be behind the blade so it cannot be cut, and doesn't obstruct the view of the edge. The other hand guides the chisel handle to the shoulder where it can be pushed with great force. I tried this technique with my beloved Hirsch firmer chisel. Its downright pointy handle wore a hole in my shoulder in minutes and left a bruise that lasted for days. What I needed instead was a chisel with a much wider butt end. Hmmm. Creating Joints With Chisels With the proper chisel, this technique can be used whenever a low angle or paring cut is desired. We usually associate paring with fine cuts, but this technique can produce chips that would make a scrub plane blush. Paring Grooves Grooves can be created quickly using this technique. In the example shown below, a groove in a drawer's front is pared to accept the drawer bottom. A marking gauge establishes the top of the drawer bottom. A sharp firming chisel, usually V4" to 3/s" wide, is used. With the board well clamped, start at the far end and begin paring, bevel down, with a few degrees of clearance between the bevel and the work. The edge of the chisel must rest against the marked line to ensure a straight groove. You needn't mark out both sides of the groove because the width of the chisel dictates the width of the groove. Paring Dados Dados can be similarly pared out, but both sides of the dado must be marked to prevent fiber break out. I typically strike the first mark with my striking knife (see "The Striking Knife," April 2005), square to the edge (using a large square). I reposition the square for the second mark using an appropriately sized chisel to establish the distance between the lines (and the width of the dado). When it's time to make the mating part, I simply set my marking gauge to the width of the chisel I used and transfer that measurement to the edge of the board. Planing to that line on the mating part is then a simple procedure. Shown here are handles of German firmer chisels. The handles' shape makes them unsuited to the traditional paring technique that uses your shoulder to drive the tool. C'Nl To pare a dado with your chisel, first strike a line on the workpiece using a knife and your square. To set the width of the dado, use the chisel's width to properly position a square and straightedge. Then scribe your second joint line. A groove for a drawer bottom can be created quickly with one scribed line and a chisel that is the width of the desired groove. Use the paring technique described in the article to cut the joint. popwood.com 83 |


