Popular Woodworking 2005-06 № 148, страница 86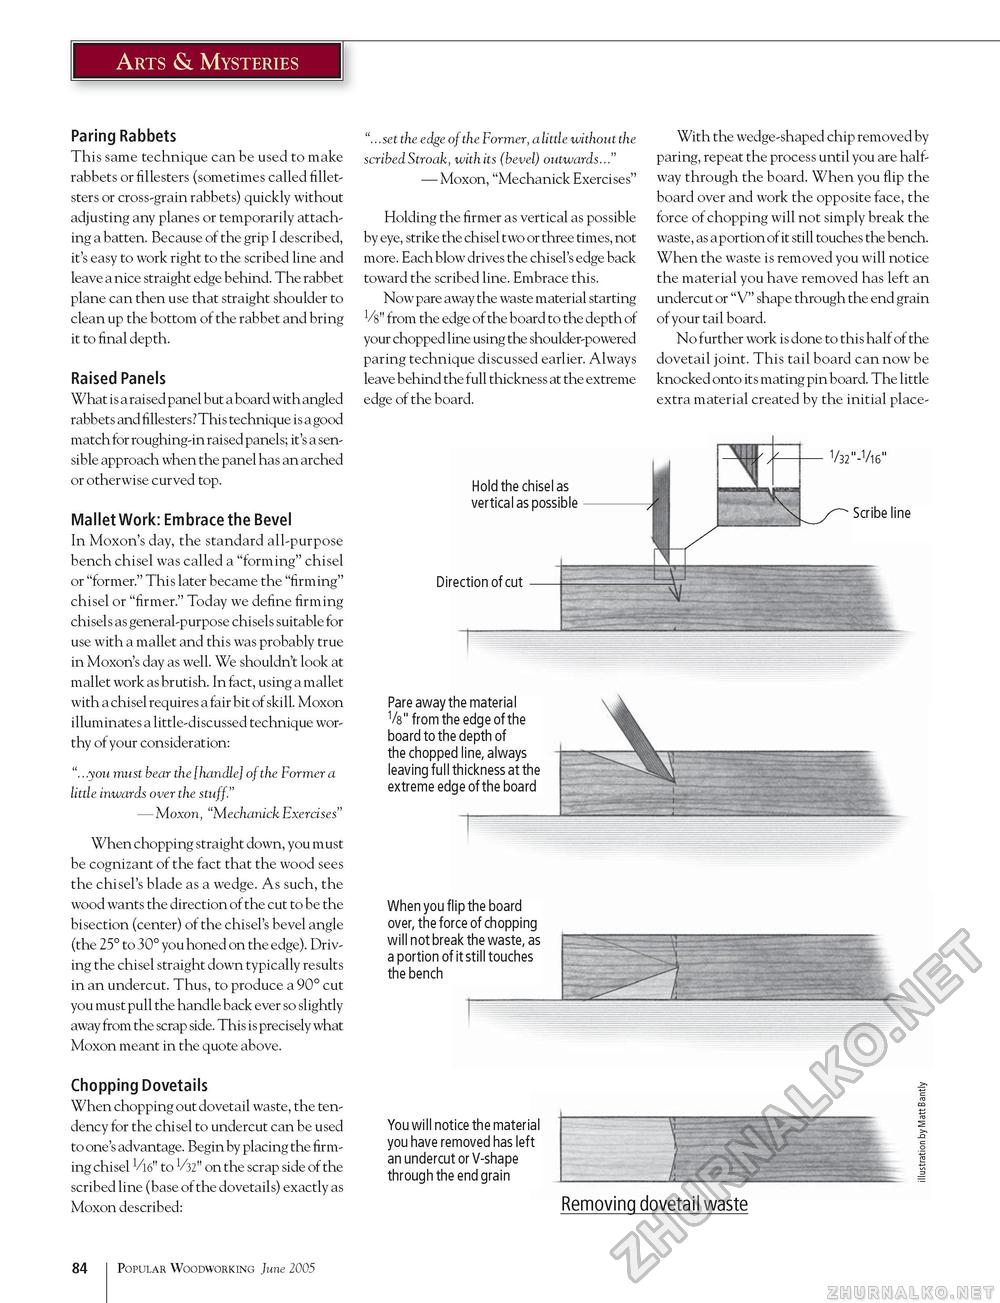
Arts & Mysteries Paring Rabbets This same technique can be used to make rabbets or fillesters (sometimes called fillet-sters or cross-grain rabbets) quickly without adjusting any planes or temporarily attaching a batten. Because of the grip I described, it's easy to work right to the scribed line and leave a nice straight edge behind. The rabbet plane can then use that straight shoulder to clean up the bottom of the rabbet and bring it to final depth. Raised Panels What is a raised panel but a board with angled rabbets and fillesters? This technique is a good match for roughing-in raised panels; it's a sensible approach when the panel has an arched or otherwise curved top. Mallet Work: Embrace the Bevel In Moxon's day, the standard all-purpose bench chisel was called a "forming" chisel or "former." This later became the "firming" chisel or "firmer." Today we define firming chisels as general-purpose chisels suitable for use with a mallet and this was probably true in Moxon's day as well. We shouldn't look at mallet work as brutish. In fact, using a mallet with a chisel requires a fair bit of skill. Moxon illuminates a little-discussed technique worthy of your consideration: ".. .you must bear the [handle] of the Former a little inwards over the stuff." — Moxon, "Mechanick Exercises" When chopping straight down, you must be cognizant of the fact that the wood sees the chisel's blade as a wedge. As such, the wood wants the direction of the cut to be the bisection (center) of the chisel's bevel angle (the 25° to 30° you honed on the edge). Driving the chisel straight down typically results in an undercut. Thus, to produce a 90° cut you must pull the handle back ever so slightly away from the scrap side. This is precisely what Moxon meant in the quote above. "...set the edge of the Former, a little without the scribed Stroak, with its (bevel) outwards..." — Moxon, "Mechanick Exercises" Holding the firmer as vertical as possible by eye, strike the chisel two or three times, not more. Each blow drives the chisel's edge back toward the scribed line. Embrace this. Now pare away the waste material starting V8" from the edge of the board to the depth of your chopped line using the shoulder-powered paring technique discussed earlier. Always leave behind the full thickness at the extreme edge of the board. Hold the chisel as vertical as possible With the wedge-shaped chip removed by paring, repeat the process until you are halfway through the board. When you flip the board over and work the opposite face, the force of chopping will not simply break the waste, as a portion of it still touches the bench. When the waste is removed you will notice the material you have removed has left an undercut or "V" shape through the end grain of your tail board. No further work is done to this half of the dovetail joint. This tail board can now be knocked onto its mating pin board. The little extra material created by the initial place- V32"-V16" Scribe line Direction of cut Pare away the material V8" from the edge of the board to the depth of the chopped line, always leaving full thickness at the extreme edge of the board When you flip the board over, the force of chopping will not break the waste, as a portion of it still touches the bench Chopping Dovetails When chopping out dovetail waste, the tendency for the chisel to undercut can be used to one's advantage. Begin by placing the firming chisel ^/W' to V32" on the scrap side of the scribed line (base of the dovetails) exactly as Moxon described: You will notice the material you have removed has left an undercut or V-shape through the end grain Removing dovetail waste 84 Popular Woodworking June 2005 |


