Popular Woodworking 2005-08 № 149, страница 42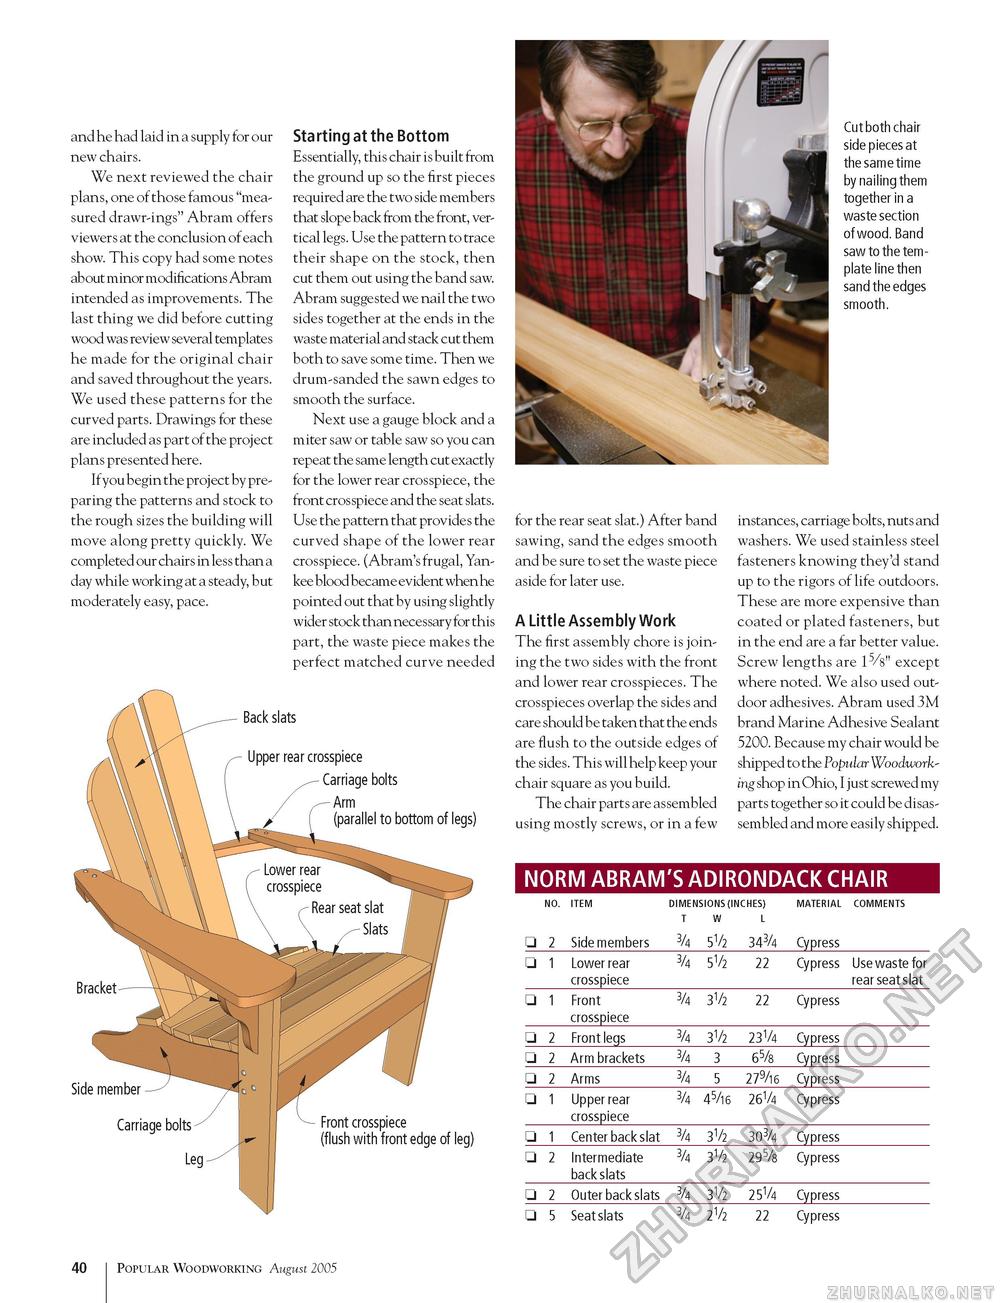
and he had laid in a supply for our new chairs. We next reviewed the chair plans, one of those famous "measured drawr-ings" Abram offers viewers at the conclusion of each show. This copy had some notes about minor modifications Abram intended as improvements. The last thing we did before cutting wood was review several templates he made for the original chair and saved throughout the years. We used these patterns for the curved parts. Drawings for these are included as part of the project plans presented here. If you begin the proj ect by preparing the patterns and stock to the rough sizes the building will move along pretty quickly. We completed our chairs in less than a day while working at a steady, but moderately easy, pace. Starting at the Bottom Essentially, this chair is built from the ground up so the first pieces required are the two side members that slope back from the front, vertical legs. Use the pattern to trace their shape on the stock, then cut them out using the band saw. Abram suggested we nail the two sides together at the ends in the waste material and stack cut them both to save some time. Then we drum-sanded the sawn edges to smooth the surface. Next use a gauge block and a miter saw or table saw so you can repeat the same length cut exactly for the lower rear crosspiece, the front crosspiece and the seat slats. Use the pattern that provides the curved shape of the lower rear crosspiece. (Abram's frugal, Yankee blood became evident when he pointed out that by using slightly wider stock than necessary for this part, the waste piece makes the perfect matched curve needed Back slats Upper rear crosspiece - Carriage bolts -Arm (parallel to bottom of legs) Side member Carriage bolts Leg Front crosspiece (flush with front edge of leg) Cut both chair side pieces at the same time by nailing them together in a waste section of wood. Band saw to the template line then sand the edges smooth. for the rear seat slat.) After band sawing, sand the edges smooth and be sure to set the waste piece aside for later use. A Little Assembly Work The first assembly chore is joining the two sides with the front and lower rear crosspieces. The crosspieces overlap the sides and care should be taken that the ends are flush to the outside edges of the sides. This will help keep your chair square as you build. The chair parts are assembled using mostly screws, or in a few instances, carriage bolts, nuts and washers. We used stainless steel fasteners knowing they'd stand up to the rigors of life outdoors. These are more expensive than coated or plated fasteners, but in the end are a far better value. Screw lengths are except where noted. We also used outdoor adhesives. Abram used 3M brand Marine Adhesive Sealant 5200. Because my chair would be shipped to the Popular Woodworking shop in Ohio, I just screwed my parts together so it could be disassembled and more easily shipped. NORM ABRAM'S ADIRONDACK CHAIR
40 Popular Woodworking August 2005 |
||||||||||||||||||||||||||||||||||||||||||||||||||||||||||||||||||||||||||||||||||||||||||||||||


