Popular Woodworking 2005-10 № 150, страница 104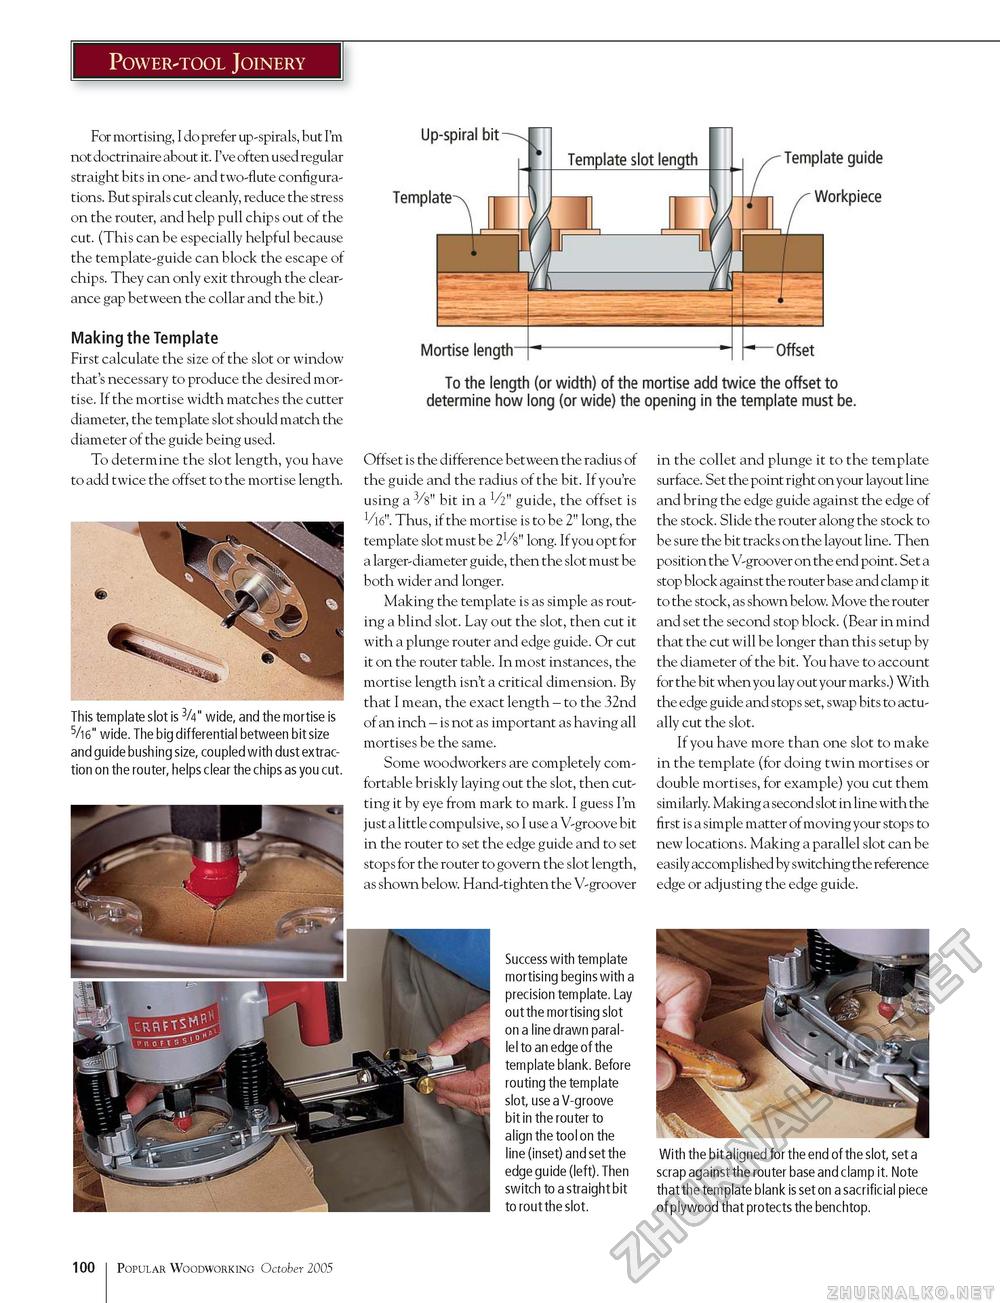
Power-tool Joinery For mortising, I do prefer up-spirals, but I'm not doctrinaire about it. I've often used regular straight bits in one- and two-flute configurations. But spirals cut cleanly, reduce the stress on the router, and help pull chips out of the cut. (This can be especially helpful because the template-guide can block the escape of chips. They can only exit through the clearance gap between the collar and the bit.) Making the Template First calculate the size of the slot or window that's necessary to produce the desired mortise. If the mortise width matches the cutter diameter, the template slot should match the diameter of the guide being used. To determine the slot length, you have to add twice the offset to the mortise length. This template slot is 3/4" wide, and the mortise is 5/i6" wide. The big differential between bit size and guide bushing size, coupled with dust extraction on the router, helps clear the chips as you cut. Offset is the difference between the radius of the guide and the radius of the bit. If you're using a 3/s" bit in a V2" guide, the offset is 116". Thus, if the mortise is to be 2" long, the template slot must be 21/s" long. Ifyou opt for a larger-diameter guide, then the slot must be both wider and longer. Making the template is as simple as routing a blind slot. Lay out the slot, then cut it with a plunge router and edge guide. Or cut it on the router table. In most instances, the mortise length isn't a critical dimension. By that I mean, the exact length - to the 32nd of an inch - is not as important as having all mortises be the same. Some woodworkers are completely comfortable briskly laying out the slot, then cutting it by eye from mark to mark. I guess I'm just a little compulsive, so I use a V-groove bit in the router to set the edge guide and to set stops for the router to govern the slot length, as shown below. Hand-tighten the V-groover Success with template mortising begins with a precision template. Lay out the mortising slot on a line drawn parallel to an edge of the template blank. Before routing the template slot, use a V-groove bit in the router to align the tool on the line (inset) and set the edge guide (left). Then switch to a straight bit to rout the slot. in the collet and plunge it to the template surface. Set the point right on your layout line and bring the edge guide against the edge of the stock. Slide the router along the stock to be sure the bit tracks on the layout line. Then position the V-groover on the end point. Set a stop block against the router base and clamp it to the stock, as shown below. Move the router and set the second stop block. (Bear in mind that the cut will be longer than this setup by the diameter of the bit. You have to account for the bit when you lay out your marks.) With the edge guide and stops set, swap bits to actually cut the slot. If you have more than one slot to make in the template (for doing twin mortises or double mortises, for example) you cut them similarly. Making a second slot in line with the first is a simple matter of moving your stops to new locations. Making a parallel slot can be easily accomplished by switching the reference edge or adjusting the edge guide. With the bit aligned for the end of the slot, set a scrap against the router base and clamp it. Note that the template blank is set on a sacrificial piece of plywood that protects the benchtop. 100 Popular Woodworking October 2005 |


